"Art is my vehicle through life; may we share the ride together." Ron Wickersham

Saturday, March 30, 2013

More Spring Class Projects

Here are two more spring classes that I'm teaching at The Little Blue House.

First is a double-page layout for Easter - perfect for photos of either the egg hunt or decorating eggs! This project uses some of the new Art Anthology paints and sprays that just arrived in house. I also used darling cupcake paper liners.


This chocolate bunny looks good enough to eat!


I also created a fun spring minibook from small burlap bags! This is the cover, also using many of the new Art Anthology products.


There are four inside pages, each of which has a tag tucked inside for more photos. In the photo below the left page has two large pockets with tags for photos and journaling. The right page (some of which is shown) has an accordion fold-out for many more photos.


These are available as classes at The Little Blue House, but if you are not local, we have good news! Our website is up and operational now (www.thelittlebluehouseonline.com) and these can be ordered online and sent to you! These kits are all precut and come with complete instructions (aka "Blueprints"). 

Friday, March 29, 2013

Mixed Media Canvas Classes

I am currently teaching two mixed media canvas classes at The Little Blue House in Keller, TX.

The first is "Love Lives Here" which I created awhile ago but forgot to post here. This is a 12" x 12" canvas.


Here are some closeups showing the details.


The "Bloom" canvas below is my newest one and is a bit larger format, 12" x 16".


If you are local and would like to sign up for either of these classes, please contact The Little Blue House at 817-431-7930. I'll be back tomorrow with more spring class projects.

Wednesday, March 27, 2013

Flip/Swing Card and a Tutorial

I belong to an online group that hosts swaps throughout the year. For March, we had a flip/swing card mingle where we had to make one card and send to a designated person; a different person sends their card to you.  This is the card I made for Ellen, which I hope she will enjoy.


If you search online you can find numerous tutorials for this type of card. There are even dies that will cut the swinging part of the card but I wanted to create the opening myself. I found a You Tube tutorial by Darlene DeVries here which uses an extra fold and that's what I used as my inspiration.

I started with a 4 1/4" x 11" piece of green cardstock and stamped a background stamp all over one side. The strip is then scored at the halfway point (5 1/2") to be used later when you fold up the card. Then it is scored at 2 3/4" and 3 3/4" to make the folds for the cut opening.  You can use any dies - I used the Spellbinders Petite Scalloped Ovals set which includes 6 different sizes so you can layer.

To cut without cutting totally through the card, open the strip and center the die over the 2 3/4" score mark. Add removable tape so the die doesn't shift. Place die and card into diecutting machine with the edge of the top plate at 3 3/4" score mark and run through machine. This cuts only one section. Turn card around and place the edge of the top plate at the 2 3/4" score mark. Again, run through machine and this will cut the other section of the shape, leaving the 1" section between the score marks uncut. This allows the cut shape to swing.


For the bird stamp, I colored directly on the stamp with three colors of Ranger Distress Markers, misted with water and then stamped. "Soar" was stamped with black Archival ink. This piece was glued to the back of the scalloped oval that will actually be the front when you fold the card. With the same ink, I stamped the sentiment on a smaller ivory cardstock diecut and glued it on the other side of the scalloped oval. (These stamps are all from a CTMH clear stamp set.)  I also added tiny pearls to the front and back of the ovals and a blank diecut to the inside of the card for writing a greeting and.


 This type of card is easy to make and is a fun card to send. Try one yourself!

Tuesday, March 26, 2013

Happy First Birthday Carl!

Yesterday was my grandson's first birthday! How is that possible - seems like yesterday we were awaiting his arrival. He celebrated with a party on Saturday - 26 adults and 18 children, 7 of which were under a year. It's been a long time since I've been in that kind of crowd. Needless to say, it was tiring and chaotic, but a great party and he enjoyed himself tremendously.


His mom, Kelly, outdid herself decorating, cooking and baking. The theme was "Monster Bash" and she made a large monster cake for everyone and a little monster "smash" cake for Carl. She was hoping for the messy-cake-eating photo op and Carl didn't disappoint her. 


He had never had sugar or cake before so he was tentative at first, but after the first taste of frosting, he went to town.


This wasn't even the final result. By the time he was finished, his entire face was blue and he was deposited directly into the bathtub!


We were happy to be able to be there for his special day and, in addition, his Aunt Dana and cousin Drew came in from Albuquerque to help celebrate. It was fun to see them interact together.


It's hard to believe that in July we will be celebrating Drew's first birthday too!


Thursday, March 21, 2013

Google Reader News

Here's a bit of important news regarding Google Reader. They are shutting it down as of July 1, 2013! You can read the announcement on the Google Reader blog here.  What that means to those 122 special people who follow my blog via Google Reader, you will no longer receive my news feed and may lose my blog information. I don't want to lose you!!

I have been hearing lots of good reviews about Bloglovin (and there are many more readers out there if you want to research them). I just signed up for Bloglovin and am impressed at how easy it was. I just created an account (FREE) by filling in a few blanks and I was done.  I now have a link on the right side of my blog so that you can just click there to start following my blog with Bloglovin.

The best part of Bloglovin was they imported all the blogs I follow personally by my clicking one button! So very easy. And I like the default format the blog reads appear in - a long list with a photo and a portion of the beginning of the post. You can manage the format as well as how often you want it to be sent to you.

So, be forewarned, as of July 1st you will no longer receive any blog postings of any blogs you follow in Google Reader! Either research the many readers out there or go with Bloglovin. Whatever your choice, I hope you will continue to read and follow my blog!

Sunday, March 17, 2013

Art Journal Page - Start to Finish

I had some free time yesterday to just play in my art journal and was inspired by this page I saw on Pinterest by Julie Kirk. In this post she documents creating her page from start to finish and I thought I would try creating a similar page which is not the usual style I do in my journals.


I also thought it was a good idea to do photos of the process, so here you are - my journal page from start to finish.

This photo is of the first two steps as I got carried away with glueing down and forgot to take a photo of the first step. First I glued down the book text page, a torn piece of security envelope (upper right) and a scrap patterned paper (red floral).  (The green area you see above the face is spray ink on the page from cleaning off a stencil previously. This will get covered in the end.) The next step was glueing down a few images cut from magazines.  I used Decou-Page from DecoArt for all glueing - it's similar to Mod Podge but smoother, less sticky and I like the finish better. I also used an old credit card to spread the glue - less messy than a paintbrush and no cleanup at the end!


Then add words and phrases cut from magazines and books, overlapping some of the images.


Add more bits and pieces (images or papers or both), again overlapping some previous elements.  Overlapping and "connecting" elements gives cohesiveness to the design and unifies the collage rather than just having isolated elements glued to a page.


Here I added a bit of white paint over some of the book text  and also around some edges of images to make them blend into the background more.


Here I also forgot to take a few step photos. After painting above, I removed the sprayer from a red spray ink and flicked droplets over the page. When this was dry I added a few more elements (the floral border on left edge and black text in upper right - both REALLY old stickers!), doodled around the glued-on words and journaled between elements.


I like how this turned out and I enjoyed using different techniques from what I usually do.

Friday, March 15, 2013

Front Porch Kit Friday (and a tutorial)

 Welcome to Front Porch Kit Friday! The Design Team for the "Say Cheese" Front Porch Kit will be sharing on their blogs today either a project or fun tutorial and some of our favorite items found in this kit.

This project I created is a covered chipboard frame which I found in my stash from years (yes, years!) ago. When I spied it I thought it would be a good surface to showcase some of the lovely fabrics in the kit.

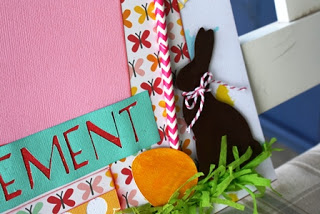
I covered the frame with the red and cream chevron fabric, pinking the edges to add a cute little edge element. Inspired by all the "chalk art" that is currently popular, I cut a piece of the chalkboard paper to fit inside the frame opening and wrote on it with a chalk marker (not included in kit).  The ribbon is just glued in the corner to balance the flowers on the opposite corner.

The flowers were all created from the fabrics.  For the yellow polkadot flower I cut a long strip, folded it over lining up the cut edges, and hand-stitched along the cut edges.  This was then pulled tight to ruffle until it formed a rosette.

The black and white polkadot fabric was also cut into a strip and tied in a knot at one end. This knot was glued to a scrap paper and then coiled and glued together in places to form the round coiled flower.  The leaves are squares of the green and cream chevron print fabric folded several times to form a leaf shape and hot glued in place.


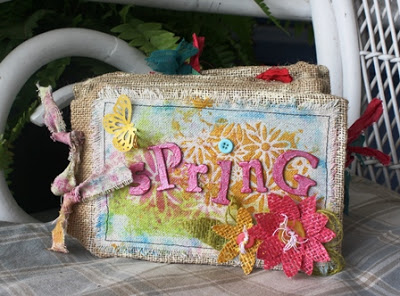
I have a short tutorial for you on how to make the pink flower as seen above. It was made from the square of pink burlap that was included in the kit.

First cut a rectangle approximately 2" wide by 6" long. (The wider the piece, the deeper the flower; the longer the piece, the bigger around the flower will be.)


Fold the rectangle lengthwise and hot glue together along the cut edges. Trim glued edge smaller if necessary.


Remove all lengthwise woven threads of the burlap between the edge of the hot glue and the fold.


threads beginning to be pulled out
all threads between glued edge and folded edge pulled out

Begin to roll strip up tightly against itself, glueing as needed to keep together. Continue until strip is totally rolled up.


beginning to roll - glue at intervals along cut edge
fully rolled up

Glue bottom of rolled strip to a piece of scrap paper.

base glued to scrap paper

Push down in the center of the roll into a circular flower shape. Arrange loops as needed. Embellish center with a jewel or button.


finished flower without embellishment

This flower could also be made with any loosely-woven fabric. It's super easy but looks complicated!

I loved working with this kit. It was packed with fun embellishments and surprise products (like the authentic filmstrip and the gusseted file folders). The patterns and colors are bright and cheerful and very versatile (have you checked out the gallery online to see all the unique projects created from this kit?)!  If I had to pick a favorite part of the kit, I would have to say the fabrics - there are chevron pieces in red, green and gold; a gold and white polka-dot; and black and white polka-dot; and pink burlap. Fun, fun, fun!

Now you must go check out all the designers' blogs (on the right column of my blog) to see their tutorials and find out their favorites!

There are still a few remaining kits, so be sure to get yours before it's too late! You may order online here, call The Little Blue House at 817-431-7930, or stop by in person at The LBH at 118 West Olive St., Keller, Tx.  And, if you're local, stop by the House anytime to see in person the fantastic projects created with this fabulous kit!

Wednesday, March 13, 2013

Another Front Porch Kit Layout

Here is another layout I created with the "Say Cheese" Front Porch Kit.


Our oldest grandson, Carl, started walking in January at around 10 months old and we visited him just afterwards.  Our photos of our little walk to the park were perfect for some of the papers and embellishments of this kit.

This is the left page. I painted and added Stickles to the little chipboard pennants in the kit and strung them for a banner. I love the black and white Thickers alphabet stickers that were included.


This is the right page where I used 2 more of the chipboard pennants but glued them end-to-end under the fussy-cut paper strips to make them look like one piece (see closeup photo below).  The "laugh" in the upper right corner is a very cute large paper clip included in the kit.


I still have one more project that I hope to share in a few days.


Monday, March 11, 2013

"Art in Bloom" Make-n-Takes


Here's a peek at the make-n-takes for The Little Blue House "Art in Bloom" Spring Open House tomorrow.  Hope you'll join us to see the new class projects, lots of new products on the shelves, enter to win prize giveaways, create a tag and feast on yummy refreshments!

Tuesday, March 12 - starting at 10:00 am

See you there!

Sunday, March 10, 2013

Ready for a Bloomin' Good Time?


Join us next Tuesday as we celebrate Art in Bloom!
Come see our NEW artful projects, fabulous NEW paper collections, NEW lotions & potions, enjoy a FREE Artsy Make & Take from 10am-5pm, yummy refreshments, Prizes, and so much more! Stop by anytime between 10am-9pm...
You will have a Bloomin' Good Time!

Thursday, March 7, 2013

One of my Front Porch Kit Layouts and a Tutorial

I think this was my favorite project to create with the "Say Cheese" kit - probably because I used some "lotions and potions" which I love to do. It's a layout with three photos of my youngest grandson, Drew, a few weeks ago when he cut his first two teeth. My daughter sent me these photos to document the occasion, but we couldn't even see his teeth!


the full one-page layout

and some closeups


I wanted to share how I made the background for this layout. I love the texture, soft color that coordinates nicely with the photos and the papers, and the amount of white space which places the focus on the photos.

I started with a piece of plain white cardstock and used a small chevron stencil (from Studio Calico) over which I spread white gesso with a palette knife. I immediately removed the stencil and then let it dry completely. (You can see that the stencil did not cover the width of the page so I had to do it twice and it doesn't exactly line up. No problem, because the photos will cover that space!) Look at that fantastic texture!


Once that was dry, I tinted more white gesso with a bit of Dylusions Turquoise Spray Ink to make a soft aqua color. I used a brayer to roll this over the stenciled pattern, covering about 2/3rds of the page. It doesn't completely cover, especially over the stenciled area, but I like the randomness of this.


This created a softly colored background and even more texture as you can see in this closeup.


When this was dry I started laying strips of patterned papers and the black and white dotted fabric in place on the layout. The edges of the papers were distressed and the fabric strips were torn. None were inked as I liked the clean contrast of the white core.  The strips were machine-stitched to the cardstock page. The title strip and "snap on" word strip were sewn just down the center so they would have some dimension.


Another fun element on the page is the addition of the white plastic rings that were in the kit. I painted some of them with acrylic paint and then added Glossy Accents to make them glossy again. I heated these with my heat gun to dry them and a serendipitous thing happened - they bubbled! I quite liked this additional texture so I didn't try to "fix" the problem.


I left the little wooden camera embellishments natural as I liked the contrast with the soft colors. I also added pieces of the tiny white acetate filmstrip under one photo and as photo corners on the other two photos.


The green-blue color of the edges of the authentic filmstrip coordinated nicely and the black contrasted well and made the photos pop. I wanted to add some dimension with this so I ruffled and stapled the filmstrip before glueing down under the largest photo.


So there you have my layout with my precious little Drew. Maybe at some point we will see his teeth and I can add a tiny photo!

I still have a few more projects to share so stop by again tomorrow!