"Art is my vehicle through life; may we share the ride together." Ron Wickersham

Saturday, April 30, 2011

National Scrapbook Day


How will you be celebrating National Scrapbook Day next Saturday (May 7)?  Come join us at The Little Blue House for our Craft Masters Mini Workshops!  There will be four workshops, each 1 1/2 hours long, with a hall-hour break between. You can sign up for one, two or make it a day and do all four!  Tracy, Elaine and I will be your instructors for these fun, technique-oriented classes.

The first workshop from 9:30 am to 11:00 am will be "DIY (Distress-It-Yourself) Blossoms."  I designed this cute project encased in an embroidery hoop.  You will learn lots of distressing techniques using many different products.


Next up from 11:30 am to 1:00 pm is Tracy's "Texture Time" workshop.  You will learn to jazz up your layouts with these adorable textured titles using some expected and unexpected products.


"Build a Border" will be from 1:30 pm to 3:00 pm.  You will learn many border-building techniques to spice up your projects.


Last, but not least, will be Elaine's "Glitterocity" workshop from 3:30 pm to 5:00 pm.  You will create this darling "Inspire" banner while learning many glitter techniques.


Check out more information on our store blog here and sign up before all the seats are taken.  We hope you will join us for a fun-filled day to celebrate scrapbooking and all paper arts!

Friday, April 29, 2011

Another New Class

 I think everyone is more than ready for springtime - I know I am! I made these cute pillows for our latest class release.  Students will receive the pre-made (by yours truly) canvas pillow case and then create the design with paint, stamps, mists, fabric and buttons.  There is no sewing involved except a tiny bit of hand- stitching and there is a "brights" choice as well as the "neutrals."  These were so fun to create!  For you local gals, there are still openings in the classes so contact The Little Blue House to sign up.


Wednesday, April 27, 2011

Gothic Arch Swap

 I recently participated in a "Gothic Arch" swap with an online group. The project had to be floral-themed and be in any arch shape.  I chose this rounded arch and used a collage image framed with a heavy coppery paper.  The butterfly is stamped on vellum and cut out with rhinestones added.  The quote is stamped as well. I added the outline in gold Krylon pen, a Maya Road suede flower and some lace.


Candy sent me this clever "arch." She made it from an old tie!  This is the front on which she added flowers, a paper image and a clay, embossed Eiffel Tower. 


Here is a shot of the back side which was a pocket.  She filled it with lots of floral ephemera and another Eiffel Tower.  So creative.


I love swaps - it's so much fun to see the many creative interpretations of the same theme.

Monday, April 25, 2011

New Classes

at The Little Blue House! Check out the website here for all the class listings, photos, full details and registration.

This is one of my projects - a keepsake box for Mom, grad or any special event.  I used some of the new lovely papers from Pink Paislee. The class includes techniques for using art metal, Kraft glassine, vellum, acetate and tissue tape.  It is fully lined with fabric.


Closeup:

Sunday, April 24, 2011

Happy Easter

free image from Vintage Workshop

Happy Easter everyone! I hope your day is filled with special moments and special people!

Wednesday, April 20, 2011

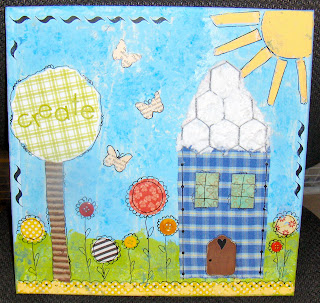
Create and Bloom

at The Little Blue House.  That's the name of the canvas I created as part of my design team commitment for the Front Porch Kits this month. (You can visit the website at www.frontporchkits.com to see
 all the design team projects in the gallery and there are still a few kits left if you wish to purchase one.)


I had so much fun making this canvas. It's 12"x12" and everything I used (except paint, rubons, molding paste and doodle pen) was in the kit.  The background was started by glueing down a 9x11 piece of Webster's Pages "Your Life. Beautiful" paper and then painting over it.  (I used an old credit card to paint with so the coverage isn't complete and some of the paper shows through - though it doesn't show up in this photo.) Most of the flowers, sun, tree, butterflies and windows were made with papers from the kit.  Bella Blvd. alpha stickers spell "create." I used fabric from the kit for the house and made the roof from chicken wire laid into wet molding paste.  The door is a tag that was attached to the tin pocket in the kit. I did lots of doodling too!


In the closeup above you can see a few of the flowers which are buttons. All the buttons in the kit were brown wooden ones so I used alcohol inks and Copic markers to color them.

I named this "Create and Bloom at the Little Blue House" because it's a little blue house and that's exactly what we do there!

Sunday, April 17, 2011

"Fresh from the Garden" Cards

Here are a few more projects I made with this month's Front Porch Kit.  Though much of the focus of the kit was on the garden theme, I wanted to design some projects to show totally different themes.  These cards could be for get well, encouragement, birthday, congratulations or thinking of you.


The "rainy day" card below uses cardstock from the kit which I cuttlebugged with the Swiss Dot folder. I sewed the die-cut scallop border along with a thin polka dot strip directly to the card base.  The scalloped circle was die cut from one of the journaling cards and stamped with one of my favorite get well phrases.  I cut two strips from the red patterned paper and hand pleated it, adhering it to the back of the circle.  The little rainboots are Maya Road chipboard which I painted red, added polka dots with white Enamel Accents and then coated with Glossy Accents. Aren't they cute? 
Rainy Day Card

The next card has a yellow floral-patterned paper layered over the olive green cardstock.  The focal design is one corner of the Webster's Pages Market Menu paper cut out. It originally said "today's special" but I added Bella Blvd alpha stickers to alter the phrase. Perfect for a birthday or congrats card. The green vine is a portion of the special Front Porch Cutz diecut included in the kit. I misted it with Maya Road Iridescent Pearl Mist to give it some sparkle.  I added black glaze pen to the wrought iron flourish and a bit of blue Distress Ink to color the bird. The little orange flower was made by gathering a bit of orange gingham ribbon into a circle and adding a wooden button tied with twine. The paper rose was also lightly misted with the pearl mist for shimmer.  The bow was tied from the gorgeous leaf trim in the kit and the butterfly pick added to finish it off.


Your Special Day Card

Everything used on the cards was included in the kit except for the "lotions and potions." And I still have tons of products remaining!

Saturday, April 16, 2011

Front Porch Kit Projects

Now that we've revealed the "Fresh from the Garden" Front Porch Kit, I can share some of the projects I made with the kit.

These two are some of the featured projects which means that the full tutorial including step-out photos are included on the instructional CD included in the kit.


This is the "Polly Pocket" tin wall pocket included in the kit. Isn't it adorable?  I decorated it with two of the beautiful papers, some of the crocheted trim and fabrics, the little bird and, of course, the darling crocheted cherries.


I just had to do something with that cute garden glove in the kit, so I designed this Garden Handbook.  Can you guess what I used for the corrugated cardboard covers of the book?  I cut them (along with the little title sign) from the box the kit arrives in!  I like to be green... I even covered the pen with some of the paper and added a button on top to secure the twine that attaches the pen so it doesn't get lost.

The Handbook fits inside the pocket, but the pocket would also be a great place to store outgoing mail, or seed packets, or even a bunch of fresh flowers.

This kit was so much fun to work with.  It's selling fast so if you're interested in getting one, check out www.frontporchkits.com and order asap!  I'll share more projects tomorrow!

Friday, April 15, 2011

Today is the big reveal!

The April Front Porch Kit "Fresh from the Garden" will be revealed tonight on our live webcast from The Little Blue House at 8:30 pm CST!  So here's a bigger sneak for you!


Like what you see? Join us on www.ustream.tv/channel/frontporchkits for the full reveal.  We will be showing the contents of the kits, along with some of the designers' projects and some fun tutorials.  We will also have a special celebrity guest - Old McDonald, fresh from the farm!  If you don't have a Ustream account, you can sign up for free and then login to chat with us.  We will even be giving away a free kit to one lucky commenter/chatter! 

Last month we quickly sold out of the kits so don't delay in ordering yours on the website (www.frontporchkits.com) or calling The Little Blue House directly at 817-431-7930.  These will be shipping in about a week.  You can also go to the gallery on www.frontporchkits.com to see all the fantastic projects made by our design team with products from this kit.

Thursday, April 14, 2011

A Front Porch Kit Project


This is a peek at part of one my projects for the kit this month.  The kit will include a CD with complete instructions for the five featured projects - and two of them are mine!  Just one more day 'til the full reveal...

Finish your taxes, get them in the mail and then relax and tune in to Friday Night Live at www.ustream.tv/channel/front-porch-kits at 8:30 pm CST tomorrow to see the kit contents, some of the projects, a few little mini-tutorials and even a "celebrity" guest!

Wednesday, April 13, 2011

Fresh from the Garden


Here's another peek at the new "Fresh from the Garden" Front Porch Kit, available now for pre-order at www.frontporchkits.com.  This kit is full of different textures and bright, springy colors. Fabulous!

Don't forget to join in on the Friday Night Live at The Little Blue House at 8:30pm CST April 15.  Here's the direct link: www.ustream.tv/channel/front-porch-kits  Drop by a little early for the "pre-show" activities.  Hope to see you then!

Tuesday, April 12, 2011

Another Peek


Here's another peek at some of the fabulous items in the new Front Porch Kit.  Pre-orders start today! You can order online HERE, call The Little Blue House at 817-431-7930 or stop by and visit us!  Last month the kits sold out during the reveal so don't hesitate!

The full kit will be revealed Friday night, 4/15, on our Friday Night Live webcast live from The Little Blue House.  Join in on the fun at 8:30 pm CST online at http://www.ustream.tv/channel/front-porch-kits or at the LBH for crop (there are still a few seats left so call to reserve yours now).

Monday, April 11, 2011

April Front Porch Kit

It's that time of the month again - April's Front Porch Kit "Fresh from the Garden" will be revealed on Friday night, 8:30 pm, live from The Little Blue House!

This is another great kit, filled with product and some interesting finds!  It has been so much fun creating with these supplies.

To whet your appetite, here is a little sneaky peek at one of my projects this month. What could it be?


Stay tuned for more peeks and information throughout this week! The kits will be available for pre-order starting tomorrow online HERE or locally at the Little Blue House.

Sunday, April 10, 2011

Awesome ATCs

Last month the Little Blue House Art Group learned about ATCs (Artist Trading Cards). Many of the ladies had never heard of them nor had they made any.  We decided to have an ATC Swap with the theme being "Springtime." That was the only "rule."  Everyone made 6, kept one and swapped five at our meeting last week.  It was exciting to see the variety of ideas and techniques used.  

This was my ATC.  I used a Distress Ink technique on a watercolor paper base.  I swiped Stormy Sky, Broken China and Peeled Paint inks directly on an acrylic block, misted it lightly with water and then "stamped" the block on the paper.  The bird and twig is a beautiful napkin which I adhered over the watercolor background. Because the napkin is so thin and translucent, some of the background shows through.  Then I stamped the nest and word, used colored pencils and Stickles on the eggs and added a dot of Stickles to the eye.  The music notes is a bit of Tim Holtz tissue tape.


In addition to the swap, we altered Maya Road divided "memory boxes."  This was the sample I made for the class.  The exterior of the box was stained with Broken China Distress Stain and the interior was painted with a metallic bronze acrylic paint.  I added the butterfly design tissue tape around the sides.  The hanger is a piece of black wire threaded through some buttons with a handcut banner added.  

I used a "Tim technique" on the bird diecut. I covered a small piece of chipboard with random strips of different-patterned tissue tapes then die cut it with the Caged Bird die.  Wild Honey Distress Stain was used to color the body and brown chalk ink for the branch. I love how the "eye and head" of the bird was serendipitously revealed! No manner of planning could have accomplished that!


Here are some of the other boxes that were made.  You will see the great variety of ATCs in these pictures since we all received a mix.


made by Carolyn

made by DeeDee

made by Hilary


made by Sandy

made by Kathleen


made by Jill
Didn't they do a great job, both on the boxes and the ATCs?  I'm so proud of them. (I hope I managed to attribute the boxes to the right people - if not, I hope they will correct me.)

Monday, April 4, 2011

Art Journal Page

Yay, I finished another page in my art journal this weekend. I love having time to just play. I had started it awhile ago with some lovely green/gold metallic paint left in my brush from another project.  I don't like to waste so glued down some book text and a piece of an old invoice on a journal page and then "cleaned" my brush. It was enough for a nice background!

I hadn't decided what to add to the page until I cleaned my desk this weekend and found this postcard of Roben-Marie Smith's gorgeous artwork that had been included in an order.  It was perfect for this! I glued down just three sides to make it into a pocket to hold a pretty tag that was included with my giveaway package from Eclectic Paperie.


I love how it turned out - with very little effort - and that I'm preserving these art pieces from other artists.

Sunday, April 3, 2011

I won!

This has been my lucky spring - I have won several blog giveaways including a recent one from Tim Holtz.  But I have to say that this prize package is the biggest to date and pretty awesome!


I followed along on Donna Downey's Inspiration Week posts a few weeks ago. (Click the highlighted link to see a recap post of the entire week.)  Every day of the week she posted a video showing her working on pages in her 6" x 12" canvas album.  It was fun to see the process and how the pages developed.  And every day she picked one winner from that day's comments to win the products she used on that day.  I could hardly believe it when I won for Day 6 out of about 350 responses!

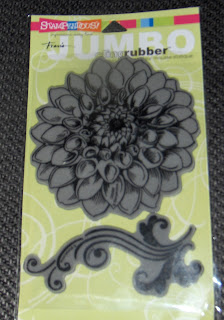
My package arrived yesterday and I was wowed by all the products.  Included (as seen above) was the entire album, Portfolio water-soluble oil pastels (24), 4 charcoal pencils, black Staz On,  Vintage Photo Distress Ink, 4 Neocolor Caran d'Ache water-soluble wax pastel crayons, 2 bottles of Golden fluid acrylic paints, 1 bottle of Helmar 450 Quick-Dry glue, a water pen, ink blending tool and a package of hollyhock flocked rubons.  (Oops, just noticed that I forgot to add the stamp set to my photo - also included was this huge flower and flourish cling-mounted Stampendous stamp set below. That flower is 5" across!)


Isn't this fantastic?  Can't wait to sit down and play!