"Art is my vehicle through life; may we share the ride together." Ron Wickersham

Thursday, April 30, 2020

Mixed media cards


Yesterday I decided I wanted to get inky so I made a master board on watercolor paper. What's a master board? You make one large piece of art and then cut it up into smaller pieces and further embellish. Years ago when I first started card making it was called "one sheet wonder!"

I used two colors of green Distress Inks and one blue one, swiping them on my craft sheet and spritzing with water. Then I "smooshed" the paper into the watery color several times, repeating as needed to fully cover the paper and drying between each step.

Once I had achieved some pretty color, I stamped some script and numbers with black Archival ink. I also added some heavy white gesso through a number stencil and splattered watered down gesso over the cards.  The final touches were adding white floral die cuts (Tim Holtz) and some word strips (also TH). Then I edged the card fronts with black ink and mounted them on white cards.

I love how they turned out and had fun getting messy again!

Tuesday, April 28, 2020

Making Background Collage Pages While Using Up Scraps

Scraps - if you use any paper in your crafting you know how many scraps you can accumulate! Here's an idea to use up all those bits.  I collaged them on 8.5" x 11" pieces of card stock (use colors you don't want as they are completely covered). I then scanned them so I can use them over and over as backgrounds, for journals, for cards, etc. They can be used in either portrait or landscape mode and can be cut up into smaller pieces. Feel free to copy these if you would like them.


Sunday, April 26, 2020

Collage Challenges 15 & 16


Almost caught up on the weekly collage challenges. Here are two more:

Collage 15


Prompts

1) something that rings (image of church bells)
2) plaid pattern (gold plaid paper in lower right corner)
3) piece of map (antique map upper left corner)
4) something in hexagon shape (light fixture image)
5) text in foreign language (Spanish book page lower left)
Bonus: numbers (on paper middle top of page and label near bottom)

You can see I used all 5 prompts along with the bonus.


Collage 16


Prompts

1) something that dangles (bride's legs dangling over wall)
2) something that starts with J (juniper branch)
3) piece of letter or note (mid-center of background)
4) a schematic (lower right of focal image)
5) rubber stamping in color other than black (circles in green paint)
Bonus: circles (stamped circles; circle design in paper, 3 collaged punched circles)

Again, I used all five prompts and the bonus.


Thursday, April 23, 2020

Collage Challenge - #12, 13 & 14

I'm still playing catch-up with the 5-prompt collage challenge by Margarete Miller. She has been posting one challenge per week since the beginning of the year but I joined in somewhat late.

Here are three more challenges I finished a few weeks ago.

Challenge 12


Prompts

1) money (the fake - Russian? - bill in lower right)
2) something that starts with F (fall foliage; flag)
3) something drawn or written in pencil (I wrote the prompts in pencil
on the red patterned paper, upper right corner)
4) coarse paper (red and green handmade papers)
5) a label (red label)
Bonus: flag (Mexican flag since the colors went with my collage)


Challenge 13


Prompts


1) something orange (paper on right, butterfly and flower)
2) something with claws (panda bear)
3) bell/bells (bells on stamps)
4) stripes or striped paper (two black and white security
envelope linings)
5) calligraphy (my horrid attempt at calligraphy for the sentiment - 
certainly need to work on that more!)
Bonus: numbers (a rubber stamp image from a catalog)


Challenge 14


Prompts

1) something wet (picture of seashore)
2) lavender - color of plant (in several papers and also flower)
3) game piece or piece of puzzle (puzzle piece that I sanded because it was too 
bright for the page)
4) paper in soft colors (many of the papers)
5) business card or portion (Rae Missigman's card in upper left corner)
Bonus: sticker (vellum flower sticker)


As you can see, by the time I got to the 13th and 14th challenges, I stopped adding the prompts to the pages. It was getting harder to find creative ways to add them to the pages and be cohesive with the collages. I will probably add a list to the back of the book when I'm finished.

Monday, April 20, 2020

Finishing the 14-Day Art Journal

Here are the last four days of Julie Fei-Fan Balzer's 14-day mini art journal series.


Day 11 - Abstract (left page)

The technique for this day was to stamp with acrylic paint multiple times on the page and then color in the negative space with watercolor to form an overall abstract design. My stamp did not give me as abstract a result as Julie's but the technique was interesting.

Day 12 - Black and White Doodles (right page)

This technique was simply drawing lines with black marker to form shapes and then to doodle on the lines and within the shapes with both black and white pens of different widths to form patterns. My white pens didn't show up well on the black - it seems they soaked into the pigment so the result is far more subtle than desired. I discovered several dried up pens, so I was also able to declutter!


Day 13 - Mixing Media (left page)

This technique used water-soluble crayons (I used Tim Holtz Distress Crayons) and acrylic paint. Three colors of the crayons were scribbled on the page and then spread with a paintbrush and water.  The yellow circles and dark blue marks were also added with the crayons. In order to make this layer permanent, I used matte medium on the gel plate and printed over the entire page. . This is a great tip to fix any water-soluble medium instead of brushing over.  Once this dried, the light blue acrylic paint was added for extra interest.

Day 14 - Monoprint and Sketch (right page)

This page was already painted from the extra acrylic paint (blue) that I used up from the previous page. Then I used the gel plate to print a second layer with orange paint. When dry I sketched the flower with permanent pen and then used fluid acrylic paints to color the flower. Since these are transparent, you can see the sketch marks and previous layers underneath. I also doodled with white pen since the page was quite dark.


I thoroughly enjoyed experimenting with these techniques - some old and some new. It was a great distraction from what's presently going on in the world. Art is therapeutic!


Saturday, April 18, 2020

Storage folders

I made these little storage folders for bits and pieces using a tutorial from Wendy bMason on YouTube. She explains it better than I can and it's good to see a video showing the construction. Check it out here: https://www.youtube.com/watch?v=Eu00zMasT7k&t=1174s

In a nutshell, you use one piece of card stock or patterned paper for the cover/outside. Inside she used pieces of card stock folded in half with washi tape closing the sides. Instead, I used envelopes that I had and trimmed off the tops. I also used washi tape on the sides, not to close them but merely as decoration.  These are glued together just down the centers and then the ends glued to the folded cover.

The red one below is 8.25" long, just a bit longer than the envelopes I had. I used six and added a closure with bakers twine, a card stock circle and a brad.


This is the inside and you can see the construction somewhat.


For the second one, I used some old yellow envelopes that were approximately 6.5" x 4".  The folder is about 7" long.


And inside:


These were fun to make and used up a bit of my stash. They will be great for storing die cuts or other small items.


Tuesday, April 14, 2020

Art Journal pages

Here are two more pages of the mini art journal class - days 9 and 10. I can't believe that there are only 4 more to do!


Day 9 on the left was made using the gel plate and a DIY "comb" to use for design and texture. Four layers of paint are on this page. The first layer was green acrylic paint spread on the gel plate and then printed on the page. The comb was made with an old credit card, cutting "teeth" into the side. Then a layer of yellow paint was added to the gel plate and the comb was dragged through the paint to make designs. This allowed the green to show through. The third layer was using white paint and another side of the credit card from which I had cut triangles. The card was again dragged through the white paint on the gel plate and printed on the page. And lastly, orange paint was placed on the gel plate and I used a cotton swab to make circles. I only printed half the page with this. It is interesting to see what each layer reveals. There is no limit to the combinations of colors and designs that could be made!

Day 10 on the right was using the gel plate again. This time a layer of magenta paint was spread on the gel plate and then the "tracks" stencil was placed on top. This was brayered over with a clean brayer which removed most of the paint from the holes of the stencil. Then this was printed on the page. The second layer was using the star stencil on blue paint on the gel plate. I removed the stencil before printing and only printed on the right side, giving me the blue stars. This same technique was used again with red paint and a rays stencil on the left side of the page.

I had forgotten how much fun it is to use the gel plate!

Saturday, April 11, 2020

Collage Challenges #9, #10 and #11

Collage 9


Prompts:

1) a piece of jewelry (green bracelet)
2) something green (bracelet, patterned paper, leaves, printout of lace trim)
3) paper with lines (chart paper in center of page)
4) something found in a desk (postage stamps)
5) something drawn in ink (used bonus in place of this one)
Bonus: security envelope pattern (lower left corner of page)


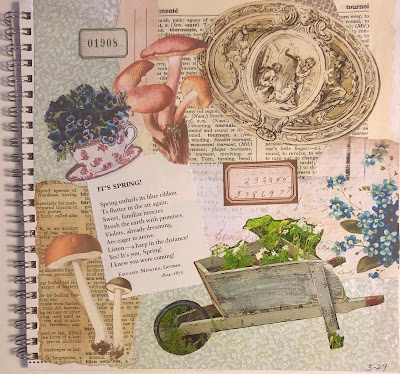
Collage 10


Prompts:

1) something you see through a window (wheelbarrow, flowers)
2) something you can hold in your hand (tea cup with flowers)
3) mushroom (two vellum mushroom stickers)
4) poem ( spring poem)
5) piece of dictionary page (top portion of page)
Bonus: geometric shape (ornate oval label, rectangular labels)

I adhered the oval label as a pocket and added a little tag with the prompts written on it.


Collage 11


Prompts:

1) something you're thankful for (music)
2) something alive (bird, bees)
3) ticket (gold, red, ivory and blue tickets)
4) piece of map (upper left corner)
5) something stenciled (paper on left side of page stenciled with paints)
Bonus: a bug or insect (bees)

I wrote the prompts on the back of the ivory "ART" ticket which slides in and out behind the red ticket.


I hope everyone is doing well during this unprecedented time. I, for one, am busier than ever trying to keep up with all the free classes, You Tube videos and activities people have been sharing.  Happy Easter!


Sunday, April 5, 2020

More Art Journal pages

Having fun playing in my tiny little art journal following Julie Fei-Fan Balzer's techniques.

Day 6 (on left)


This day was repeat stamping to make a pattern.  Julie used a nice tiling stamp that she had hand-carved. I didn't have any stamps like that so I used a zigzag I had hand-carved awhile ago.  It's not as graphic a result as hers but it worked ok.

Day 7 (above right)

This technique was "rainbow roll stamping" using a brayer with multiple colors and a large foam stamp. I had forgotten how much fun this technique is.


Day 8 (double spread below)


For this page we did layered stenciling. First a thin layer of three colors of acrylic paint was applied over the entire page and dried. Then a contrasting color was stenciled over the page. Lastly, a thick coat of acrylic paint was placed all over and then quickly wiped away through a stencil with a baby wipe.  The possibilities for this are endless, depending on the colors and stencils used.

Thursday, April 2, 2020

Collage Challenge - #7 and 8


Collage #7 - Prompts

1) a leaf or leaves (leaves stenciled with acrylic paint)
2) something sweet (cupcake napkin)
3) a group of three (butterflies)
4) a math symbol ( multiplication and subtraction symbols)
5) a doodle (doodled leaves and top border)
Bonus: a label (red label with prompts)


Collage #8 - Prompts

1) a person or people (picture of little girl)
2) bubbles (also in picture)
3) crossword or newspaper/magazine puzzle (Sudoku)
4)  text in language not in English or your home language (Russian book page)
5) sticker from fruit or vegetable from grocery store (house-shaped label from tomatoes)
Bonus: next noun you hear

I didn't use the bonus prompt.  Other items collaged were a piece of vintage wallpaper, some drywall tape, and a die-cut heart. The prompts are written on the back of the picture which is slid under the left side of the heart.