"Art is my vehicle through life; may we share the ride together." Ron Wickersham

Wednesday, March 24, 2021

Collage Challenge - Weeks 11 and 12

Week 11


Prompts:
1) a flower (digital floral image)
2) a foreign language (French script paper in upper right)
3) stitching, real, drawn or stamped (I machine-stitched the left side of the floral
image to a mat; also drew stitch lines around hexagons)
4) a measurement (ruler and a piece of sewing pattern showing
body measurements  - tan paper in center)
5) something torn (script paper, sewing pattern paper, floral image,
dark green strip)
Bonus: geometric shapes (punched hexagons from 
various patterned papers

I like the color combo on this page and am pleased with how it came out.


Week 12


Prompts:
1) a comic (vintage comic strip in upper left corner)
2) architecture (the old building lower right corner)
3) something cold (image of two boys sledding in snow - 
also added some snowflakes)
4) a favorite word (stamped cherish and also definition)
5) a bird (two in upper right corner_
Bonus: stamping in non-black ink (stamped postal marks 
in green on background page, upper right corner)

I added some labels, patterned paper and number washi tape to complete the collage. I was surprised this turned out so "vintagey" but it started with the comic I found.

I am really enjoying these collages this year and the "planner/collage book" from Margarete Miller. The size (approximately 5.5" w x 9" h) is perfect for a quick project without having to cover too much real estate.

Tuesday, March 16, 2021

March Vintage Journal Page Swap

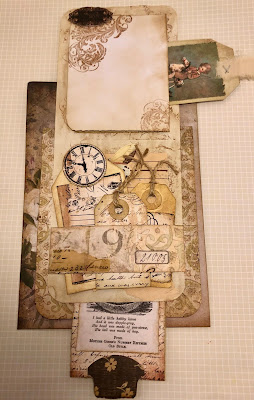
 The theme for this month's vintage journal page swap is "Antique Rocking Horses."  I used several vintage images from online and lots of interactive flips and pockets for tags. The color scheme is very neutral and vintage.

Here is the front of the page. The image is on a flip-up which is attached to the page as a top-loading pocket.


This is the tag in the large pocket. The top piece is also a pocket - bottom-loading and has a small tag.


When you flip up the top piece, these are the two images you see.


The piece at the top with the little boy on the rocking horse is actually a top-folding  piece. On the back at the top is a fold-out journaling spot which also forms a pocket to hold a little tag horizontally. At the bottom is a belly band holding several more small tags. Here you can also see the tag  in the bottom pocket.


I forgot to take a photo of the back. It just has a small corner pocket with a tag on which is printed a short history of antique rocking horses.

This was a fun page to make with all the hidden pockets. At first I had no idea what to do with the theme, but once I found the sweet images online, I was able to proceed.

I won't be posting for the next week as we will be going to Mexico for dental work.


Friday, March 12, 2021

More 6" x 6" paper ideas

I've got more ideas for using up some 6" x 6" papers (or even 12" x 12" cut in fourths).


Coin Envelope

Score at 1 5/8" and 4 3/8", then turn 90 degrees and score at 1 1/8" and 5 1/2". Cut out the four corner areas, fold and glue. Can use various closures.


Double Pocket

Fold upper right corner down and glue bottom edge. Glue (or sew) right, left and bottom of larger piece to page. Makes a large pocket plus a smaller side pocket.


Envelopes and Folder

For smaller envelope (middle) fold one edge of square down approximately one inch; fold up the opposite edge a little less than 2 1/2".  Glue side edges.

For the folder (upper right) fold square in half. Then fold up the bottom edge approximately 1 1/2 inches for little inside pockets. Leave as is or add a strip of coordinating paper for a closure band.


Edge of Page Pocket/Tuck Spot

Fold paper in half and round corners. Place over edge of page. Both sides can be glued at top and bottom edges to make pockets or just bottom edge for a tuck spot.


Two -Pocket Flip (Best with double-sided paper)

Fold paper in half vertically. Then make cut from halfway point on one vertical edge to the fold only. Punch thumb holes at top of both smaller pieces. Fold one to back (see below) and other to front (second photo). This can be glued to page to make a small pocket on page as shown plus a pocket on front. You an add a little "notebook" of several pages to back of larger piece. Or glue back pocket to back and front pocket to front and just clip onto page.


Here is the same thing only both pockets are glued to front. This can be clipped to a page or glued along three edges to a page to form yet another pocket.


So many possibilities! If you search online there are probably many more.  I've been having fun using some of my small paper pads.
 

Monday, March 8, 2021

Collage Challenge - Weeks 9 and 10

I'm continuing the weekly 5-prompt collage challenge of Margarete Miller and really enjoying it. Often the five prompts are so unrelated that it makes for quite a challenge to make the collage work out cohesively, but it's a good exercise to try to make it work.

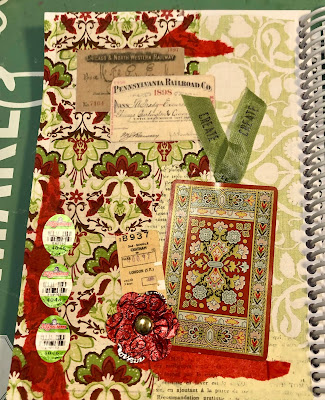
Week 9


Prompts: 
1) a ribbon (the green "create" ribbon)
2) transportation (ticket or picture etc - I used several train tickets)
3) tissue paper (the script on bottom right and the red pieces are tissue paper and 
the red and green pattern on the left is a napkin which is like tissue paper)
4) food packaging or label (three avocado labels on left)
5) a repeating pattern (the napkin and green patterned paper on right)
Bonus: something shiny (the playing card and the flower made with two
Dove chocolate candy wrappers and a brad)


Week 10


Prompts:
1) an illustration (the ladies at the bottom of page)
2) a person (two women from a G45 paper)
3) something round (the clock)
4) a shoe (lower left and right)
5) sheet music (vintage music upper left)
Bonus: tissue paper -wrapping kind (red tissue paper which I stamped on)

I didn't realize until I uploaded these photos that these two weeks look very similar - in color especially. Well, I do really like red...


Monday, March 1, 2021

Making Cards


 The online group I'm a member of has a weekly challenge this year. Last week we were to post card sketches and use at least one to make a card. I rarely use sketches just because I usually forget!

I found this one online and thought it was a great idea to make four cards at once. It was a very old post but the gal suggested using 8.5" x 11" white card stock, cutting it into fourths and stamping all over each piece in different colors. You could also use a background stamp. It would be good for using embossed pieces of card stock also.


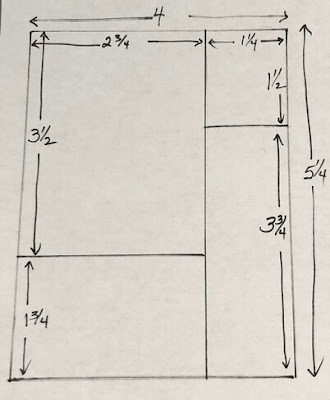
Since there wasn't a sketch per say, I went ahead and drew a diagram.


I decided to use four papers from an old Fancy Pants 6" x 6" paper pad. These pads are perfect for cards as they all coordinate and are also scaled smaller than larger papers. I cut them all down to 5 1/4" high by 4" wide and then cut them at the same time with my paper trimmer according to the diagram above. Then I just had to place them on the card bases so that they had one each of the patterns. The sentiments took me way longer to do than creating the cards! You can see this design works either horizontally or vertically.


Here are two sketches that other members posted.


I made a card from each sketch using the leftovers from my previous cards. (See top two cards below.)
For the bottom card is I just used up the few pieces remaining however they fit. No waste!