"Art is my vehicle through life; may we share the ride together." Ron Wickersham

Tuesday, March 31, 2020

Art Journal pages 4 and 5

Here are two more days of Julie Fei-Fan Balzer's art journal technique series.

Day 4 (on left) was using watercolors. Concentrated colors were used to make marks on the page (she used arches; I used rectangles). Then a wash of color was added to the background and, when everything was dry, the rectangles were outlined with white pen. It worked well, considering this was not watercolor paper.


Day 5 (on the right) looks scary! The theme was doodled collage. A magazine image of a woman was glued to the page and then doodled with gel pens. I only have a few of these, so had to make do with what I had. This is a fun technique and could be used in so many ways to enhance a magazine image.

Sunday, March 29, 2020

Collage Challenge - #5 & 6


Collage 5 Prompts

1. a path or road (photo)
2. something cold (snowy path; snowflakes)
3. a favorite word (inspire)
4. piece of calendar (upper right)
5. paper with repeating pattern (brown paper; graph paper)
Bonus: an illustration (tree)


Collage 6 Prompts

1. something ornate (labels)
2. piece of dictionary page (in lower left and upper right corners)
3. something that turns or spins (bicycle wheels)
4. something that starts with letter C (stamped circles)
5. a form (guest check)
Bonus: something you see through a window (flower)

I used all five prompts plus the bonus on each of these.

Thursday, March 26, 2020

14-Day Art Journal Freebie

Julie Fei-Fan Balzer is hosting a free 14-day art journal series on her website. You have to join, but it's free. You can check it out here: balzerdesigns.com

First she makes a tiny journal - about 3" wide by 5" high. You take four pieces of paper 6"w  x 5"l and fold each in half lengthwise. (I used mixed media paper but it's not very thick and, if I did this another time, I would use watercolor paper to stand up to all the wet media she is using.) Whatever you want for a cover is also cut 6" x 5" (or even slightly larger) and folded. The pages are nested into the cover and then stapled along the spine. To reinforce the covers, the first page is glued to the inside of the front cover and the last page is glued to the inside of the back cover. This will give you 14 pages for the series.

I had a piece of fabric cloth leftover from a book cover I made a few years ago and it was almost the exact size! So that is what I used.


Every day Julie is posting another mini-tutorial (5-10 minutes) for a technique. I think today is the third day, but I've done two so far.

The first (on the left) was using oil pastel as a resist with acrylic paint. I had recently decluttered my oil pastels, so I used a white crayon. I don't think it resulted in as nice a resist as hers did, but it was a lesson learned!


The second (on the right) used two layers of acrylic paint. The first layer was dried thoroughly before painting on a thick layer of the second paint. Then before this dried it was scribbled into using a skewer. This technique is called "sgraffito."

This is an interesting and fun exercise, especially now when we are home-bound and looking for projects to fill the time. Hope you will join us and spend some time arting!

Monday, March 23, 2020

Collage Challenge - #3 and #4

I finished two more collages over the weekend.


Collage #3 Prompts

1. use a bug or insect (the caterpillar and butterfly)
2. a key (stamped and embossed key)
3. sequence of numbers (stenciled numbers on script paper)
4. ink (I used ink to stencil the numbers as well as a floral image on the book text)
5. a quote (quote downloaded from Internet)
Bonus: something in black and white (book text, script paper, magazine scrap under quote,
 painted marks on tissue paper above quote)

I used all five prompts plus the bonus for this one. It was hard incorporating these different items on one page!


Collage #4 Prompts

1. use playing card (I used front of a vintage card)
2. group of 3 (three people, three buttons below, three eggs)
3. something bumpy (paper doily and lace)
4. something that splashes (fish and duck)
5. buttons, real or not (pictures of buttons from magazine)
Bonus: person/people (family photo)

This one was even harder for me! I was only going to use the fish but needed the duck to fill in the collage. I wrote the prompts on a little tag tucked under the playing card which was attached like a pocket.

Friday, March 20, 2020

Collage Challenge - #2

This is the second collage challenge.


I used all of the prompts for this one, including the bonus:

1. something with a bit of pink (the print background, stamped flourish and pink in the focal point images)
2. sheet music (horizontal piece)
3. clothing tag (I added the list - #4 below- to the clothing tag and placed it in the glassine bag)
4. list (see above)
5. text from book page (I used two pieces)
Bonus: stamping in two colors (the flourishes in pink and navy blue)

This was an easy collage, maybe because I prefer pink and blue to the neutrals of the first collage!

Thursday, March 19, 2020

Collage Challenge - #1

How is everyone doing in self-quarantine? For me, it's not a significant change as I love being at home holed up in my art room creating! (My husband, who is just the opposite, is already experiencing cabin fever and withdrawals from sports!).

I've been browsing for some fun challenges to inspire me and keep me creating during these surreal times and I found a 2020 ongoing collage challenge on margaretemiller.com that sounds interesting.  I love collage and doing them often helps to improve your skills. For this challenge, five prompts plus one bonus are uploaded each week and you make a collage using the prompts. The bonus is extra if you want to use it and can also be used to replace one of the other prompts. I decided to follow along. Since this challenge is already in its 12th week, I will just do the weekly prompts either daily or whenever I have the time and inclination.

I am going to create these in this very old Hampton Arts stamp catalog which I picked up at a trade show years ago. I kept it since it is coil-bound and has nice, sturdy pages. It's approximately 8" square, so large enough to get several images on and small enough to not be too overwhelming.

This is the cover which I will collage at a later date.


And this is the first page - before I started working on it.


This is my completed collage. The prompts were: 

1. something that represents time (I used the clock image from a magazine and the stamped time quote)
2. something that blows in the wind (the paper on the left which has seed pods and leaves)
3. threads or a piece of fabric (I forgot this one, but used the bonus instead)
4. an animal (the elephant on a piece of old scrapbook paper as well as the horse on the long, vertical postage stamp)
5. something out of the recycle bin (part of a paper bag on the right side, a piece of food wrapper - striped, and a small scrap of kraft packaging)
Bonus:  postage stamp (I used two - I added the prompts on the underside of the large stamp in the upper left corner)


I'm assuming you can use other items and images to bring your collage together or at least I will be doing so. I added some vellum leaf stickers and a Tim Holtz butterfly.

I had fun with this. It's amazing that you can take unrelated images and tie everything together. This is certainly not my most favorite piece ever but I think it works. If this sounds interesting to you, go check out the link above and join in!

Monday, March 16, 2020

Tutorial - Small Ephemera/Postage Stamp Storage Folder

I've been in an organizing mood lately and, since I'm trying to stay home most of the time, I've also had lots of time to create. I came across a little ephemera storage folder on YouTube and decided to give it a try.

This is a fairly quick and easy little folder to make. It is 4 inches wide by 6 inches high when closed and uses just one 12"x12" piece of paper plus two 4" x 6" pieces. This can be made with patterned paper, solid card stock, coordinating patterns or all the same. I used papers from an old Pink Paisley collection.  


First you will need to cut 8 pieces 4"x6" - I cut 6 from the 12x12 paper for the "pages" and 2 coordinating ones for the front and back covers.


You will also need three 4"-long strips of muslin about an inch wide. Take two pieces of your paper and lay side by side with a tiny (about 1/8") space between, front side facing down.


Place a line of liquid glue along each side of the gap and lay down the muslin. This secures the two pieces together and allows for a fold.


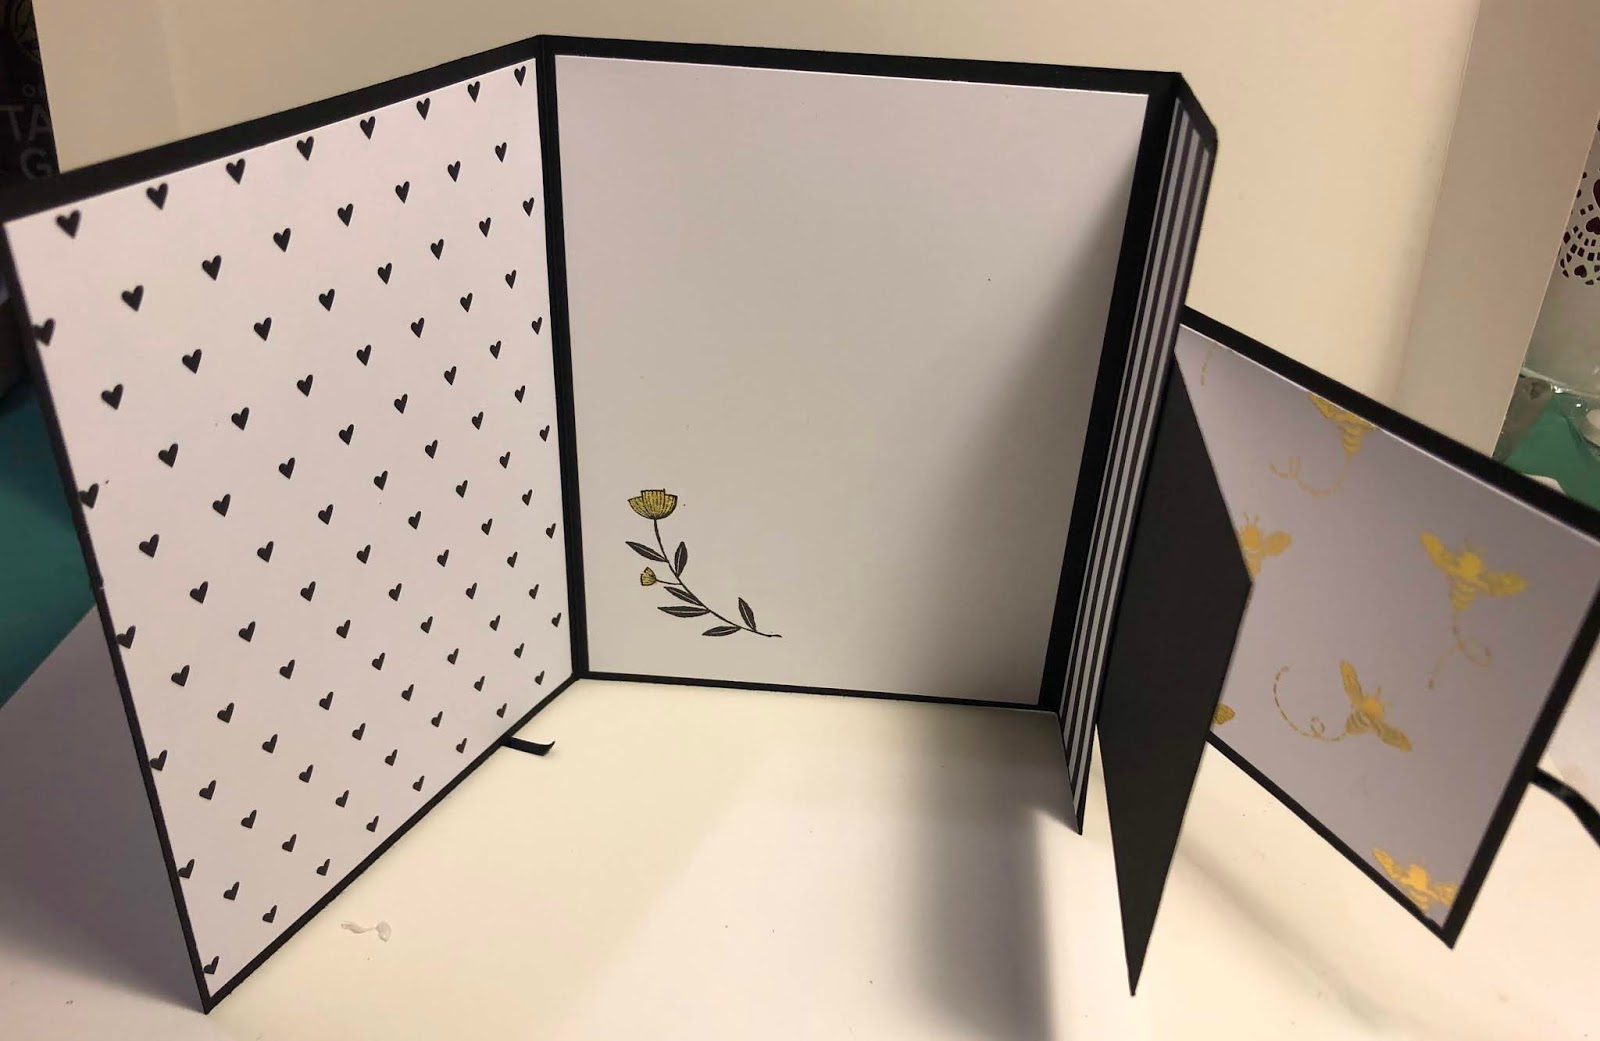
Repeat the above with two more pieces of paper. Then attach the two sections together in the same  manner.  With the four pieces now joined and still facing down, glue the two remaining papers to the two center sections ("right" side up).


Next, glue on the front cover paper to the section farthest to the right (see below). If you want to attach a ribbon for the closure, glue that on before placing the cover paper on.  You could also just add an eyelet for a closure after completely covering the booklet.


Repeat for the back cover, adding to the section farthest to the left.  Accordion-fold the booklet.


For the little pockets to hold ephemera you will need some vellum.  Cut 6 pieces of each of the following measurements: 4"w x 1 1/4" h; 4"w x 1 1/2" h; and 4"w x 2" h.


Use a thin line of glue on three sides of each piece and adhere to the pages, the largest on the bottom of the page, the 1 1/2" high pieces in the middle, and the shortest at the top, leaving a small space above each. (See below).


I then sewed around each page but this is not a necessary step. It would help the pockets be more stable though. 

This was a fun little project and will be useful in keeping small ephemera sorted and visible. Hopefully it will make it easier to find and use these items. I hope you will try one yourself. It could be adapted to any size!


Thursday, March 12, 2020

Another junk journal page for a swap

I am participating in a junk journal page swap every other month. There are no themes - just have to create one approximately 5" w x 7"h page.

This is my page which has already been sent off to my partner. I actually used some of the "scrap roll" I posted about several days ago.  This was a piece about 11' wide and 7' high which I folded in half and stitched around to make a pocket.  I added the woman's image which came from an old piece of scrapbook paper and a piece of old book spine at the bottom for texture. I used a little stamp on another scrap of patterned paper.


Inside are two tags. The one on the right is made from another portion of the scrap roll. I added a strip of upholstery fabric, some mulberry paper and coffee-dyed cheesecloth under the vintage image. The "tag" on the left is made from a guest check. I added strips of book text and brown paper bag under a Tim Holtz "paper doll." I sewed three old postage stamps over the book page and also stitched around the perimeter of the tag. I stamped the numbers above the image. Both tags have plain paper mounted on the back for journaling.


I am having such fun making these pages. I hope my partner likes vintage as much as I do!

Friday, March 6, 2020

Playing with scraps

Remember that "scrap roll" I made a few posts ago? I cut it up into the following: three large tags,
four journal cards, three large single pages for a journal, and a fold-over page for a journal which I will stitch into a pocket.


This is one of the journal cards that I collaged and embellished. The finished piece doesn't look anything like the original!


Tuesday, March 3, 2020

Art day and pretty cards

Last week two of my friends and I got together to make some cards that one of them had designed and prepped for us. We had a great day of friendship, eating and crafting. These are the cards we made.


Embossed backgrounds, Stampin Up stamps, watercolor, Stickles
same floral stamp as above


napkin collaged on watercolor paper, Stickles


heat-embossed beehive, Stampin Up stamps, card unties and then opens to reveal  the small
notecard on top and a tri-fold below


inside of above card - love the gold patterned paper