"Art is my vehicle through life; may we share the ride together." Ron Wickersham

Thursday, June 30, 2011

A Card!

It's been a long time since I made a card!  What with current teaching and designing commitments, I have had very little time for personal arting.  My mother loves to receive mail, especially my handmade cards, so I decided to make it a top priority to get one made for her for July 4th.


This card was relatively quick and simple as I used alot of odds and ends from previous projects.  The navy square base (old Rusty Pickle paper) was a leftover from a 4x4 swap on which I had painted and then stamped the pledge.  I covered a chipboard star with patriotic paper (also Rusty Pickle, really old, but I still love these!) and added an accordian rosette made with red, white and blue striped paper. I added some red fibers, an inked flag, and red border-punched strips. There is a tiny silver star in the center of the rosette and Stickles on the edge.

Wednesday, June 29, 2011

Altered Composition Book

Back in early June when the Great American Scrapbook Convention was in town, I helped Vicki Chrisman with Crafty Secrets teach a workshop.  One of the projects was altering a composition book with patterned papers from their new Vintage Images CD.    This CD is awesome - it works with PCs or Macs and contains 72 color paper patterns, 24 transparent overlays that can be printed as is or on colored paper for even more variations, and numerous embellishments, frames and templates.  Full instructions are included.  Both jpg and png files are included so you can either print out the patterns as is or use them digitally.  If you love vintage, you will love this!

photo from Crafty Secrets website

This is the composition book class project.  Vicki gave me one of the kits and I've finally made it up to use for notes and information pertaining to my classes and design team assignments.  Maybe now I can keep track of everything in one place!

cover of book using one of the CD patterns, crepe ribbon and a color-misted flower


front and back of the book - LOVE that pattern on back

inside covers using another pattern from CD

This was a fun project and super simple when using the papers from the CD.  I love that these are always available to me and I will never run out of a certain pattern again!

Tuesday, June 28, 2011

Family Treasure

Blogging has certainly taken the back burner the last few weeks as I've been busy with family matters. First, two of our daughters were in town for Sara's graduation ceremony (see last post) and then most of this week we were in Austin to help my husband's 86-year-old widowed aunt pack and hold a garage sale before her move to Colorado.  Downsizing after 15 years in the same house and divesting herself of many items of her 65 years of marriage was very emotional for her and it didn't help that this all happened in 100+ degrees! Needless to say, it was an exhausting and sweaty week for all of us.

The upside is that I brought home several family treasures, among them this wonderful old cookbook dated 1934! It belonged to my husband's paternal grandmother.  It is falling apart but I love that it is full of hand-written recipes, some written on scraps of paper and others written on the book itself. The pages are yellowed and spattered and you just know it was well-used and well-loved.


An added bonus was finding a few letters inside. One was written by Aunt Melba to her mother (owner of the cookbook) just before her marriage in 1946.  Another was written later by her husband to his in-laws.  Such special treasures!

Monday, June 20, 2011

We LUV Southwest Airlines

It's been a crazy, busy week here and this is one of the reasons.  Our youngest daughter, Sara, just received her SW wings at a graduation celebration on Friday that was also Southwest's 40th Anniversary.  She follows in her sister's footsteps who has been a SW flight attendant for nine years and they will both be based in Chicago!  Kelly came in town to present Sara her wings.  They are so cute together, especially in their uniforms.  (Kelly is the taller one; Sara is in blue.)


It's a tradition that each class signs a poster which hangs during graduation.  Here the girls are posed in front of the poster with Sara's official certificate.  You can even see Sara's signature in the upper left.


Now back to work!

Sunday, June 12, 2011

"Happy Family" Star Book

I wanted to share yet another project I made with the recent Front Porch Kit.   Because my children are all grown and none live locally, I don't have many family photos except from Christmas and weddings and I wasn't sure if they would coordinate with the bright colors and patterns in this kit. But I think it worked out well.

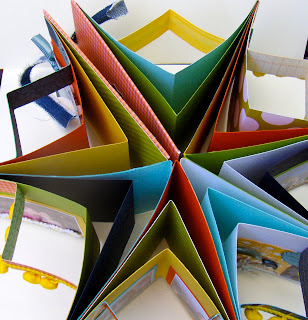
I created this star book which (closed) measures 4" tall and 6" wide.  This photo shows the book closed.


This is a closeup of the flowers.  The yellow polka dot flower was made with the "Build-a-Flower" template that is included on the CD in the kit.  Three paper flowers of different sizes are stacked together,   molded with a "rock and roll" technique and finished with a button in the center.  The dark blue coiled flower is made with a strip of denim fabric.


This is a view from the top showing the seven different "signatures" that make up the book.  You can see the star shape, hence the name of this kind of book!


On the pop-out headers at the top of each page, I alternated embellishing them with the orange rick rack and the yellow ball fringe.


On the right page below you can see the torn sandpaper strip (yes, that was in the kit!) that I added to some beach photos along with a few tiny shells.


 I color-misted all the mini scalloped chipboard pieces and used them for journaling.  A torn strip of denim was used for the closure ties.  Everything used in the book (except the shells) was in the kit and I still have lots of products left over!

Saturday, June 11, 2011

Floral Canvas Pocket Tutorial


I made this canvas pocket using two of the canvas pennants from the Front Porch Kit.  Here is the tutorial to make your own.
Floral Canvas Pocket

Supplies from the kit:
2 Maya Road canvas banners
Stella Rose “Happy  Bouquet” paper - strip approx. 1 1/2” x 5”
denim fabric - 1/2” x 10”
turquoise print fabric - 1” x 8”; 1/4” x 6”
yellow and orange print fabrics - 1/4” x 6” each
rust rick rack - 14”
teal sheer ribbon (full piece) 
1 daisy cut from daisy trim
2 large dark blue buttons
1 small yellow button
yellow balls - 4 large; 1 small
small yellow flower
glassine bag
Additional supplies used:
Liquid glue (Helmar 450 Quick Dry)
Glimmer Mist - Gold (Tattered Angels)
Tattered Florals die (Sizzix) or flower die or punch of choice
large hole scallop border punch (EK Success)
paper piercer
large-eye tapestry needle
sewing needle and thread
pinking scissors
1” circle scrap cardstock any color
Directions:

1.  Protect your work surface and spray two canvas banners with a generous layer of gold glimmer mist.  Let dry.

Tip:  Using a brayer over the surface while still wet will result in more even coverage.  Be sure to clean brayer well.
2. Turn over one canvas piece to work on the back.  Place the middle point of the length of rick rack on the center bottom point of the canvas piece and start glueing the trim along the edge. Position it so about half the width will show from the front.  


Continue glueing along one side.  Turn over to check that rick rack is peeking out from the edge.


3.  With plain canvas sides facing each other (colored sides facing out), line up both pieces (rick rack will be sandwiched between) and glue together along outer edges.  Do not glue the top edge together as this is a pocket!


4.  Border punch the strip of paper and glue along top edge of front banner piece.
Tip:  I punched twice to get scallops along both edges.  First punch the strip normally.  


Then turn the punch upside down so you can see the cutting edges.  Turn the strip around so the first punched edge is facing away from the scalloped cutting edge and align the design with the already-punched section.  The unpunched edge should be facing the back of the punch and the scallop cutting edge. 


Punch and you will have a double-edge scalloped strip.


5.   Glue four large yellow balls in 4 center holes of the paper border.


6.   Thread each end of the turquoise ribbon through the holes of the two dark blue buttons. Glue one button to each end of the paper strip.
Tip:  Cut ribbon end on a sharp angle and use a large-eye needle or tweezers to pull/poke ribbon through.
7.   Glassine Flower: Cut six pieces of glassine bag approximately 3" square (or larger than your specific flower die or punch) and die cut 6 flower shapes. Stack all six together and pierce through the center (protect your work surface with a foam piece or old mouse pad). Insert the wired yellow flower and bend the wire to hold all together. Cut off the excess wire and add glue if necessary to hold. Scrunch the flower to add dimension.


8.  Denim Flower: Add a drop of glue to the center of a scrap piece of cardstock (1" circle or  square - color doesn't matter as it won't show). Pinch one end of the denim strip and place in glue.

Hold the scrap piece in one hand and, using your dominant hand, start twisting the fabric strip. As you twist, coil around the center.

At about every quarter turn, add a drop of glue on the cardstock close to the fabric coils.


Continue until the strip is completed or you have reached the size desired.  To finish, glue the end of the strip under the cardstock scrap.  

Cut off any excess paper that shows.  Glue a small yellow ball to the center of the flower.
9.  Gathered Flower:  Use pinking scissors to pink the long edge of the larger turquoise fabric strip.  Thread a needle with sewing thread and knot the end.  Sew a small running stitch along the straight edge the entire length.  When completed, gently pull the thread to gather the strip into a tight circle.  Take a few final stitches to secure the circle and tie off with a knot.  Cut one daisy from the daisy trim and glue to the center of the flower.

10.  Glue all three flowers on canvas banner as shown.


11.  Thread one narrow strip of fabric through a small yellow button. Glue the remaining two strips to center bottom point of the pocket. (The button holes are too small to get all strips through.) Glue the threaded button over the other strips.

ENJOY!

Friday, June 10, 2011

More cards using the FPK

I created two additional cards with the kit supplies - these were for the Inspiration Gallery online and the instructions were not included on the CD in the kit.

I used several of the coordinating patterned papers from the kit for this card, stamping one of my favorite friendship sentiments on the yellow paper.  I used the wired, navy blue burlapy (is that a word?) trim across the middle.  I attached it with a strong double-sided narrow tape and then sprinkled super fine iridescent glitter in the holes.  It adds alot of sparkle!  The flower was made with one of the white glassine bags in the kit. I die-cut several layers using the Tim Holtz Tattered Florals die (the daisy-type flower), stacked and glued them together in the center and then added one of the wooden buttons with some of the yellow "stamens" around it.  I also lightly inked the petals - I was surprised that the glassine didn't resist the ink!  The bottom edge is scalloped with decorative scissors and inked with navy ink.


The card below also uses the glassine bag - this time it was embossed and die cut with a butterfly die.  I also die cut the same shape out of the orange patterned paper.  The edges of all the layers of papers are distressed and I machine stitched around the base layer to add some definition.  The white shape and coordinating stamps are from Papertrey Ink.

Thursday, June 9, 2011

Front Porch Kit Projects

I created these two cards as feature samples for this month's "One Sunny Day" kit.  The step-by-step tutorial for each of these is included on the CD enclosed with each kit.  (If you haven't ordered yours yet, go to www.frontporchkits.com to see the kit contents and the fabulous gallery of projects and order before they are gone!)  Both projects were created solely with items in the kit.

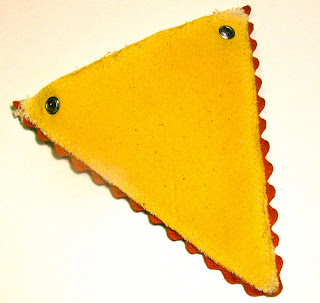
The first card is a birthday card using one of the canvas banner pennants included in the kit.  This is a Maya Road banner/album but you should see all the creative ways the design team used it - not one banner or album in all the projects!  

I cut off the top of the banner piece with the grommets (and used a strip of the canvas for tying on the little tag) and turned the pennant over to use as a party hat.  The plaid pattern was "stamped"  with a piece of the corrugated cardboard cut from the kit box.  I used orange paint in one direction, let it dry and then restamped with teal paint in the opposite direction to form the plaid.  The "pouf" on top of the hat is flower stamens included in the kit.


The second card is a pool party invitation.  A package of Thickers alpha stickers was in the kit.  I misted "pool" with Maya Road mist and added Glossy Accents when dry.  I left the remaining letters white but inked the edges lightly.  The water is two layers of the wide, lacy trim that's in the kit. The top layer is left loose and ruffly.  I created the wavy background on the white card base by glueing yarn from the kit to a strip of cardstock and then inking it and stamping on the background.  The flip-flops were hand-drawn and cut from one of the patterned papers.

Monday, June 6, 2011

New FPK Blog and Full Reveal

Front Porch Kits now has it's own blog! You can check it out here and become a follower so you don't miss out on any creative fun!

And I just realized in the commotion of this weekend, I forgot to post the full kit reveal. So, drumroll, here it is - One Sunny Day.  The colors and textures are delicious!  Be sure to wander over to either the blog (above) or the website (www.frontporchkits.com) to see the complete listing of the contents and browse the gallery of fantastic projects made by the design team this month.


I'll be back tomorrow to share a few of the projects I created.

Sunday, June 5, 2011

Great American Scrapbook Convention

The convention has come and gone and I'm totally wiped out. I spent three long days there working both the Little Blue House booth and helping in the Crafty Secrets booth.

We (or I should say Tracy's woodworking master of a hubbie) recreated the LBH front porch as our backdrop.  We even had an old screen door to display the contents of this month's Front Porch Kit  and a six-pane window that is a current class project.


Isn't the booth cute? It attracted alot of attention at the show.  We packed alot into that 10x10 space!  We did make-n-takes all three days at the table on the left, creating a "blooming pin" with three Build-a-Flowers (template in the current FPKit) and felt leaves.  It was very popular and we had people waiting in line most of the time.  


Here are (from right to left) Rhonda, Elaine, Tracy and I just before the show opened.  No photos were taken at the end - we were all too exhausted!  It was tons of fun and we saw alot of our regular customers and some faces we haven't seen in awhile!  Thanks to all of you who stopped by and said hello!

Saturday, June 4, 2011

Busy. busy, busy

The Great American Scrapbook Convention is here in town this weekend and I've been running for days!  The Little Blue House has a booth there and we prepared for almost 500 make-and-takes!

I spent all day yesterday teaching "build-a-flowers" and helping man the booth and all day today helping out in the Crafty Secrets booth (love that store - fantastic products and fantastic people).  It was such fun to catch up with my good friend, Vicki Chrisman, who does the Crafty Secrets make-and-takes and is their Design Team Leader.  She and I have known each other for several years (met online) and see each other every June at the convention.  I was lucky enough to be able to help her teach her Alice in Wonderland class today.


After closing the convention this evening, we rushed back to the LBH for our Friday Night Live U-stream webcast at 8:30 pm.  Our June Front Porch Kit was revealed and is now available for purchase on the website.

And tomorrow it's back to the convention for another full day!  Guess I'd better get to bed - this night owl has to get up at the crack of dawn!

Friday, June 3, 2011

Friday Night Live!


Order the newest Front Porch Kit now!  They won't last, I'm sure.  They can be purchased online at www.frontporchkits.com or come by The Little Blue House to get yours today.  And don't forget to tune in tonight at 8:30 pm CST for the latest Friday Night Live.  We'll be showing the kit products and doing a few projects, one of which is the Build-a-Flower.  (The template is included in this month's kit.)  See you tonight!

Thursday, June 2, 2011

Today's the Day!

Check out the newest Front Porch Kit "One Sunny Day" at www.frontporchkits.com which is now LIVE on the website! You can now order it there or, if you are at the Great American Scrapbook Convention in Arlington, TX, this weekend, we will have kits there to purchase.  Thursday (today) through Saturday come drop by our front porch (Booth #1111) on the back wall of the convention center to see all the fantastic designer projects made with this kit.  We will have a fun make-n-take too!

Don't forget to join us for Friday Night Live at The Little Blue House on  Ustream - www.ustreamtv.com/channel/front-porch-kits.  Tune in at 8:30 pm CST (or earlier if you want to see the "preshow".)  We'll be showing the new kit as well as doing a few mini-tutorials. Shades and flip flops required for One Sunny Day!

Wednesday, June 1, 2011

One day to reveal

Only one more day til the Thursday full reveal of our newest Front Porch Kit "One Sunny Day."  Pre-orders are being taken now online at www.frontporchkits.com or by phone or in person at The Little Blue House at 817-431-7930. 

Here are a few more peek at the awesome goodies included in this kit.  Love those polka dots!


Lots of teal and yellow this month. 


Here is a peek at one of my projects from the kit.  This was particularly fun to work on.


And here's part of another project. What could that flower be made of?


Remember to check back on the LBH blog (click HERE) tomorrow for the full reveal of the kit.  And don't forget to come by our booth (#1111) at the Great American Scrapbook Convention in Arlington, TX, this weekend where you can create a cute make-n-take and see the kit and the designer projects up-close-and-personal. Hope to see you there!