"Art is my vehicle through life; may we share the ride together." Ron Wickersham

Sunday, July 31, 2011

Art Journaling again

It's been awhile since I've done any art journaling. It's crazy that we let ourselves get too busy to do what we really want to do!

I signed up last week for Christy Tomlinson's online 3Hearts Workshop and am getting inspired again to journal.  We are also working on funky art journals in the Blue House Art Group so I have double motivation to do this. 

I made this page in stages.  The background was made while demoing to the art group how to apply paints randomly to a surface with an old credit card.  I did this on the back of an old, large (5" x 7") Heidi Swapp playing card I had. You can see some of the original black background with white polka dots peeking through. I had no idea what more to add until I was rummaging through old scraps of "stuff" and found this sample I'd made years ago using a great heart background stamp, beeswax and crayons.  The colors were perfect so I added it to the page.  It still needed something more, so I added some torn strips of the black and white polka dot tape I'd recently gotten with my Smashbook.  I'm loving that my sample finally has a home!


Here's the other side of the card.  I still need to work on this, but I like the image so will have to incorporate it into the page.


I've pre-gessoed several pages in another journal so I'm off to play some more...

Friday, July 29, 2011

Game On Diet

I'm four days into a new diet/habit-changing plan.  It all started when Tracy (owner of the LBH) and her family heard about this new plan and decided to take it on.  One of the premises is that competition helps, so you form teams (even one-on-one) to help you stay focused for the month-long diet.  Tracy determined that she would do better if those of us at the LBH also joined her, so, after much cajoling and persuading, we did.

You can find out more details of this on the website www.gameondiet.com, but basically the rules are: 5 small meals per day consisting of one protein, one carb, one healthy fat (min. of 4 vegetables per day); no soda (not even diet) or alcohol; 20 min. exercise daily; minimum of 7 hours sleep each night; 3 liters of water daily; adding one healthy habit (and doing it every day) and eliminating one bad habit (also every day); and communicating with both teammates and opponents.

So far I'm doing ok on the food portion and find I'm not even hungry, probably because I'm eating so often! What's hard is giving up chocolate, sweets and Diet Coke, though, surprisingly, it's not as bad as I feared.  I'm even managing to get 7 hours of sleep in - usually I only get 5-6.  I am normally a water drinker so I wasn't worried about the water rule, but 3 liters is ALOT! I'm drinking constantly to get it all in. (Maybe that's for men...) Every day I'm drinking more, but have only managed the 3 ltrs once.  As far as exercise, let's just say I'm trying and have walked a few days. I also did heavy cleaning on my day off - maybe that counts...

Almost a month to go - we'll see what happens.  Wish me luck!

Tuesday, July 26, 2011

Using up Scraps

Warning: Lots of photos!

This is a little scrapbook (literally, as I made it with all the scraps left over from one of the Front Porch Kits!).  The prototype for this was a Scrapstasher's project at the Little Blue House a few months ago.  The book is 6"x6" and the basic structure uses a 6"x12" piece of cardstock for each page.  In this book I used 6 pages and a front and back 6" square cover.

All pages were folded in half to make fold-out pages. Then I cut a 1" x 6" strip off three pages to leave room for the binding.  The uncut edge will be on the binding side.  For the remaining three pages I made a one-inch cut along the fold and then cut an inch strip from that point to one short edge of the cardstock.  These pages either flip up or down, depending whether you place the fold at the top of the book or the bottom.  (This will be clearer when you see the photos below.)

For the cover, I cut several 2" x 4" rectangles of coordinating patterned papers and then cut each piece diagonally from one corner to the opposite corner.  This results in long triangles.  These are then arranged around the center point of a 6" square base.  Line up the four triangles on the corners and then fill in with other triangles, overlapping slightly as necessary.  Adhere everything down and cut off the excess papers.  You don't have to worry about how the center looks with all those points coming together as it will be covered with a cardstock circle (I used a 3" one) along with pretty buttons.


Finished cover

Inside front cover and first page, closed

First page - flips out to right

Back of first page and second page, closed

Second page - flips up

Back of second page and third page, closed

Third page flips out to right

Back of third page and fourth page, closed

Fourth page - flips down

Back of fourth page and fifth page, closed

Fifth page flips out to right

Back of fifth page and sixth page, closed

Sixth page - flips up

Back of sixth page and inside back cover

Back cover

This is a great project to use up scraps, especially if you use leftovers from a specific project or a kit as they will all coordinate.  Here is the small pile of scraps from the Front Porch Kit that I had left after making this book.  The largest pieces are the floral print and the yellow print on the left! All the rest will be going into the wastebasket!


This is a fun little minibook and can hold alot of photos - mine will hold 25!  They make nice, quick gifts especially for people who don't make paper crafts or don't have time.  It will be going to one of my daughters to fill with special memories.

Sunday, July 24, 2011

Make-and-Takes from Retreat

Here are a few more fun small projects we made at the Artful Gathering last week.  It's always fun to see what little make-and-takes everyone brings to share.

simple layered card

paper-piecing

card made from my leftover scraps


tag with real seed packet

back of tag
This was a "corsage" we made and wore all weekend using a small children's garden glove, silk flowers and ribbons, and a tiny garden tool.


Saturday, July 23, 2011

You're Invited to Black Velvet Halloween Retreat

Do you love Halloween?  Would you like to get away for the weekend, immerse yourself in four delightful Halloween projects and learn some new techniques?  Then this is the event for you.

Black Velvet Halloween
October 1 and 2, 2011
Artful Gatherings Studio
McGregor, TX


You will make FOUR projects!  First up is the "Beware" Halloween Banner which I will be teaching.


Black Cat Wooden Torso Doll by Jeri Aaron


Spine-Tingling Black Velvet Halloween Book by Linda Findley

Witchy Woman Beeswax  Collage by Sherry Schoenfeldt


Check out the blog for all the details and sign up now. You don't want to miss out on this fun opportunity!

Friday, July 22, 2011

My second retreat

I returned home from the Artful Gathering last Sunday and left again on Monday morning for our LBH (Little Blue House) Gals retreat!  The one good thing about doing back-to-back retreats is you don't have to do much unpacking/repacking.  I just added to the pile...

This retreat was much smaller - only Tracy (store owner), Elaine (other instructor) and myself were there the entire time. We were intermittently joined by Rhonda (store manager), Kristen (sales associate) and Rachel (part-time sales associate and prep assistant).  Kristen and Rachel are Tracy's daughters, so this was an intimate, "family" affair.  We each had a six-foot table to ourselves plus another room to spread out our stuff. We ate, slept, talked, laughed, rested and arted for three whole days! Awesome!

I wasn't as prepared as I could have been for three days, but I did manage to get several projects finished as well as getting caught up on much-needed sleep.

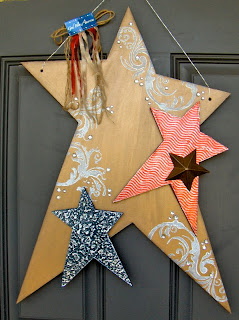
As teachers, we don't always have time to do the class projects for ourselves, so several of us took these projects to the retreat.  This is our patriotic star door hanger which I finally was able to create. It is now hanging on my front door - a little late for July 4th, but at least I'll be in time for Labor Day!  That's the great thing about patriotic decor - it can last from Memorial Day through Labor Day.


The three larger stars are wooden and the smallest is painted paper mache.  The largest is painted with a metallic "Rich Espresso" paint with the flourishes stamped in white paint.  The red and blue stars are covered with embossed and sanded Ten Seconds Studio art metal.


Then I made this darling plaque to hold paintbrushes or art tools. Tracy had made this as an inspiration sample for this month's Front Porch Kit (still a few more available).  I still had leftover papers and supplies in my kit so this was easy to recreate.  It uses the wooden plaque (Hank the Plank) from our very first kit.


I also made this 8" x 10" canvas using more leftovers from the kit.  I painted the canvas dark brown and adhered a piece of denim, two patterned papers, a piece of mesh and a cardstock photo mat (all from the kit).  The photo is of two of my daughters, Kelly and Sara, in Chicago this spring, just before Kelly moved to Austin.  

The white flower and butterfly were made for my tutorial on the Front Porch Kits blog here, so it was fun to be able to use them for another project.  The paper flower under the silk teal flower was misted with Maya Mist.  The title in the upper left is a sticker from the kit that I added to cardstock and popped up for added dimension.  This will be going to one of the girls so I am now in the process of recreating it for the other one!

Thursday, July 21, 2011

Chunky Garden Book

Two posts in one day - wow! But there's so much to share after the retreat.

The big book project during this year's Artful Gathering was this gorgeous chunky garden book. I finished mine during the retreat but needed to add a few more finishing touches when I got home.  This book was a collaborative effort - six artists designed and created the prototype for one page spread each.  We used 7 Gypsies Conservatory papers throughout along with their book covers.

 This is the first spread, designed by my dear friend, Julie. She used lots of lace, glitz and flowers on this page.  The long ruffle mimics a Prima ruffle - we hand-pleated both  crepe and tulle together and glued to the page, adding the rhinestones down the center to hide the glue.  I love this page - you would never know that Julie has four boys!
 This is Jean's spread, using lots of transparencies and vellum. Jean had half the work done for us as she had Xyroned everything so adhesive wouldn't show.  I love the dragonfly stamp and how we used Angelina fibers on the wings.
Even the back of the tag was decorated with stamped "deli paper."

This page, by Joan, was an engineering feat!  The Cricut gates were adhered to chipboard covered with text pages and hinged on to the main page.

 This photo shows the left gate open. The eggs were cut out of the printed paper but almost look dimensional with the burlap and moss around them.


 A view of the right side with the gate open.
This is the spread Kris created - she loves birds!  The iris is printed on vellum and laid over the paper background. Below it is a small paper sack/envelope for a little tag. On the right page there is a small piece of real masking tape placed over the masking tape image on the paper. It's hard to see, but there is a Tattered Florals layered flower in the lower right corner and it's very dimensional.
The leader of the group and organizer of the event, Jeri, made this spread. She left it very spare so we could add lots of the little trinkets we acquired or made during the retreat.  There are two circular pockets on the right to hold memorabilia and on the left I added the burlap pocket and goodies from Joan and Diann.

These are the items in the pockets: a tiny "sweet basil" card which opens to reveal a pesto recipe; a "parsley" ATC; a  floral playing card; and another ATC with a coin envelope.
This page was created by Joanne who did not attend the gathering.  The background is a photocopy of a garden.  The statues were printed on what looks like a matte sticker paper and, when adhered, look like vellum - very soft.

This is the front of the book.  The ribbons are decoration only and are not holding the book together.  The page spreads are actually adhered back-to-back and then to the covers to bind the book.
The book is so fat and chunky that it won't stay closed, which I love!  I made this closure after getting the idea from Linda F (thanks!!). I took two little binder clips and ran a length of chain through them.  I added a few jump rings with a piece of old jewelry, a Tim Holtz trinket pin and key, and a small TH fragment covered in alcohol ink on which I wrote the date for the retreat.  When looking at the book you simply remove the clip from the front cover and clip it to the back cover until you want to close the book again.


This was so much fun to make and there are so many techniques covered in so few pages. Thank you to the ladies who designed it and shared their talent with us. It is certainly a treasure and a wonderful memento of a fabulous weekend!

Next year's theme is "Christmas in July" and I can hardly wait!

More flower pages

Here are more of the "skinny" flower pages we swapped at my last retreat (the Artful Gathering).

poppy by Dee with pretty punched birder and a tiny 3D bee


Sue D's orchids

zinnias by Dawn - love how she signed on the stem

Julie's peony - from her yard

more zinnias from Claudia

Linda F's calla lily - love the banner and tissue tape

a photo of Jean's rose in her yard

dahlia by Renee with a darling butterfly stamp

a sunflower tag in a tiny envelope from Kris
Aren't they all wonderful? I'm always amazed at the uniqueness and creativity of all the pages when we do a swap like this. So many ideas!