"Art is my vehicle through life; may we share the ride together." Ron Wickersham

Tuesday, August 28, 2012

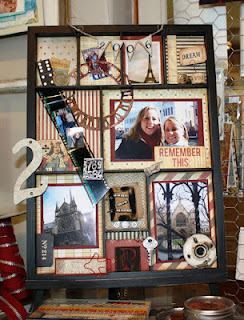
Altered 7 Gypsies Tray Class

We're still taking sign ups at The Little Blue House for this fun altered tray. I loved making this, using pretty 7 Gypsies papers and some vintage pieces like the doorknob base, real filmstrip and a little booklet created with cardboard slide mounts.  It's perfect for favorite photos from a memorable trip!


If you'd like to create your own memory tray, contact the LBH soon to reserve your seat!

Friday, August 24, 2012

What would you make with a coffee cup sleeve?

I am hosting a swap this month and the theme is to use a coffee cup sleeve in any project.  This is what I came up with: two little mini notebooks made from just one sleeve!


I used scrap papers to cover either the inside or outside covers and painted the remaining covers. For the booklet, I cut a sheet of thin white copy paper into multiple pages, folded them in half and stacked inside the covers. Then I punched holes to sew pearl cotton through to keep the pages intact. 

This was a fun and quick project and a great way to recycle coffee sleeves and scrap papers and embellishments.

Wednesday, August 22, 2012

A Card for All Seasons

The next Card Keepers Class at The Little Blue House will feature four cards, one for each season of the year. Using the same basic design, each "Front Door" is decorated for a particular season or holiday.

Spring

Summer

Fall

Winter


These are so much fun to make!! 

Come join us on Tuesday, August 28, either daytime (10 am - 1 pm) or evening (6 - 9 pm).  Reservations are being taken now - call the store at 817-431-7930 or stop by to sign up.

Friday, August 17, 2012

"Play" Activity Bag

I'm back with yet another project I created for the current "Just Add Water" Front Porch Kit.  I had alot of fun with this one, especially since it was a challenge to come up with ways to create the parts and pieces.

A natural canvas bag is one of the surfaces in this kit (we affectionately call her "Callie Canvas") and I wanted to use it in an unconventional way.  Here she is finished as an activity bag for taking to the park, the beach or even on a car trip.


I slit the sides of the bag and glued the raw edges down so the bag could be opened flat for playing games.  I punched holes along the edges with a Crop-a-dile and threaded various ribbons and trims through to tie the bag back together when it's not being used.

Here is one side of the inside of the bag. I used painter's low-tack tape to tape off the checkerboard pattern and painted with two colors of acrylic paint.  The checkers were made by glueing scraps of the printed papers from the kit onto pieces of the cardboard box (that the kit came in) and then diecutting one-inch circles and hearts for the game pieces.  I made a cute little drawstring bag to keep the pieces in when not in use and this ties onto one of the straps. Since many people don't sew, I used hot glue for this to show that it can be done without sewing.


The other side of the bag has a 9-inch square of one of the tone-on-tone prints from the kit glued to the canvas. I glued apiece of lightweight, rigid acrylic also cut 9 inches square over the paper to create a dry-erase board. I tore strips of two coordinating fabrics and tied into knots to embellish the corners.  A small piece of coral lace was glued into a tube at the bottom of the board to hold a dry-erase marker.


The outside of the bag is collaged with pages from word-game books and embellished with my favorite part of the entire project - the little chipboard word.  This was the front cover of the chipboard book included in the kit.  


I mixed embossing paste and Dylusions Spray Ink together to make a gorgeous shade of turquoise and spread this generously all over the top of the chipboard word.


While it was still wet I laid a piece of sequin waste ribbon (most people will recognize this specialty ribbon as homecoming mums ribbon) over the paste and gently removed it.  This creates a wonderful pattern and, once dry, it can be inked to enhance the design.


I added Glossy Accents to make it shiny and tied a strip lace through the hole before glueing it to the front of the bag.  Below is a close-up to show the wonderful dimension and texture.


As you can see from the different projects I made with this kit (and if you've visited the online gallery to see ALL the amazing projects), this is a fantastic, really versatile kit.  There are still a few remaining kits which can be ordered online (www.thelittlebluehouseonline.com) or by visiting or calling The Little Blue House at 817-431-7930.  So be sure to get yours while they last!


Monday, August 13, 2012

Altered Bottle

Another project I created for the recent Front Porch Kit is this altered bottle. I thought the colors and beach theme fit well and I even added a "message in a bottle" by rolling up a page from an old book and inserting it into the bottle.


I used alcohol inks to color inside the bottle, dripping them inside and rolling the bottle around until they dried.  The threads of the bottle neck are covered with silver metal tape and I inserted a cork covered with a piece of fiber from the kit.  Two stacked buttons are glued to the top of the cork.  I made several paper beads with the kit's printed papers and threaded them, along with some of the beads from the kit, onto fibers tied around the neck. I also stamped a starfish on shrink plastic and wired it to the top of the bottle.

I used Viva Decor Inka Gold on the metal filigree piece and glued it to the side of the bottle and added an old photograph of my mother-in-law and her friend (circa 1935). I glued crushed shells, blue glass beads and some gathered net trim to the base.  The coral seashell is a portion of an accordion-folded rosette topped with one of the beads from the kit.


I loved using some of the kit contents in a unique way - a little "out of the box" from the usual paper projects.

Friday, August 10, 2012

It's been a week

since I last posted - how can that be?  There's been alot going on...


Last weekend, this little guy came to visit. We are having so much fun with him! He's now 4 1/2 months old and at such a cute age.

Sunday I left for a four-day art retreat with my co-workers, the LBH gals.  We had such a fun and relaxing (but not restful) time, working on our own projects, brainstorming and planning future events and class features for the store and having great girlfriend time!  Now back to real life...

Here's another project I created with the "Just Add Water" Front Porch Kit. Many of the papers and embellishments were beachy/watery colors and themed, but several items, when separated out, could be used in a totally different way.  For this project, I used the pink printed papers and cardstock along with the chipboard minibook pages to create a name banner for a new baby girl. The nursery colors are pink and green and there was no appropriate green in the kit, so I used the ivory cardstock for the letters (Storybook Cricut cartridge) and inked with light green ink.


And, not to play favorites, here's my other favorite little man, Drew, now one month old!

Friday, August 3, 2012

Check this out!

We're on Scrap Scene today! Click on this link to read all about the newest Front Porch Kit.

Thursday, August 2, 2012

Tub Time Layout


As promised, I'm back to tell you a bit about the layout I created for the Just Add Water kit.  These photos are of my grandson in April. It wasn't his first bath, but the first bath I was present for.  He started out liking it - until his mom got water in his eyes. Then he was inconsolable!  I decided to use these photos for the layout since the colors were perfect for some of the papers in the kit. I also wanted to show that "just add water" doesn't only refer to beach or pool subjects!


I tore the two patterned papers for the background and didn't ink the edges because I wanted the white edges to simulate the water.  I used a wave type border punch on the teal cardstock piece.  The journal card included in the kit was perfect for adding the date and brief journaling


In this closeup you can see the blue beads that I scattered throughout the layout.  The kit includes a length of clear plastic tubing which I sliced in tiny slivers to also add randomly over the layout. Both these elements suggest bubbles.


Also in the kit is a piece of beach towel which I cut into a strip and knotted to add both texture and dimension.  

I had fun with this layout and enjoyed capturing this special moment in my grandson's life.

If you haven't already, be sure to check out the Inspiration Gallery HERE to see all the fabulous projects created by the FPK Design Team. They are really amazing!  You can still order this kit online at www.thelittlebluehouseonline.com or stop by the Little Blue House to get yours today!