"Art is my vehicle through life; may we share the ride together." Ron Wickersham

Wednesday, May 18, 2016

DLP unPlanner - May Week 2

Here is the weekly spread for the second week of May.


It was a fairly quiet week - no babysitting for a change!


I decided to do another Dare 2B card this month. I chose the words "patient" and "positive." We are about to leave on a 2 1/2 week adventure and I will need lots of patience and positive thoughts!

Our former exchange student's sister and her husband are arriving on May 22 in Orlando and we are meeting them there. They will visit the Disney parks and we will visit some friends there for a few days. Halfway through the week Kelly, Josh, Carl and Mitchell will arrive and stay for a few days to go to the beach.  

We will leave there on May 27, all four of us flying non-rev(!?) to Washington, DC for a week. Dana, John, Drew and Grant will spend that week with us touring DC.

Then we will fly to Albuquerque and drive the Brazilians up to Colorado to see the Rocky Mountains.    
Whew! You can see why I'm hoping for patience and positive thoughts with so many people and schedules involved.


For this month's Dare 2B card, I used collage paper for the spine, lightly watercolored the page and used the "waste" edge of the circle sticker sheet for the right side embellishment. A few stamps finished it off. 

The art challenge for the PAC this week was to use underpaper - the scrap paper you use to keep your work table clean or clean your brushes on. Usually this is thrown away but I like to keep many of mine as they end up so pretty!

Here's the card with the under paper adhered to it.


And here is the finished PAC. I added a few splotches of paint with a brush; stenciled with turquoise, purple and white paints and stamped with black. I doodled with black and white pens and used a portion of a Dyan Reaveley stamp for the sentiment.


I'm sure I will fall behind in the next several weeks due to the traveling. I am taking a small notebook to document the days so I won't forget and can transfer the information to the binder when I return. But I still will have a lot of catchup to do! And I hope to check in here sometimes.


Wednesday, May 11, 2016

DLP unPlanner 2016 - May - Wk 1 PAC

The art challenge for this week's PAC is to add your name in a creative way.

Not sure what direction I was going to take, I just started by adding leftover alpha stickers to a blank card. These were mostly consonants and letters you don't often use and I just wanted to get rid of it (without throwing it away). This is what it first looked like.


Then I added a few coats of white gesso.


Next I blended several colors of Intense Blocks with water and a brush. I used these because they are permanent when dry.


The last few steps included adding a bit of yellow Distress Crayon and blending it in with my finger, painting over the letters of my name (totally unplanned, but they were all there!) and adding a ruffle of some cute fabric.  I outlined the letters in black and added Stickles to make my name pop. Done!


PS - If you look at the first photo you will notice that I really didn't have an "a" on there, but the "d" worked perfectly by just ignoring it's upper section.

Monday, May 9, 2016

DLP unPlanner 2016 - May - Wk. 1

May Theme - A Look Through My Eyes: Gaining New Perspectives

I've started a new binder! The first one held four months so I am hoping this one will too.

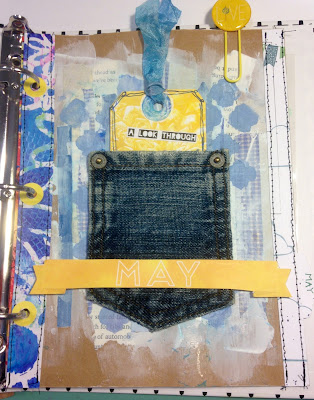
Here's my May divider page. As usual, I've added a pocket on the front (this time a real denim pocket from a child's pair of jeans) to hold a tag with the monthly theme. I thought the eye image downloaded from the internet went with the theme.


I printed the monthly calendar on the back of the divider to save space. Lots of stamped/doodled flowers and some washi tape. The pennants are cut from the May calendar that was included in the kit.


And Week 1. I stamped and embossed the dates and days of the week in white - love the look on the kraft paper. The scrolls are stenciled with yellow paint. You can see from my handmade LBH "stickers" that I was there quite a bit this past week! National Scrapbook Day/Week was busy for us.


I'm currently working on the PAC for the week.

Friday, May 6, 2016

DLP unPlanner - last week of April


Final week in April - for the background I put 2-3 colors of Distress Ink on acrylic blocks, misted with water and then pressed onto page. This gave me a random watercolor look.


The art challenge for the PAC this week was "Use a color you usually avoid."  I used purple as I don't use it often. I struggled with this because of the color and it kept getting too dark. Finally I just walked away. Adding scallops cut from a piece of printed paper on the left helped some and also the white splatters. I finished it off with some messy stitching on the side to give it some texture. (This was created on an actual playing card which is the same size as an ATC/PAC.)

Front of pocket page protector

In my monthly pocket I added a tag I watercolored in the "Creating in Faith" workshop I took with Jamie Doughtery early in the month.  The remainder consists mostly of photos of my grand boys since we spent a good portion of the month babysitting and spent one busy, fun-filled weekend with all of them.

Back of page protector

One fun note - I embroidered a blanket stitch on the edge of the plastic protector as some of the DLP gals have been doing. I love that it adds some fun color and texture. Will be doing that again!


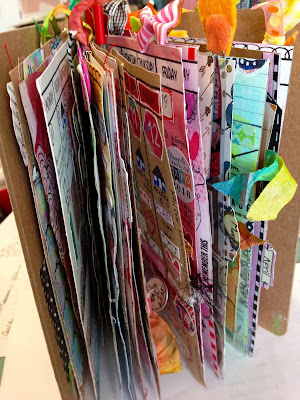
As I finish up April, I am also done with Binder #1! Four months of 2016! It is bursting at the seams as you can see below with lots of colorful yumminess throughout! I love it! 


Here is the very simple cover I did - a little gesso, stamps, stencil and paint and some drips. I'm cinching it together with an elastic band so it will stay closed!


On to May and the second "third" of the year. Hope I manage to get four months in the next binder!

Wednesday, May 4, 2016

"ART" Artsy Canvas


Yesterday I posted this canvas I created for a recent swap. It changed a lot along the way, so I thought I would share the process along with some photos I managed to take while creating.


The first step was adding inky, "dirty" paper towels to the canvas with a 50/50 mixture of gesso and mat medium - a "faux" plaster technique. I separated the plies of paper towel to add just one ply and "smoothed" this into the wet mixture creating wrinkles and texture. 


Once fully dry (takes quite awhile) I covered it all with another coat of gesso. Note - if your towels have spray ink or other mediums on them, which are not permanent, you will never get back to pure white! But it's a great way to avoid the "blank canvas" syndrome.


When that was dry, I added modeling paste through an irregular diamond-pattern stencil.


Next came the fun part - adding all the bits and bobs.  In this photo you can really see what all I added - everything but the kitchen sink! I had forgotten to clean my paintbrush with gesso in it and it sat overnight. It was unsalvageable so I decided to add it to my piece. Other things added were: buttons, a plaster frame, chipboard pieces, screws, paper flowers, beads, bottle cap, resin flower, hinge, wood plug and a few assorted metal pieces.


Several more coats of white gesso blended everything together to prepare for the colors. 

Here's where I stopped taking photos! I added turquoise and magenta spray inks, blotting up and adding more until I was happy with the look. The finishing touches were dry-brushing over textures with gesso and adding some silver metallic paste to some high areas.

This is such a fun technique - I hope I've inspired you to make one of your own!

Tuesday, May 3, 2016

Artsy Canvas Swap

I recently hosted an "Artsy Canvas" swap on an online group. The challenge was to create a "Finnabair" style canvas. Finnabair is actually Anna Dabrowska, a Finnish mixed media artist known for her elaborate, three-dimensional canvases. Her "signature" is lots of various embellishments, including lots of metal, covered in either black or white gesso and then colored with different paints and spray inks.

The canvases were to be smaller than 5 x 7" and we sent one and received one in return.


I created on a 6 x 6" square burlap canvas because that's what I had in my stash. Since I piled on so many embellishments, I added additional support on the back of the canvas by glueing on a piece of cardboard.  There were many steps to accomplishing this mixed media piece - tomorrow I will share more about the process.


I received this lovely canvas board from Shellie. It's a beautiful pastel background with lots of added embellishments.