"Art is my vehicle through life; may we share the ride together." Ron Wickersham

Wednesday, May 30, 2007

Fourth page completed!


Finished the fourth page of the color swap tonight. The colors for this were "sunny orange, lemon yellor, pink and a dash of red." I painted the background with all the colors a few days ago and let it sit until I became inspired. When I looked at it today, it said "Zetti" to me (i.e. the Zettiology/Teesha Moore style.) The face is from one of Teesha's collage sheets and most of the other images were cut freeform from scrap papers and magazines. The curlycue and arms are stamps and some of the shapes are outlined with oil pastels. This was totally fun to do!

Tuesday, May 29, 2007

My third "color" page


I just finished my third page for the color swap - this color scheme was "the blue that is popular now" and burnt umber. I painted the background with blue and burnt umber using the edge of a credit card instead of a brush and added torn music pages which were antiqued with a gel glaze. I then stamped randomly with a text stamp and a harlequin background, created radiating brush strokes with gesso and adhered a copy of an angel statue and a strip cut from a patterned paper. I now have three down and seven to go!

Sunday, May 27, 2007

I won "Blog of the Day" Award


I can't believe it! I won the "Best Blog of the Day" Award today! WOW - my head's in the clouds. (Thanks for the nomination Katherine!) This is just too incredible.

Thursday, May 24, 2007

"One sheet wonder" cards


Tuesday night my local stamp group got together and made "one sheet wonder" cards. We took a 12" x 12" piece of patterned paper (you could also stamp your own) and made specific cuts. Then, with these pieces together with scraps of coordinating cardstock, white cards, and various stamps and embellishments, we followed "recipes" to make 16 cards! I didn't finish them all that night, but managed to complete them today. (The light green patterned paper was what I started with.)

Monday, May 21, 2007

Another "color" page


I've finished my second page for the Color Swap I'm in. (I posted earlier about this.) The color scheme for this page is "yellow ochre and tomato red." The page measures 8 1/2" x 11." I used the "magazine scrunchie technique" developed by Sherre (check out an older post on her blog: http://sherresartmusings.blogspot.com) where you scrunch up a magazine page, then flatten it out and adhere to a cardstock base. I then added inks, gesso and paints until I liked the colors. I stamped and added torn text scraps. The clock and flowers were cut from magazines, the woman is an internet image, the words were a stamped quote and cut apart, and the stripes along the bottom edge are from a napkin. Clicking on the photos should enlarge them and you can get an idea of the rich background texture.


The first picture shows the initial stage just after adhering the scrunched magazine and adding some inks and paints. The second photo shows the finished collage for Anita.
This was a challenge for me as I do not usually work with these colors! Using this technique helped me get over the blank white page syndrome and the collage just developed from there.

Stamp Club card

It's been a busy week for me, but I have managed to get some art done. I went to a stamp club last night and made the cutest card. It's so unique and is interactive - two little flaps pop up when the card is "open." All the stamps and inks were Stampin Up. Thanks Sharon for showing us how to do this.

Wednesday, May 16, 2007

My first scrapbook page


I have recently started working at a scrapbook store, Recollections. All the employees have to make a scrapbook page about themselves to hang in the scrap room so other employees and customers can get to know us. I have been procrastinating on this as I am not a scrapbooker! I do collage and rubber stamping and altered arts. So this was a stretch for me. I finished it today and it's not nearly as extravagant and embellished as the others. It certainly didn't help that I only had one current photo of the entire family and that was taken at Christmas. At least I don't have to worry about it anymore!

Color Swap


What was I thinking? A friend asked me two months ago to join a color swap with 11 other artists and I said yes! The due date was in July - so far away at the time. Well, now it's creeping up on me and I need to get in gear! Everyone chose a color or colors for their own "book" and each artist must make an 8 1/2" by 11" collage page using that color scheme for each participant. The hardest part of this is not knowing most of the artists.
I have just finished my first page - this one was for "cream to sepia." My first thought for these colors was vintage and, since that's my favorite theme, I started with this one. I hope it's cream and sepia enough!

Monday, May 14, 2007

A different artform


Take a look at the beautiful Edible Arrangement of fruit I received for Mother's Day from one of my daughters. The "daisies" are made of pineapple with cantaloupe balls for the centers; other "flowers" are chocolate covered strawberries. Grapes threaded on skewers form the vertical "flowers" and the foliage is cabbage leaves. The best part is it's as delicious as it is pretty. Thank you Kelly!

Sunday, May 13, 2007

Happy Mother's Day!

I hope all of you mothers had a wonderful day spent with your loved ones doing what makes you happy. I had to work all afternoon, but since I love working at the scrapbook store, I didn't mind.


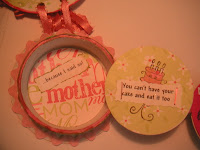
Now that the day is almost over, I can post the little circle book I made for my mother. The title is "Motherisms - things Mom always said." It is made from a cardboard ribbon spool. I removed one end of the spool, covered the outside with patterned papers and wrapped ribbon around the outside of the "core." The book itself is made with circles of cardstock, decorated with stamps, images, handwriting, brads, ribbons etc. I laid half the circles upside down in a row and glued a length of ribbon over them with approximately a 1/4" space between each. The I adhered the remaining circle pages on top of the ribbon. The last page is just one-sided and glued to the bottom inside of the spool. The first page has a little length of ribbon attached to pull the book out. The "cover" is the top of the ribbon spool. I set two eyelets in the top and two in the side of the spool. Ribbon was threaded through and tied in bows to form the "hinge." To keep everything intact, I added a band made with border-punched white cardstock and ribbon which slips over the book.


I had lots of fun making this, thinking of and remembering all those "motherisms." I hope she enjoys it. Remember to click on photos if you want to see close-ups. (EDIT: For some reason clicking on the photos was not working. I have just spent at least an hour reloading the photos, sometimes multiple times, and all are enlarging except the last one. I have no idea what's happening with Blogger...)

Thursday, May 10, 2007

Ribbon Storage


I am constantly looking for great storage and organizing options. I have tried several different methods of storing my many spools of ribbon: on dowels suspended between two lengths of chain mounted on the back of my studio door (I liked this, but it wasn't portable enough); on a long dowel on two hooks hung on my wire shelves above my art desk; in Iris cart drawers (too messy); in the cardboard display racks used by the craft stores (I really liked this but just don't have much wall space to spare); and, most recently, I had them in four plastic ribbon boxes from Target (like shoeboxes with holes in side for ribbons to thread through). Again, this took up shelf space
Yesterday I found a pants hanger at Target and came home and organized my ribbons. This hanger is made for hanging 5 pairs of pants with four swing-arm bars. I was able to fit all my ribbons except the whites and metallics. As you can see, it's very compact, will take up little space on a hook or in the closet and is easily transportable. I used tiny sequin pins to secure the ends of the ribbons so they won't become a tangled mess. And, it was only $5.00! I think this is going to be a very compact and portable solution!

Woo hoo!

My art and blog are getting noticed! I was chosen as "Featured Artist" on the Yahoo Group pARTs-a-la-carte for this week. And, the moderator of that same group nominated my blog for the "Blog Award of the Week"! I didn't win, but just knowing that someone thought enough of my blog to make the nomination is very affirming.

Also, Zneart.com is creating a new homepage for ZNE members to link to for showing off their Podcasts, YouTube videos and Slideshows. I don't think this has gone public yet, but portions of two of my art pieces were chosen for the page header! (They are the two on the far right.) You can check this out at www.zne-store.citymax.com/Teatro.html. There is something really, really cool about opening a website and seeing your own art pop up!

Thanks to Chel and Katherine for these opportunities!

Wednesday, May 9, 2007

May Design Team Assignment


I've finished the ZNE Design Team assignment for May. We had to make two whimsical ATCs using a letter of the alphabet, lavendar "dymo" labels for each letter plus a word beginning with that letter, a collage or image of the chosen word and one of four given backgrounds. I chose "H" and "Home" and "Q" and "Queen." Check out this cool site for making your own "dymo" labels in any color: http://www.acme.com/labelmaker

Sunday, May 6, 2007

More make and takes


Recollections had two more "make and takes" today. These were designed by Heidi Swapp using the Recollections papers. Both are quick and easy cards using her acrylic stamp "Fabulous" - one is stamped on cardstock and the other on acetate. Aren't they cute?

Saturday, May 5, 2007

National Scrapbooking Day


The local scrapbook store, Recollections (where I work), is celebrating National Scrapbook Day with events all three days this weekend. I attended two of the make-and-takes today.


The first is an "idea folder" designed by Ali Edwards exclusively for Recollections with the Papillon paper line. Two chipboard squares were covered with paper and Making Memories paint was swiped on the edges of both squares as well as the card-size white folder. The third chipboard square was painted. The words are on acetate and were run through a
Xyron and adhered to the painted square and the file tab. Very cute and easy!


The second (and my favorite) is a tag designed by Tim Holtz exclusively for Recollections. The manilla tag was first stamped with a swirl stamp (Stampers Anonymous) and Ranger Paint Dabber. Then various Distress Inks were sponged on the tag and a square of the Papillon paper. Droplets of water were "flicked" at the tag and blotted with a paper towel after sitting for a few minutes (this creates a bleached look - the water dilutes the ink - and doesn't work with other inks). This doesn't show up well in the scan, even when you click for the larger picture.
Then the script stamp (also Stampers Anon) was stamped and let dry. The tag was wiped with a damp paper towel which removed some of the script over the previously stamped swirl (the paint acts like a resist). The paper square was folded in half diagonally and glued over a similarly folded manilla scrap. All edges were distressed and inked with a brown ink. The paper triangle was glued to the bottom of the tag to form a pocket and ribbon tied through the top of the tag. Great techniques to use!


Another collage


I finished another collage for a friend's birthday a few weeks ago, but waited to post until she received it. This one is on an 8" x 10" canvas, painted, stamped and collaged with several papers and images. I trimmed the edges of the canvas with black rayon ribbon and covered the back with cardstock to give it a finished look. The scan came out greener than the actual piece.

Friday, May 4, 2007

Life and Art

Life sometimes gets in the way of art. I can't believe it's been more than a week since posting here - and I had been so good at posting almost daily! I've been working more hours at the scrapbook store - this is National Scrapbook Weekend! And my husband and I just spent several days in Chicago helping one of our daughters move to a new apartment. Lots of work but the move went smoothly and she is now settled several blocks from her old apartment but closer to her other sister who also lives there.

Today our son, who lives in San Francisco, had a three-hour layover in Dallas on his way to Jordan and Syria so we picked him up, fed him and returned him in time for his connection. On Monday and Tuesday we will be driving to Lubbock to pack up and pick up our youngest daughter from her first year at Texas Tech. Hopefully everyone will then stay put for awhile.

So, my art projects are getting nowhere right now!