"Art is my vehicle through life; may we share the ride together." Ron Wickersham
Showing posts with label card. Show all posts

Saturday, July 22, 2017

The Retreat - Viva Mexico!

As I mentioned in my last post, this year's retreat's theme was "Viva Mexico." As always, we decorated the conference room/classroom with all things Mexico.

Part of wall decor and "Mercado" - the pole on left held a giant piƱata;
I brought the papel picado back from Mexico at Christmas.

The "Mercado" - everyone brought 20 whatevers for each of us and we "shopped"
for our goodies.
Before the retreat, we each made 3 art pieces which were our "money" for shopping. They were all placed in a bag and we each picked out three.  I received these: a beautifully-colored balloon trio 4x4; an adorable little cactus; and a lovely Lady of Guadalupe Altoid tin lid "shrine."  Unfortunately, I totally forgot to take photos of the three pieces I made!


Four ladies were assigned brief topics to share with us. One was on the foods of Mexico, one on five interesting Mexican artists, one on cacti and one on The Day of the Dead.  Below is the wonderful display that was made for the DOD. We learned a lot and it also brightened up our room!


On Thursday we always have some "Make 'n Takes" to do, shared by several attendees.

Jeri helped us make these vintage tin shrines with images, German glass glitter and beads.  I shared making ceramic tiles decoupaged with napkins.


We made these darling cactus gatefold cards after Joyce's cacti presentation.

Card closed
Card open


Kris showed us how to make tassels with beads, felt balls and a skein of embroidery floss.


And, last but not least, Jeri gave everyone a configuration box to do whatever we wished.  I decided to make mine for our 2016 Christmas memories in San Miguel de Allende, Mexico.  I added photos as well as some of the little goodies from the Mercado.

The entire box was painted turquoise and orange and then the front and back covers decoupaged with paper.  I love the decoration on the front of the box - I used a colorful straw, some fibers and a doily, all goodies shared by participants.


Front cover


Inside

Right side close-up

Whew! You can see we were very busy at our retreat! Tomorrow I will share the 
book I created on Friday.

Saturday, April 1, 2017

Im Back and Catching Up

I've been gone for a week visiting the grands and babysitting a few days. It was Carl's fifth birthday (how is that possible??) last Saturday and he had a Pokemon-themed party. Since my other daughter's family couldn't get away, I had promised Drew that he could come to Carl's birthday. So on Friday I flew into Albuquerque on an early flight and Drew and his dad met me at the curb at the airport. Then Drew and I caught a flight to Dallas and my husband met us and we drove to Austin. Whew, what a long day!

Drew's first trip without parental!

The boys always have such a good time together and Drew didn't have time to miss his parents all week! On Monday Kelly and Josh went to Seattle for three days to attend a concert so we babysat all three boys. We took them to The Thinkery (children's interactive museum) in Austin and The Jumpy Place in Kyle. They all had a blast!

Happy 5th Birthday Carl

The Thinkery

Meeting Aunt Kim for lunch


Just hanging out - drawing
Storytime and bedtime


On Thursday I flew back to Albuquerque with Drew and then home that night. I must say, I'm exhausted - those boys keep you going! But I do miss them when I'm not there!

Anyway, back to my normal reality...

I received a finished "divided postcard" from the swap I mentioned in the last post. Three other artists worked on it and I love how it came together!


I also received the last postcard that I needed to create on. The other two artists used cats as their themes so I decided to stick with that. My section is the far right. With all the stamps I own, I couldn't believe I didn't have one cat stamp that wasn't a Halloween one. So I found this cute "mer-cat" online and printed it out. The recipient of this postcard loves mermaids, so I thought that was appropriate. I colored the cat with colored pencils and a metallic pen and used Distress Oxide Broken China ink on the background and a few word stickers. 


On another note, I also received a RAK from a friend in Missouri who didn't participate in the saving cream background card swap but made one and sent it to me anyway! I love the stark contrast of the colorful background with the black layer and the black die cut (which is actually glossy but doesn't show in the photo). She also added some rounded corner offcuts to add some texture - I never would have thought of that!


Monday, December 19, 2016

More "12 Days of Christmas"

Days 4, 5 and 6 of the "12 Days..." Swap


Here are three more gifts from the swap I mentioned in the last post.

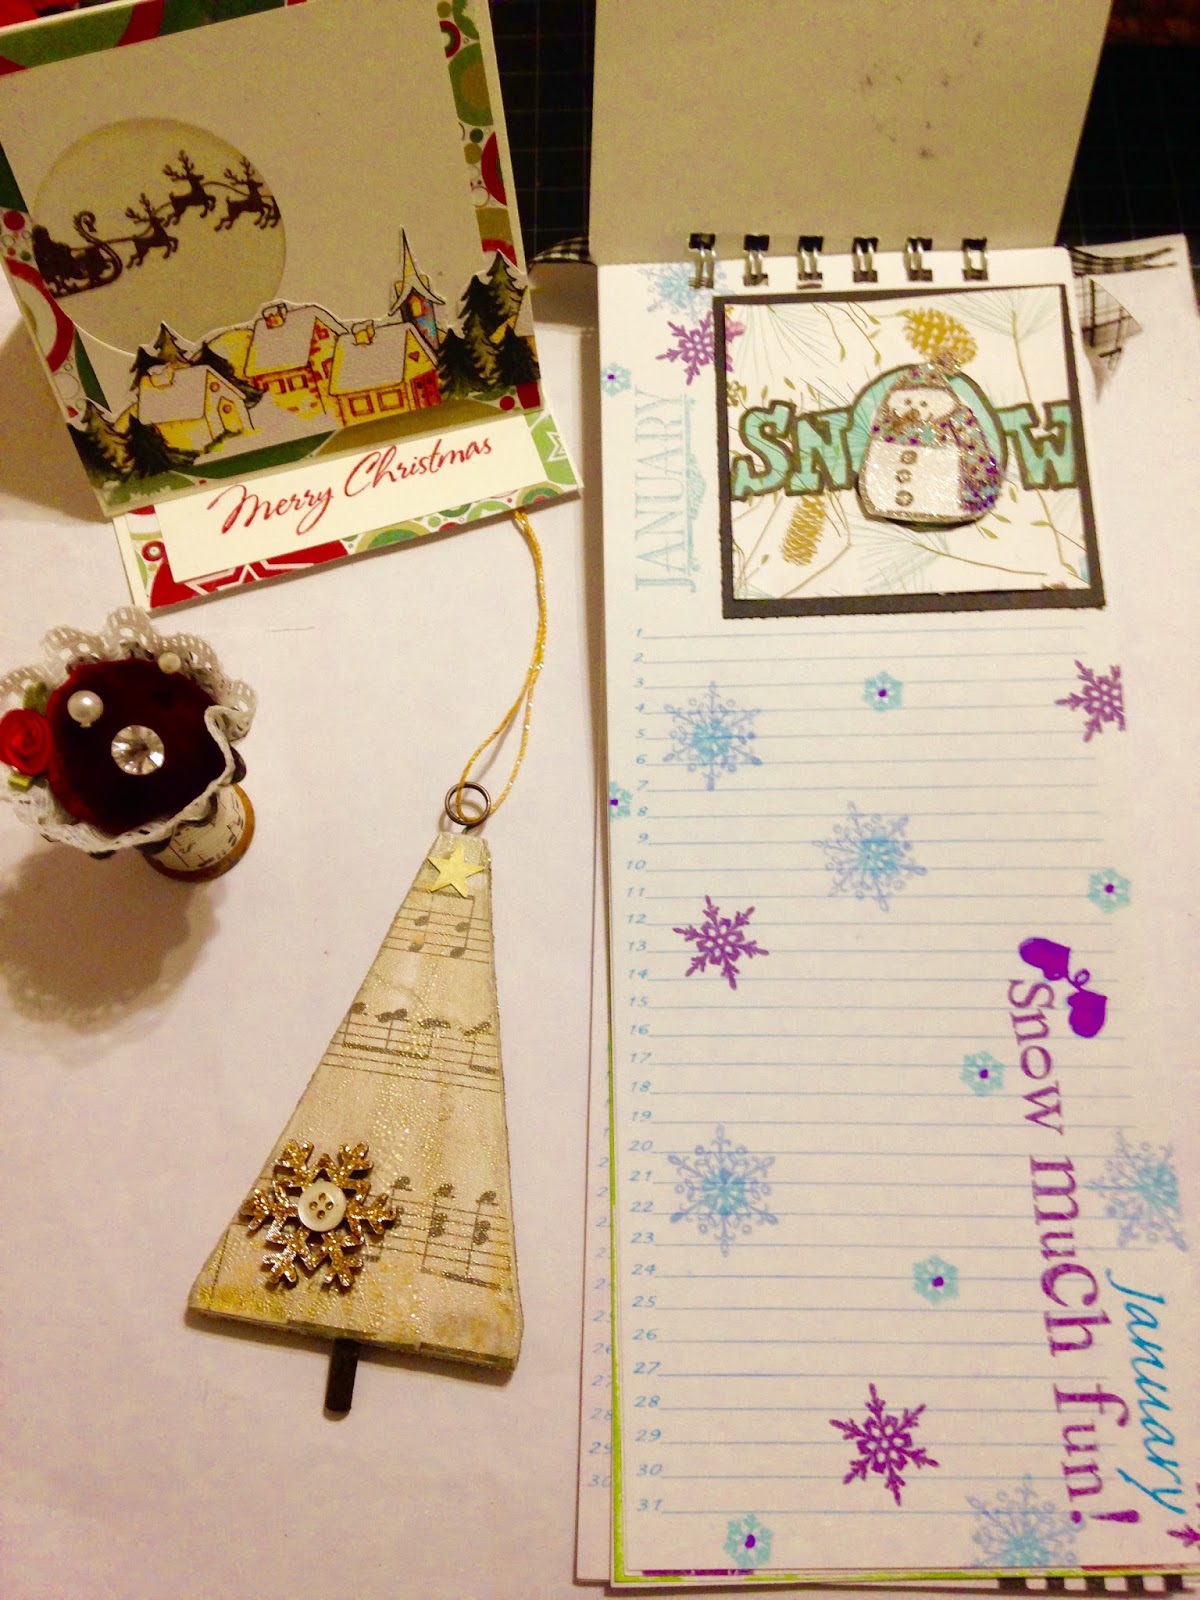
On the left is a sweet little pincushion mounted on a wooden spool; in the center is a pretty vintage music tree ornament; and on the right is a perpetual birthday calendar - so creative and useful! Each month has space for the 30-31 days so you can write birthdays for that month. Along with the calendar came the cute easel card (upper left). When opened you insert a little battery-operated candle and it glows through the vellum window. Neat!


Wednesday, July 20, 2016

More Retreat Projects

The first day of the retreat, while everyone is arriving, is purely a social one and dedicated to setting up our work areas.

On the second day, we have a variety of make-'n-takes provided for and taught by members.

Jan taught this cute three-dimensional crazy birds card.  The two front sections curve out as does the firecracker.


Roxanne taught this 8x10" mixed media canvas using Tim Holtz tissue wrap, Distress Paint, modeling paste, and Distress Inks. The tag is stamped with images from the Tim Holtz "Americana" mini-blueprint stamp set and attached to the canvas.


We also made the very popular Pinterest-inspired ribbon flags. I had previously made one for myself so this one will go to my daughter if she wants it.


And that evening, mixed media artist Rita Barakat (sponsored by Marcos Paper and Faber Castell) taught this mixed media project on sticky-back canvas using gelatos, gesso, modeling paste and texture cream paint.  I have added this to my art journal.


These projects, along with the patriotic book, were not all that we did over the weekend! There was plenty of conversation, laughter, eating and just fun girlfriend time! If you ever have a chance to go on an art retreat with like-minded friends, I highly recommend it!


Tuesday, April 5, 2016

Pinterest Party and Girls' Weekend

I spent this past weekend at my friend's house near Waco, Texas, about two hours from here. She invited 7 gals to join her for a Pinterest Party. Everyone brought a project inspired by Pinterest, complete with kits for all, and we created some fun things.

Two gals made their projects beforehand and gifted them to us. One was a DIY "Poo-pourri" spray and the other was a package of DIY essential oil "bombs" for the shower. Both included recipes so we can re-create these on our own.

First up was a beautiful project using an old Graphic 45 paper collection, "A Lady's Diary." These papers are still my favorite collection from G45.  I hesitate to call this a card as it is much more elaborate. It's a trifold with a "belly band" for a closure. Isn't it gorgeous?


Here you can see it open. Love it!


This is a decorated gift bag using a Julie Nutting girl stamp and paper scraps. We colored the skin with colored pencils and stamped the doll a second time on patterned paper for the dress. I think this would be darling on a canvas as well.


This was a simple card but with such an impact. The flowers, lace and satin bow just add such special elegant touches. It's very dimensional so would probably cost a fortune to mail! But I doubt I will be parting with this for awhile.


This was another scrap project done on a canvas. We simply hand-cut different sizes of pointy ovals and Mod Podged them in place.  This is a great idea for using scraps and would be fun on different colored backgrounds. I can just see it on black making the colors really pop. This canvas is 8"x10" but how cool would this be on a huge canvas!


And this was my project - a spring banner.  The pennants are paper rectangles with one end dove-tailed. The letters are glued to die cut scalloped circles. Holes are punched in upper corners of each pennant and then threaded on twine. Torn fabric strips are tied between each pennant. Simple but sweet.


This was such a fun party. There are so many ideas on Pinterest - I suggest you gather a few friends and host your own Pinterest Party!

Monday, December 15, 2014

A Fall Card Swap

I'm late at posting this swap that I hosted for my online group in November. The "rules" of the swap were to make a fall card inspired by the November 2014 Tim Holtz Tag. 

This was the original tag created by Tim.


This was the card I created. I did not have his large leaf die but I had the Tattered Leaves set of three. Of course they wouldn't fit on a card front  so I had to improvise. I ended up using two leaves (the negative of the die cut on corrugated cardboard) and then added the third leaf as an embellishment. I also don't have an of the Distress Stains yet so I improvised on that technique also by adding some reinker and water to a mini-mister.  The "fall" title are some old stickers which I added to twill ribbon.


This was the card I received from Linda S (thanks!) which is a very close interpretation of the original tag. I love it!


Saturday, August 2, 2014

Steampunk Card Swap

I recently hosted a Steampunk Card Swap. The cards had to use a steampunk theme and include at least one metal embellishment.

I created this card for my partner.  The focal piece is a portion of a Graphic 45 paper. One of the background pieces is black art metal embossed with a gears embossing folder and then sanded. The other background piece is card stock stenciled with spray ink and an eye chart stencil.  The gears surrounding the eyes and the hanging tag are all metal.


And I received this wonderful card in return.  The aviator is on a transparency and I especially love how the gear and metal pieces on the bottom are laced with black thread. Even the twill ribbon is printed with gears.


It is so much fun to see how others interpret a theme.

Monday, October 3, 2011

Autumn?

It may be the beginning of October, but here in Texas we have a long way to go before we can say it's fall. This week we're actually getting a "cold spell" with mid-80's temps!  At least we can create autumn projects.

I belong to a Yahoo group that is starting a new monthly challenge. One member posts a "make-and-take" project with specific guidelines and then we can play along, creating a similar piece or changing it up as we wish.

This month Diann posted a 5" x 7" autumn card with several layers. We were to incorporate an oval layered fall quote/sentiment and fall leaves.

I decided to play along - it was relaxing and fun to follow someone else's directions for a project!  I made this fall card with bits and pieces from my stash.


It's a simple card with several layers of patterned papers and a stamped quote.  The leaves are glossy paper with alcohol inks.  They were diecut with the Tattered Leaves die.  I added the burlap and twine for texture.

Monday, July 23, 2007

Retreat projects

Different members presented make and takes during the weekend. This first project was a 4 x 4 "danglie". A collage sheet image was adhered to two pieces of cardstock with a beaded trim sandwiched between on the bottom edge. A wire hanger, German scrap scalloped border and decorative fibers were added. A fast and fun project.


We also made a "triptych" folder with library pockets and cards for keeping track of books and supplies we loan out. This is made with 4" x 8" pieces of cardboard covered with patterned cardstock. A ribbon closure was added before adhering the end papers. We stamped images and added them to circles of gold candy wrappers (and, yes, we were able to eat the candy!).


We also played with Heidi Swapp masks, cutting them into smaller pieces and laying them on card fronts. We then wiped chalk ink across the card and removed the mask to reveal the resist. This is a simple card but an easy technique. It would make awesome backgrounds to stamp over.


Sunday, May 6, 2007

More make and takes


Recollections had two more "make and takes" today. These were designed by Heidi Swapp using the Recollections papers. Both are quick and easy cards using her acrylic stamp "Fabulous" - one is stamped on cardstock and the other on acetate. Aren't they cute?

Wednesday, April 25, 2007

Masculine Cards


Tonight my local stamp group had our monthly meeting and we had a "masculine card shoebox swap". We each designed a masculine card and then assembled all the materials and tools to make the card in a box. We then rotated the boxes so that each of us had an opportunity to make one of each card. There were five of us and we returned home with five wonderful masculine cards for the men in our lives.

This first card is mine - I used a Paper Artsy stamp stamped in brown ink on white cardstock and then stippled with turquoise ink. This was then layered on a distressed brown background and adhered to a turquoise card stamped around the edges with a texture stamp.

Here are the other four designed by Christine, Cathy, Mette and Julie. (I hope you gals don't mind me sharing!)


Friday, March 30, 2007

Cuttlebug Cards


I finally made some cards from the cardstock that I had "cuttlebugged" several days ago. The red heart card is actually white cardstock that I swiped with red chalk ink. The coppery Happy Birthday card is a piece of copper paper. I "painted" the black happy with a black Sharpie.