"Art is my vehicle through life; may we share the ride together." Ron Wickersham

Saturday, June 29, 2019

China Cabinet Redo


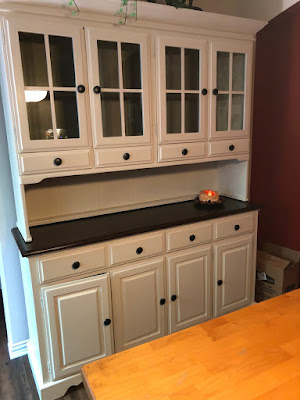
When we downsized to our townhouse 13 years ago, we had to get rid of our antique dining table, buffet and matching china cabinet. But I needed something for all our china and crystal. We already had a light pine farmhouse-style kitchen table and chairs and I couldn't believe I found this piece on Craig's List which matched perfectly!

I've wanted to paint or refinish both for years, but knew it would be a big job and procrastinated. Fast forward to now and it was the right time!  I started with the cabinet because it's contents were all still packed in boxes and I wanted to get them settled. The table will come later.

This was a big job which took most of a week including dry times. Luckily I didn't have to strip it and just lightly sanded. I also didn't need to use primer. I used two coats of my DIY chalk paint in off-white for the entire cabinet and then used the gray-green left over from one of the end tables for inside the upper portion. The top has three coats each of Java gel stain and polyacrylic. The rest of the piece has two coats of a wipe-on clear topcoat. The before photo doesn't show the original wooden knobs which I intended to replace. But after determining that I would need 16 I opted to spray them with Rustoleum Oil Rubbed Bronze paint.

AFTER
(So much better than the stained pine - see portion of table in photo)


I am very pleased with the results! I'm dreading doing the six chairs with spindle-backs when I do the table. Right now I'm taking a break and thinking of investing in a sprayer before tackling that!

As you read this, I will be returning to Austin (spent four days there last weekend babysitting for the grands). Our son is coming in from Hong Kong and has a short weekend to see everyone between work schedules. It'll be a quick overnight but will be good to see him again.

Thursday, June 27, 2019

More furniture redos

I've painted several of our end tables and a coffee table. 

I used a DIY chalk paint on these as you only have to sand lightly, paint and then add a topcoat - no primer necessary unless there is stain bleed-through.  (I researched several sites for a DIY chalk paint recipe - some use Plaster of Paris - but the consensus seemed to favor adding calcium carbonate to regular flat latex paint which I bought on Amazon. I bought sample sizes of paint from Home Depot which are under $4 for 8 oz and had enough to do several coats on several tables.)

On the table tops I used General Finishes Gel Stain in Java. Here again you need only sand very lightly, wipe on the stain and then wipe off. Instead of usual stains that soak into the wood, this stays on top much like paint. It took several coats with a day's dry time between each. Then I used several coats of water-based polyacrylic to seal. I also replaced the knobs.

BEFORE 
(I had no idea this one's finish was in such bad shape and didn't intend to sand down to bare wood, but it came off in seconds!)


DURING


AFTER (Version 1-off white)


VERSION 2 - very pale gray-green


BEFORE 
(I'd already painted a coat on the bottom portion before remembering to take a photo.)


AFTER


BEFORE


AFTER


BEFORE


AFTER

Thursday, June 20, 2019

Granny's cabinet

This cabinet belonged to my husband's grandmother and we acquired it over 40 years ago. It has always graced either our kitchen or laundry room wherever we've lived. Though I loved it because it was hers and because it's a cute piece, I always hated the bad stain job covering not-so-wonderful wood. But I knew it would be a bear to either refinish or paint because of the bleeding stain. And it was! 

BEFORE


Again, I used chalk paint but because of the bleeding issue I ended up having to do several coats of an oil-based (yuck) primer/sealer first. Once the hard work was done I painted two coats of white inside and two coats of a pale robin's egg blue color on the outside. This resides in my laundry room holding cookbooks and miscellaneous so I went with a color that I just loved and didn't have to match anything! I dry-brushed the original hardware with white paint.

AFTER

Looks a little washed out because of the daylight streaming in the garage

Better idea of actual color

I am in love! I think this is one of my most favorite painted pieces ever!

And because I had a bit of paint leftover, I painted this old end table of my parents that we've had forever to go with my new colors in my bedroom. When I pulled it out of the attic two legs were off and I had to do a bit of repair. It's not perfect but it will do. ) I had just enough paint and used a dark gel stain on the top. I think the little feet are brass so when I have more time I will try to polish them a bit. After doing the above cabinet, this was a piece of cake!

BEFORE


AFTER


Tuesday, June 18, 2019

Painting, but not art

It's the domino effect - you know, once you start something it just keeps leading to more things...

When we were first married I painted and refinished a lot of furniture as we couldn't afford new and had to furnish with thrifted and garage sale/estate sale pieces. I always enjoyed it but then along came children and activities and no time! Fast forward to now and our remodel.

 I decided to try painting the guest bath vanity as the bid was for over $400 to paint a four-door, two-drawer vanity! I figured if I messed up we could always have them do it.  I researched lots of DIY blogs and YouTube channels (what did we ever do without the Internet?) and finally decided on using chalk/mineral paint. The reason? Very little prep needed - just cleaning and very light sanding - and also low-to-no VOCs (toxic fumes) so working inside would be no problem.  The project turned out great.

Here's the before:


And after:
The paint is actually a medium gray but it looks almost blue in some lights.

While I was at it, I painted the little shelf (from blue and brown to white and gray) and the light fixture to a brushed nickel to match the new faucet.

I forgot to take a before pic until I had already started painting.


And this motivated me to keep painting!  I had several reasons to do so:

1) I had to be home for the workmen and didn't have much space to do anything,
2) Most of the furniture had been emptied and was already in the garage,
3) With the new dark wood floor, all our dark furniture was going to be overwhelming,
4) No money to replace our 20+ years old furniture.

Stay tuned for my first project in the next post!                                                                  


Thursday, June 6, 2019

"Old is New Again" Technique Tag Swap

I host a quarterly tag swap for my online group showcasing a different "old is new again" technique for each swap. May's technique was "Faux Patina Background."  In case you haven't seen this technique here is a brief tutorial and video link.

  Faux Patina Background:
Ink embossing folder with lightest ink and run thru machine. Sponge medium color ink over embossed area. Sponge darker color over embossed area. Sponge darkest color over embossed area. Sponge with Versamark ink and gold emboss. Use as background. See a video tutorial here: https://www.splitcoaststampers.com/resources/tutorials/fauxpatina/

We send one tag and receive one.  For my tag I used a Paris embossing folder and four Distress Inks ranging from light yellowy-green to an olive green. I used Versamark and gold embossing powder for the final step.  I stamped another Eiffel Tower on black cardstock and embossed with black embossing powder. After fussy cutting it I popped it up on the tag. Since the embossing folder wasn't long enough for the entire tag, I stitched on a piece of black lace.


The is the lovely tag I received from Gloria. It has a touch of light blue in the background. She dyed torn muslin strips with a bit of blue also. I like the addition of cheesecloth and lace medallions under the gold heart - my style for sure!

Monday, June 3, 2019

May Altered Trading Coins

The theme for the monthly ATCoin swap was flowers or happy birthday. I chose to do flowers - the coins are similar but not identical. I used gelli-plated papers for the background, added floral images from a magazine and added word strips.


I received these two:


from Linda - watercolored 3D flowers


from Pam - embossed with chalk coloring and lots of metallic


And here's a photo of my ATC book halfway through the year. I am pretty sure it will never close with all 24 in there!