A few weeks ago, my local art group swapped Irish/St. Patrick Day "twinchies." We each made 8 identical little 2" x 2" squares. I used a green alcohol inked background mounted on a larger cream colored cardstock. The words are stamped and cut out; I found the image online and greatly reduced it; Stickles frames the square and a tiny shamrock cut from a decorated hair elastic adorns the upper right corner.
"Art is my vehicle through life; may we share the ride together." Ron Wickersham
Wednesday, March 17, 2010
Happy St. Pat's Day!
I hope everyone has a fun St. Patrick's Day - are you wearing green? And Happy Birthday to my good friend, Trisha, whose mother told her when she was growing up that everyone was celebrating because it was her birthday! How fun is that.
A few weeks ago, my local art group swapped Irish/St. Patrick Day "twinchies." We each made 8 identical little 2" x 2" squares. I used a green alcohol inked background mounted on a larger cream colored cardstock. The words are stamped and cut out; I found the image online and greatly reduced it; Stickles frames the square and a tiny shamrock cut from a decorated hair elastic adorns the upper right corner.
We swapped them at our meeting and then took unfinished, approximately 7" square boxes from the dollar store and painted and embellished them, adding the twinchies to the little compartments. We each had to complete one additional square to fill the box. This is my completed box - I love seeing all the different and wonderful little mini artworks from my friends.
A few weeks ago, my local art group swapped Irish/St. Patrick Day "twinchies." We each made 8 identical little 2" x 2" squares. I used a green alcohol inked background mounted on a larger cream colored cardstock. The words are stamped and cut out; I found the image online and greatly reduced it; Stickles frames the square and a tiny shamrock cut from a decorated hair elastic adorns the upper right corner.
Tuesday, March 16, 2010
I'm back from Albuquerque
This weekend I flew to Albuquerque to my daughter's bridal shower - a short trip, leaving Friday evening and returning Sunday morning. Other than missing four flights (non-rev standby) due to the heavy spring break traffic and having to buy a full-fare ticket for the last seat on the last flight in, it was a great trip. All four of my girls attended (from Chicago and New York City) so we had a fun girl weekend. Two of Kelly's flight attendant girlfriends flew in also and three of her childhood/high school and college friends attended. All the girls went to Santa Fe for a bachelorette night out on the town followed by a spa day on Sunday. Here's a cute photo of them before they met up with the "locals". My four are on the left - Kelly is the bride-to-be in the light blue shirt.
Back at Anthologies, we were having our Spring Fling Open House, debuting our twenty new spring and Easter classes. I was there on Friday helping with the make-and-take and explaining some of the classes. We had a wonderful turnout and the class projects were well-received. Almost 300 classes have been sold! So we are going to be busy!
Sorry I can't reveal the projects in their entirety, but here's one sneak peek at a canvas Tracy and I collaborated on.

Sorry I can't reveal the projects in their entirety, but here's one sneak peek at a canvas Tracy and I collaborated on.

I LOVE this chair - it was a dirty brown and we painted it pink, distressed with white and then decoupaged old hymnal music pages on the seat and back with an occasional butterfly. It's part of our display, but I'd love to take it home... Can't you just see this done for a teenager's room with teen magazine cutouts or torn posters? What about a chair for the kitchen done in recipes? The possibilities are endless.
Monday, March 8, 2010
Anthologies Connections and New Design Team

Exciting news - the paper arts store, Anthologies, where I work (or should I say play, as it's too much fun to call it work!) is launching a new kit club on April 1st called Anthologies Connections. It will be a monthly kit of delicious coordinating products just waiting for your creativity. (Sneak peak above!) More information is on the website: http://www.anthologiesbyme.com or click on the blinkie in the right column. And a new design team has just been announced for creating projects with the kit contents for inspiration. It will be so much fun to see what everyone comes up with!
Congratulations to all the fabulous artists who were chosen! Welcome to Anthologies!
Sandy Hubbard - http://www.asmylittleworldturns.blogspot.com/
Lori Camperlengo - http://www.camperlengo.blogspot.com/
Jing-Jing Nickel - http://www.thislittleartofmine.blogspot.com/
April Hummert - http://www.scrappingskylar.blogspot.com/
Rebecca Turner - http://www.pigtailspapertrails.blogspot.com/
Lisa Houpt - http://www.itsjustlisa.blogspot.com/
Erica Hofstetter - http://www.zunky-chic.blogspot.com/
Michele Brooks - http://www.michelebrooks.typepad.com/
Jennifer Yates - http://www.thepinkroom.typepad.com/
In addition, our in-store design team and instructors will be rotating in on a monthly basis and creating projects with the Anthologies Connections kit.
Tracy Pounds, Creative Director - http://www.luv2cre8joy.blogspot.com/
Susan Tidwell (me!)
Rhonda Merry - http://www.noidlehandshere.blogspot.com/
Elaine Howell
Anna Dixon
Aaron Gwaltney
Be sure to visit these blogs to get a feel for their different styles and see some delicious eye candy! Can't wait to share more with you.
Saturday, March 6, 2010
More fairy tales
Today was another six-hour day at work, teaching classes, and we're about to have our Spring Open House on Friday and Saturday to showcase our next feature of spring and Easter class projects, so guess what I'm feverishly working on!
As promised, here are the fairy tale shadowboxes made by the other art group members. I apologize for the terrible photos - since these all have glass, I had to shoot without a flash and, as you will note, not a very steady hand!
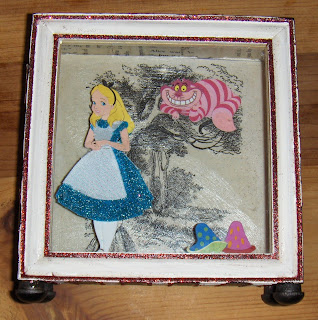
The first one is another Alice box - isn't it fun to see the different interpretations! This was made by Trisha and she even added little black feet to the bottom of the box.
Mette did a Danish fairy tale (oops, can't remember what it was called). I love how she added paper strips to the front of the glass to look like a window which the butterfly is peeking through.
Next we have Christine's and this one was very hard to photograph, not only because of the glass, but she added a transparency inside which is much easier to see in real life. This is a Thai fairy tale, as she is Thai. Lots of collaged images inside.

Yet another Alice. She was popular in our group! Cathy made this and stained the box. I like the addition of the ribbon and the key.

Debbie did Cinderella, which, with all the glitter and bling, suits her. She is the "embellishment queen" of the group. This really sparkles in real life and the silver-painted box is perfect.
Julie did Hansel and Gretel, with a vintagey, old-world feel. I believe the background was fabric and she added lots of gold trim and sequins. The outside of the box was rubbed with what looked like a metallic wax. Another out of focus photo!
As promised, here are the fairy tale shadowboxes made by the other art group members. I apologize for the terrible photos - since these all have glass, I had to shoot without a flash and, as you will note, not a very steady hand!
The first one is another Alice box - isn't it fun to see the different interpretations! This was made by Trisha and she even added little black feet to the bottom of the box.
Yet another Alice. She was popular in our group! Cathy made this and stained the box. I like the addition of the ribbon and the key.
Debbie did Cinderella, which, with all the glitter and bling, suits her. She is the "embellishment queen" of the group. This really sparkles in real life and the silver-painted box is perfect.
Fairy Tales
Last month my local art group started a fairy tale shadow box challenge. We were each given a small 5" wooden shadowbox which had a glass top and opened. We were supposed to alter the box using our favorite fairy tale. Tuesday night was the "reveal."
I chose Alice in Wonderland (not the new movie version, but the original classic). This is my finished shadowbox. The words "curiouser and curiuser" and Alice are on the front of the glass; everything else is inside the box. Several of the images are on dimensional pop dots to give depth. I painted wide blue stripes on a page from the book for the background. Most of the images are from a digital kit from ScrapArtist. I also added a real Queen of Hearts mini playing card, the brass crown and a sheer clock from Maya Road.
Here is a view of the inside (without the glare of the glass). I didn't notice that the word "time" had fallen off the clock until after I took this photo.
I chose Alice in Wonderland (not the new movie version, but the original classic). This is my finished shadowbox. The words "curiouser and curiuser" and Alice are on the front of the glass; everything else is inside the box. Several of the images are on dimensional pop dots to give depth. I painted wide blue stripes on a page from the book for the background. Most of the images are from a digital kit from ScrapArtist. I also added a real Queen of Hearts mini playing card, the brass crown and a sheer clock from Maya Road.
Here is a view of the inside (without the glare of the glass). I didn't notice that the word "time" had fallen off the clock until after I took this photo.
Wednesday, February 24, 2010
Scrapbook in a Day
8 hours plus 17 ladies plus twenty pages equals ? Scrapbook in a Day! On Saturday and Tuesday Anthologies featured two scrapbook-in-a-day classes which I team-taught to a total of 17 women. They made this fantastic Prima 6x6 scrapbook with a total of five double-sided canvas pages and five double-sided paper layouts in page protectors. It was a super fun class filled with lots of techniques including sewing, glimmer misting, masking, painting, stamping and more. Each of the five store designer/teachers designed four pages which were then assembled together into this darling "You = Joy" book.
Here's the cover - love these fun colors!
And a peek at the open, assembled book (that's one of my pages on top).
Another view of the front of one of my canvas pages. The patchwork border includes both fabric and paper pieces. I especially love the wire heart.
Backside of the above page - before a few button and doodling embellishments were added. Forgot to take a picture of the finished page.
My second canvas page. I love making those paper flowers with twisted stems. Also love how the canvas takes the paints so well.
Here's the cover - love these fun colors!
Tuesday, February 23, 2010
Artist of the Week
I will be teaching two classes at an artist retreat in Salado, Texas, in April, and today I'm the featured "artist of the week." Check out the details of the retreat, including venue, classes and teachers at: http://www.shadyladiesalteredart.blogspot.com. While there, sign up for some classes and join us this spring!
Subscribe to:
Posts (Atom)