"Art is my vehicle through life; may we share the ride together." Ron Wickersham

Tuesday, February 18, 2014

More January RCADs

As promised, here are the remaining RCADs of January.


The products and techniques I used are too numerous to detail, but if you have any questions about any of the cards, let me know and I will elaborate.

Monday, February 17, 2014

Rolodex Art Journal

ICAD - Index Card a Day - has become a very popular exercise in the art community within the past year or so.  Here is a link to where I think it started: http://daisyyellowart.com/icad/icad-faq.html.  In short, the idea is to create some kind of art every day for a determined amount of time (usually 30 days at a time) to keep your creative juices flowing. You can join a group where there are daily prompts to help with ideas or just do it yourself.

Late last fall I started doing this to make myself create something every day. After a few weeks I had accumulated several cards and was trying to find something to put them in. I discovered an old Rolodex file I had saved for altering and a lightbulb went off.  Instead of doing ICADs, I would do Rolodex cards (which were already with the card file) and the card file would keep them contained.

Due to the holidays and life happening, I fell off the wagon last year, but in January I determined to keep up for the entire month.  (I must confess that I cheated a bit, as I created 2 cards some days to make up for a day I missed. But, I reached my goal and have 31 cards for January! (I've been gone a lot during the first part of Feb., but the past week I've been very religious doing my RCADs again!)

This is a very relaxing and enjoyable exercise and I hope to continue all year. I know I won't get to a a card every day but I can try!  The fun part of this is deciding what to do on the cards - and there's unlimited possibilities. Sometimes I try out a new technique or product; sometimes I just clean off my desk - whatever strikes me that day.

Here are the RCADs from the first half of January. Some of them I like; some of them I don't, but it's all about the process and just sitting down to make art. Nothing happens if you don't show up!


I'm having a lot of fun with this project; it's becoming addicting!  Tomorrow I will share the remaining RCADs from January.

Sunday, February 16, 2014

I'm back!

How time flies! We returned from Mexico on Feb. 9th and since then I've been busy creating new layouts to teach at the LBH and teaching a few days too.

We had a fun time in Mexico but still have to go back one more time for more dental work for both my husband and I.  It's a surreal experience there - Los Algodones is right on the AZ border and exists only for dental, optical and cosmetic procedures for Canadians and Americans.  Everyone there is super friendly and most have had dental work so there's a commonality not found elsewhere.  There is a large open-air cantina in the middle of the tiny town where everyone congregates for the sunshine, good Mexican food, music all day long and, of course, margaritas and beer! We felt extremely safe and enjoyed the lazy, slow pace of life at least for a few days. It was perfect timing too as we missed the severe weather that hit the entire US that week!


The icing on the cake, of course, was stopping in Albuquerque on the way home to see this little guy. He has changed so much just from when we babysat him in January.  Wish they would stay little longer!


Friday, January 31, 2014

A few more journaling pages and I'm off to Mexico!

If you've been reading my blog for awhile, you might remember that in July I went to Mexico for some dental implants. Since they have now healed and grown into the bones, it is time for my return visit to get the permanent teeth! While I am there I will also have some crowns done. So, we leave tomorrow for a week in Mexico - am sure my husband will enjoy it but it won't be as relaxing for me!

It will be quiet here on the blog all week so I'm leaving you with some art journaling pages - all works in progress and more layers to go!


This one is gesso applied through a floral stencil which acts as a resist for the Distress Paints I added after it was dry. 


This one has several colors of Dylusions ink sprays on the background. When those were dry, I covered the entire page with black gesso. Before the gesso dried completely, I covered it with a circle stencil and removed the gesso in the holes.  This makes me think of the solar system, but I really don't have a clue where to go with the page from here!


Gesso was applied to this page rather thickly with a palette knife. When it was dry, I used blue and yellow ink sprays and let them run and drip. I like how these colors mixed and the texture is fantastic.


This page is extra products from another project I was working on and I tried out some things here. Modeling paste was used through the honeycomb stencil. I then sprayed it with Dylusions Melted Chocolate spray ink. I have to say that with a name like that I want to love it, but I'm not sure I'm a fan of this color. It reacts funny. You can see that when I blended it with a baby wipe it turned pinkish. Then I tried heating it with a heat tool and it turned blackish green! It actually looks a lot better now that it is completely dry, but I don't like that you never know how it will react! There are also flecks of gold and black paint. The trick to those are diluting the paint, using a small paintbrush and covering the surrounding area! 


This page is a hodge podge of lots of things and I'm not even sure I can remember all I've done to it! It started out as decoupaged paper scraps and then there are several layers of scraped paint and spray mists. I used a clock stencil with modeling paste which became dyed with a subsequent ink spray. There are also painted circles (with a toilet paper tube) and white paint lines (from corrugated cardboard) and white paint stamped on with bubble wrap.


This last one is what I call a "mop up page." When I have paint or mediums left over I don't want to waste them so I brush them onto another journal page. It eliminates the "blank page" syndrome when I start to work on that page and saves my drains from excess paint! I love these colors together.

As I said, none of these is finished yet. I rarely finish a page in one sitting. It's an ongoing process!

Ciao...I'll see you in a week!

Thursday, January 30, 2014

More Art Journaling Pages

Here are two more art journaling pages I've made in the past few weeks.

The first one I challenged myself to only use Distress inks, as that was what I was teaching in the art journaling class this month.  Everything on the page is Distress ink except the tiny stenciled dots (modeling paste), star and text outlines (journaling pen) and a touch of Stickles on the large stars. The background started with some Distress stains and lots of water, then I applied the ink directly to the page with a blending tool and also through some stencils (small stars and numbers). I stamped with a few different colors of Distress ink (script and lines).  When the modeling paste was applied, some of the inks (which are not waterproof) bled into the design, which added more nice color. I cut the large stars out of book text, inked them and then glued to the page. The black lines are made with a credit card and diluted black Distress ink on my craft sheet and the small black flecks are flicked with a paintbrush dipped in the same diluted ink. 


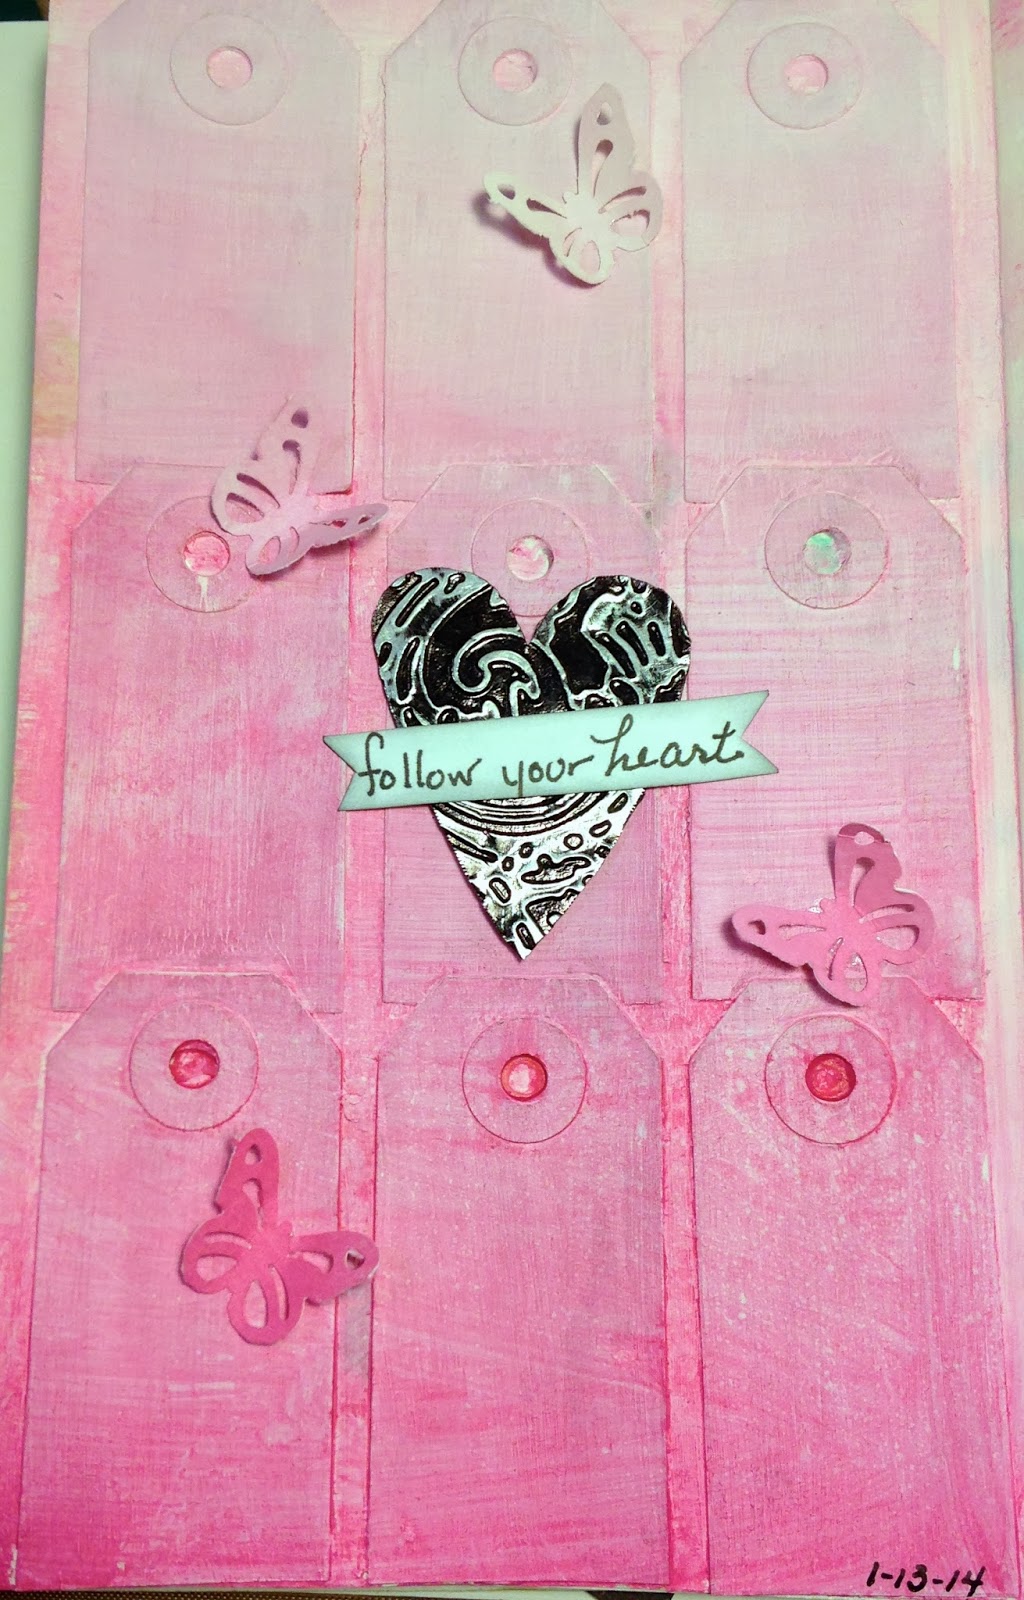
This page was inspired by a similar one on Pinterest. I happened to have several small kraft colored tags leftover from another project, still on my workspace, so I glued these to a small journal page and then gessoed over the entire surface.  Once that was dry I used Picked Raspberry Distress Paint and ran a thick, juicy line across the bottom of the page. I spritzed with water and used a paintbrush to wash the paint over the entire page, using more water and less paint as I progressed to the top of the page. This gives a nice ombre effect.  I punched a few butterflies from card stock and painted them with the respective shades of pink.  The embossed metal foil heart was also a leftover and I thought using it as the focal point grounded the page. This is very simple but I love the effect!


Sunday, January 26, 2014

Fabric Tag for a Swap


I've joined another online swap, this time for a fabric tag. Maybe because it's been cold and yucky lately, my thoughts have turned to spring, so I featured a sweet bird image as the focal point of the tag.  It is an image transfer onto muslin which I then layered and sewed to natural burlap, blue and white ticking, some vintage laces, and light blue rickrack on two pieces of canvas fabric. A manilla shipping tag is ensconced between the canvas pieces to give it some added stiffness.

The seam binding ribbon was dyed with Tumbled Glass Distress ink and I glued on three old buttons. The nest is some unraveled threads bunched up and glued to the tag.

I had so much fun making this that I made two more - one to keep and one to swap with a local friend.

Saturday, January 25, 2014

Evolution of an Art Journal Page

I've had this art journal page in the works for quite awhile now and it still is not finished. Who knows what it will become? (That's the fun of this genre!)

First I started by glueing paper scraps all over the page.


Then I added blue Distress Paint and spritzed it with water to drip down the page.


Next up was a layer of modeling paste through a circle stencil.


When this was dry I added some green Distress stain which randomly colored some of the circles.


And then a bit of yellow stain here and there along with white acrylic paint "stamped" on with bubble wrap (one of my favorite techniques).


This is what is looks like at the moment, awaiting many further layers I'm sure. It's all about building up layers of paints, stamps and colors until the page "speaks" to you and you feel it's finally finished.

I love playing in my art journals!