"Art is my vehicle through life; may we share the ride together." Ron Wickersham
Showing posts with label paper scraps. Show all posts

Wednesday, July 15, 2015

LBH Clear Pillow Box Challenge


"Owl" Treat Container
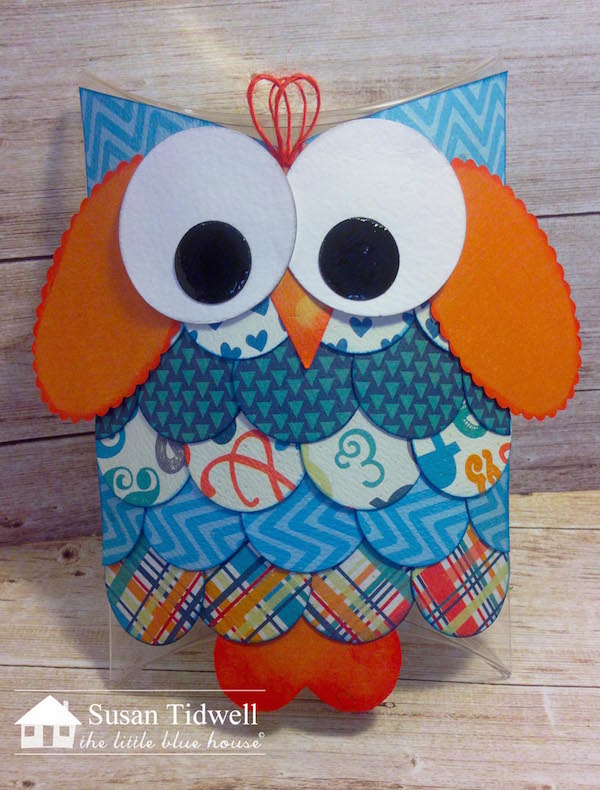


This month the LBH Media Team was given a clear pillow box and challenged to create something with the paper collections we received. I made this cute little owl treat container using all my scraps from the other projects for this month. I used the Authentique "Playful" Paper Collection which includes fun, bright papers and is available at The Little Blue House.


Here is a brief tutorial on how I made this little guy.

You will need:

clear pillow box
scraps of "Playful" paper collection
small scraps of white, black and orange cardstock
1 3/4" circle punch
3/4" circle punch
1 1/4" circle punch
small heart punch (about 1")
scalloped or plain oval punch or die approximately 2 3/4" long x 1 1/2" wide
6" dark orange thin twine
Scor Tape
blue, coral and black inks for edges if desired (I used Quick Quotes Blue Moon and Coal Miner and Abandoned Coral Distress Ink)
Glossy Accents


1. Punch 20 - 1 1/4" circles from five different patterned papers.

2. Punch 2 - 1 3/4" circles from white cardstock.

3. Punch 2 - 3/4" circles from black cardstock.

4. Punch small heart from orange cardstock (for beak).

5. Handcut one larger heart from orange cardstock (for feet).

6. Ink edges of punched pieces.


7. Start at bottom of pillow box and lay a piece of Scor tape across the width of the box. (Easiest to do if you keep the box flat while assembling.) Adhere feet first and then four circles across the width.

8. Continue adding tape and circles approximately one-inch apart so they overlap slightly. Note that for every other row you will cut one circle in half for the edges.

9. Cut one of your papers for the "ears" (measure on box) and adhere.

10. Tape ovals in place for the wings and the heart (point facing down) for the beak.

11. Layer black circles on top of larger white circles for eyes and tape in place.

12. Make a few loops with the twine and glue or tape in place between eyes.

13. Add Glossy Accents to the black circles if desired.

14. Open box and fill with your choice of treats!

All the pillow boxes created by the LBH Media Team are being featured on today's post over on The Little Blue House blog. Click here to see the amazing projects create by this talented team!


Monday, September 1, 2014

Catching Up on Art Journaling

It's been awhile since I've posted new art journal pages so here are a few I've done recently.

I did these first two as examples of using alcohol inks for my art journaling class.  The first was done in my smaller Dylusions Art Journal. Since alcohol inks work best on a non-porous, glossy surface, I decided to try using gel medium on the page. It worked well! I also did some alcohol ink "splats" using a straw and blowing closely at the drops. You can also use canned air.


This page is in my larger Dylusions Art Journal. This time I completely covered the page with a crinkled brown glassine bag I had. Since this is less porous than regular paper, it worked well on the background. I added some stamping and stenciling with white gesso which resisted the alcohol inks somewhat. The three smaller butterflies were stamped on glossy paper and colored with alcohol inks. the larger butterfly was stamped on clear plastic packaging, colored with alcohol inks and heated slightly until warm and then molded.


These next two spreads were created for the "using up your scraps" lesson for the art journaling class.  On the first spread I gessoed the background and then applied various watercolor inks and stains. Then I randomly glued on small bits of paper scraps, taking care not to cover the entire surface.  I embellished with more paper quotes and washi tapes. 


For this page I covered the entire background in cut squares of book text. Then I used ink sprays, dripping and blotting so the text wasn't completely obscured. I also added droplets of water over the page and then blotted the color up in places to get more texture. It's hard to see in the photo, but the  cut edges of the papers give the page even more texture. I stamped and added the fun quote (from an old  Paula Best stamp).


The next page is from some personal playtime.  This is small, done on an old manilla index card divider, approximately 5" x 6." I signed up for an online class, Journal Soup by Kate Crane, and this was the first lesson. I followed pretty much exactly what she did as I miraculously had all the same supplies! Not my usual style but I love it! That's a white glassine bag on the right which holds some miscellaneous quotes and bits of papers.


Are you ready for my August Rolodex-Card-A-Day posts? I will be back tomorrow with the first half.