"Art is my vehicle through life; may we share the ride together." Ron Wickersham

Friday, October 23, 2020

Inspiration "Board"

 I'm participating in an online "Artist Soul Retreat" by Laly Mille which has three workshops. The first one was posted yesterday and we were guided on how to make an inspiration page using bits and pieces of images and things that inspire us. This is much like a "mood board." She instructed us to adhere the items with a bit of glue stick and/or masking tape so they could be removed at a later time if we wanted to use them in a project.

I started gathering papers, images, fabrics, washi tape, wallpaper scraps and a dyed doily and collaged them in my sketchbook, doing a double--page spread. Without thinking too much about it, it turned into mostly florals and soft pinks. I like how it turned out. This is a fun activity when you're not feeling very inspired or motivated.


Saturday, October 17, 2020

A few art journal pages

 It's been quite awhile since I've played in my art journals. I've been working so much with paper and collage that I decided this week that it was time to get messy again!

I took a mini tutorial/class from Tiare Smith online and these were two of the pages she showed. 


She provided the "coloring book" drawing above and I tore around it and adhered it to a page in my journal. I sealed it with clear gesso so the ink wouldn't run and the media I put on top would blend well. The background is just a few different colors of blue and green acrylic smeared randomly and then white gesso added with a brayer when it was dry.  I used Faber Castell Big Brush pens to color in the image. These are water soluble while wet but permanent when dry (they are India ink).  The big takeaway I got from Tiare for this page was that you don't have to color in each tiny space of an intricate pattern. A large swath of color is ok too.


For this page I started with one that I had already painted with an ivory acrylic paint. I experimented with my new Vicki Boutin art crayons I received from a friend for my birthday. These are much like many of the watercolor crayons on the market from different manufacturers. I found these to be very creamy and pigmented. I used them in three ways: first I used a wet paintbrush to pick up color from the crayons directly and then painted different areas of the background for a watercolor look; secondly I colored directly onto the page with the crayons and then used a wet brush to blend the pigment; and lastly I scribbled the black crayon on a non-porous surface and watered it down to splatter on the background with a brush.

It felt good to get back into mixed media!

Monday, October 12, 2020

More October Swaps

I've joined two other swaps for October - the quarterly "inchie house" and the monthly AT coin.

There was no theme for the inchie houses, so I decided to go with a Halloween theme. I made haunted houses. I cut wonky houses out of watercolor paper, added textured sand paste and then painted them black. The doors and windows are cut from scraps of watercolor paper and colored with paint pens. These were fun to make.


The theme for the altered trading coins was "witchy woman" so I added these "cute" witches to a background of Halloween paper. They were all from one image having a tea party and two fit perfectly on each coin. It's hard to see in the photo, but I lightly colored their faces and hands with a green marker.

Add caption


Thursday, October 8, 2020

"6 Days of Halloween Spooktacular" Swap

 I joined a 6-day Halloween swap with five others. Each of us made a Halloween project (X5) and were assigned a day number. This week is the "reveal." We open one gift per day according to the numbers.

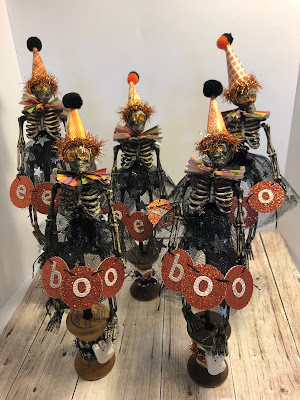
I had Day One and this is what I made for everyone.


They are "skeletons on a stick." The bases are old wooden thread spools wrapped with Halloween papers and tied with black eyelash fiber. I dry-brushed the skeletons with black paint and used orange Stickles in the eyes. The hats are also Halloween papers with pompoms on top and orange tinsel around the brim. The neck ruffles are mimi Halloween cupcake liners; skirts are ruffled black net with silver stars and moons and the banners are circle-punched orange glitter card stock with sticker letters. 

Once I had them finished I had to think of how to mail them. I didn't want to add the expense and weight of cardboard boxes to fit, so I recycled tonic water bottles! I cut two in half, inserted the skeleton and then taped them back together. After wrapped the join with Halloween patterned paper, I added the address label. The P.O. had a good laugh when I took them in to mail. I think they brought a smile to the recipients too.