"Art is my vehicle through life; may we share the ride together." Ron Wickersham

Wednesday, July 29, 2009

Under Lock and Key

I'm participating in a huge 4" x 4" "fat book" swap online. The theme is "Under Lock and Key" and we each made 38 pages. The hostess will bind the pages into a fat little book for each of us.

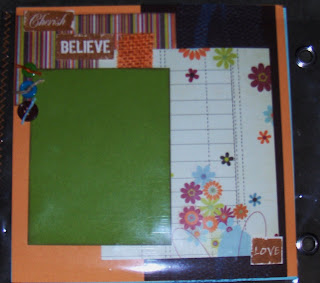
This is my page which I finally finished late, late last night. I had no idea what to do for this swap until I found this quote from Winston Churchill and the accompanying stamp set from Cornish Heritage Farms.

I stamped the quote on ledger paper and adhered it to the background cardstock and patterned paper. The number stamp in the background is from Paper Bag Studios. The title was embossed with black embossing powder. The keyhole was embossed using the Cuttlebug and Ten Seconds Studio art metal and a real metal keyhole from Tim Holtz. (It was far too expensive to put one of these on each of 38 pages, so I made my own!) And the keys were cut with a Sizzix die out of chipboard. I then used Versamark on them and embossed with Antiquities Rust Embossing Powder (a couple of layers).

These are going in the mail tomorrow and I can hardly wait to receive a finished book back to see all the unique pages everyone made!


Tuesday, July 28, 2009

Technique Cards

I've been busy making projects for August classes. These cards will be a technique card class. The first one uses the spotlight technique with alcohol inks.


The second uses stamps to make patterned backgrounds.
Stamping with water is the technique on this one.

This is a "matchbox" card and uses vellum and a special, sparkly embossing powder.

So, if you're a local, check out the Create Joy website for more information. These aren't listed yet but will be online at the end of the week.

Monday, July 27, 2009

Metal and canvas

Another week without posting - my apologies! It was a busy week of classes and then I went away for the weekend to attend my daughter's bridal shower. And it doesn't look like it will slow down any time soon!

I've been meaning to post this project from a "Hot Metal Mamas" class. It is held at Ten Seconds Studio but taught by Tracy from Create Joy. She sends us a list of supplies to bring and we also get to use the tools and metal at Ten Seconds. The project is always a mystery.

This month's project was a canvas, combining embossed metal and papers. I used my favorite Graphic 45 Fashionista papers along with red metal and the new Brrr Blue metal frm Ten Seconds. The canvas was first painted with a sandy-colored paint. The red metal was embossed with one of the new Kabuka molds and the blue metal was embossed with a new Stampin Up texture plate using the Cuttlebug. The butterfly is a Cuttlebug embossing folder. I just added a mat of dark blue cardstock as I haven't decided which photo to add. This was a fun and simple project - I can see it in so many color and pattern combinations - a great alternative to an expensive frame.


Sunday, July 19, 2009

Scrapbook in a Day

Tracy, Jaclyn and I designed and taught an 8-hr Scrapbook-in-a-Day class for Create Joy using the new canvas album by Donna Downey for Prima. This is an 8"x8" album made from canvas with five canvas pages and five page protectors for paper layouts. We divided the album among us, each taking a few canvas pages as well as protectors for papers. We used the Delight paper line from Fancy Pants, several printed fabrics, several colors of felt and burlap, four paint colors and four colors of cardstock. After about a week of working individually, we put everything together into one fabulous album for the class - a total of five double-sided canvas pages and ten layouts for the page protectors.

It is amazing how well this went together and how it all flows even though three designers worked separately on it! Now that the class is finished, Tracy kept the sample album for herself but gave Jaclyn and I full kits to make one for ourselves. I have spent most of this past week, on and off, working on mine and finally finished this afternoon! I love it! I think I shared the pages I actually designed on an earlier post, but here are sequential photos of the entire album. If you have never worked with canvas or fabric, you absolutely must try it. This was such a fun, fun project! (Remember, you can click on each picture to enlarge it.)


COVER

Inside front cover and first canvas page
pg 2(canvas) and 3(paper)


pg 4(paper) and 5 (canvas)


pg 6 (canvas) and 7(paper)


pg 8 (paper) and 9 (canvas)


pg 10(canvas) and 11 (paper)

pg 12 (paper) and 13 (canvas)

pg 14 (canvas) and 15 (paper)

pg 16 (paper) and 17 (canvas)

pg 18 (canvas) and 19 (paper)

last page (paper)
This is truly a mixed-media book. We sewed, stamped, painted, inked, and used lots of ribbons, buttons and other embellishments. I can't wait to find the perfect photos to add to this album.

Saturday, July 18, 2009

Final Two

I can't believe it's been a week since my last post! Where does the time go? I have been super busy with going to Albuquerque for a bridal shower for my daughter, teaching classes, taking a class and just the day-to-day regular stuff.

I received the final two patriotic 4" x 4" squares from the swap. The first one is from Jeri who lives in Texas near me. I love the image of the window box with flags and how it's sandwiched between the red and blue papers.


And this one is from Nancy. She said the picture is of her father (center) and his two Army buddies from WWII. His draft photo is on the tag and the postmark is a stamp made from her uncle's original draft letter. Nancy owns Sugar Lump Studios so you can check out more of her work as well as her stamps there.

Saturday, July 11, 2009

Two More

The mail brought two more patriotic 4x4s. This one is from Jean - I believe it's a photo of the ship her father was assigned to. It looks like she did this all digitally - wish I was better at that.

And she printed the Navy Hymn on the back superimposed over the flag. Very nice!
This one is from Angie. I love the image she used on this as well as the German scrap borders!

I'm still expecting 4 more. Can't wait to see them.


Friday, July 10, 2009

Finished at last!

After weeks of stamping, punching, cutting, printing, folding, scoring, taping and gluing, all 115 wedding invitations are finished! Although I was very excited and honored that my daughter wanted me to design and make these for her wedding and enjoyed every minute of the design and assembly, I am also sighing with relief that this task is now behind me! I am going to Albuquerque this weekend for her first shower and will hand-deliver this special package to her.

Here's a photo of all of them stacked neatly in piles ready to be boxed up somehow so I can get them on the plane with me.

And here's a closer photo of one to show the beautiful metallic Prism paper we used for the folders. I also used the Just Rite Stamper monogram for the centers of the scallops. Her colors are gunmetal, deep pink (almost fuschia) and dark orange.
I used white Prism textured cardstock for the invitations. They wanted them very plain - no ribbons, hearts etc. - but I thought they were a bit too plain. After receiving "permission," I cuttlebugged the top and bottom with the Swiss dots embossing folder.

Since I had plenty of offcuts of the metallic paper, I will probably make wedding programs too.

Wednesday, July 8, 2009

Altered Bottles

Our local stamp group met last night and had our altered bottle swap. At Christmas time, one of the members gave each of us a small bottle and we were to alter it for this month's swap. We exchanged according to our birthday month.

My bottle went to Karen. I used a double-sided transparency of a little fairy girl inside the bottle. (Click on the image to see a closeup.) When I cut the image out, I kept a little tab on the bottom which I glued inside a tiny wooden thread spool. I painted the spool white to be less noticeable and glued it to the bottom of the bottle and added irridescent shred around it. On the outside I added inspirational word rub-ons and tiny little adhesive pearls. Gold German scrap border was glued to the bottom of the bottle and around the neck. I also added some gold foil tape above that on the neck. I glued a fairy image to a flat-sided glass marble and attached that to the top of the cork. Silver glitter was glued to the side of the cork that showed above the bottle and I wrapped silver and gold wire around the neck to hang the small charms.

And this is the one that I received from Debbie (thank you!!). Isn't it darling? It's so different from the others - she thought "outside the box" and used it as a vase for the button/paper flowers. And the bottle is full of red, white and black buttons - if I ever need those colors, I will know just where to go! I love the black and white toile around the outside - it's a napkin - along with all the jewels!

All the bottles were very unique and suited the recipients so well. I wish I had gotten a group photo!

Tuesday, July 7, 2009

Another Patriotic 4x4

The patriotic 4" x 4"s from the online swap are arriving one by one. I received this darling one from Barbara H yesterday. I love the stamped image of the little boy. It's hard to see in the photo but the swirls are sparkly and the God Bless America is on acetate. Love it!


Monday, July 6, 2009

Breaking News!

Great news here - a new paper arts store will be opening soon in the North Richland Hills/Hurst area of Ft. Worth! The owner, Nita Tuirpin, is a former customer of the Recollections store so many of us know her already. And, the best news of all is that she has asked the Create Joy Team to join her on the creative/education side! So, Tracy, Jaclyn and I will be designers and instructors for the store. I am busy making a list and checking it twice as we are having an initial meeting tonight to start addressing questions, ideas and product! I will keep you informed as news develops, but we are shooting for an Oct. 1 opening date. Can't wait! Oh, and the name is Anthologies - a collection of works by an artist - how perfect!

Saturday, July 4, 2009

Happy July 4th!

I hope everyone is enjoying a very relaxing and fun fireworks-filled day! Do take some time to remember the reason for this holiday - freedom. And give thanks for all veterans and active servicemen and women for their service and sacrifice so that we may enjoy this freedom!

Above and below are some patriotic crafts for the holiday. I know it's late for this year, but maybe next! These are all from Country Living. You can find more pictures and full instructions for these at http://countryliving.com/crafts/projects/fourth-july-crafts-0707. On that site there are also files for the six vintage images used in the first project below which you can save to your computer for other projects.


Enjoy!

Thursday, July 2, 2009

Red, White and Blue Decorating Ideas

Red, white and blue, aside from being a very symbolic color combination, is also a very happy and versatile color combo. It can be bright and cheery or muted and vintagey. I love it. Check out these great photos from Country Living. Don't they make you happy? I hope they will give you some ideas for your summer picnics.


Wednesday, July 1, 2009

Red White and Blue

July 1st already - can you believe it?! July 4th is one of my most favorite holidays. I LOVE red, white and blue together and have always had at least one room of my houses decorated in these colors. To get you in the patriotic spirit, here are some photos from Country Living magazine's July online newsletter. (By the way, if you don't already subscribe to this, you should consider it - there are always great recipes, decorating ideas, crafts and "yummy" pictures.)
Don't forget to get out your flag and fly it this weekend!

Don't you love how these beautiful old white houses are decorated for the holiday!

Here is a patriotic 4"x4" collage I made for a friend. The red, white and blue rosette is made from _____? A cupcake liner! The patterned paper is from Rusty Pickle and the image is from a collage sheet from Digital Collage Sheets.
Tomorrow I will share some patriotic decorating ideas.