"Art is my vehicle through life; may we share the ride together." Ron Wickersham

Wednesday, June 30, 2010

Cuttlebug Challenge - Easel Cards

Just recently I decided to start participating in some online challenges - to jumpstart the creative juices. I've been making easel cards lately which just happens to be this week's Cuttlebug Challenge, so... here is mine!


This is a 5" square card. I cut the base card 5" x 10" and scored at 2 1/2" and 5" from one short end. I mountain-folded the card at the 5" mark and then valley-folded at the 2 1/2" mark bringing the edge up to the other fold.

The top layer is another 5" square piece with a green cardstock layer 4 3/4" square. The white piece on the left is 3 1/4"w x 3 1/2"h and embossed with the Textile Cuttlebug folder. Then I swiped over the top of the embossing with a Perfect Medium inkpad and brushed on "Pearl" Perfect Pearls. This gives a gorgeous shimmer which is difficult to see in the photo and is more subtle than either heat embossing or using glitter.

The flower is "faux watercolor" - markers are applied to the stamp, misted lightly with water and then stamped on the cardstock. The sentiment is heat-embossed with black embossing powder.

It's hard to see because the card is white, but the ribbon-tied button is actually inside the card and is the "bumper" that holds the card upright when open.

Be sure to check out all the creations of the Cuttlebug Design team and the other challenge participants at the blog: www.Cuttlebugchallenge.blogspot.com.

Monday, June 28, 2010

Patriotic Treats

Can you believe it's almost July 4th?! I know this is off-topic, but I just have to share these yummy sounding and looking desserts to make for your patriotic get-togethers this weekend. Some of them are really easy too.

First we have the Uncle Sam ice cream treat. Nothing more than a scoop of vanilla ice cream, a cake cone with a piece of fruit roll-up and some decorative icing gel, M&Ms and some whipped cream. The kids would love to help make this one!
What could be simpler than this pretty presentation! Fresh strawberries surrounding a few fresh blueberries and whipped cream.

This red-white-and-blue cheesecake would take a bit more time but how beautiful - and I bet it's delicious!

This flag cake is one I made every year when my own kids were growing up. Our neighborhood had an annual block party and we always brought this dessert. It's so easy, too - a cake mix in a sheet pan, topped with Cool Whip and decorated with fresh fruit. This one has blackberries for the "star" section, but I always used blueberries.
And, last but not least, the Edible Eagle. Isn't he cute? It's a marshmallow rolled in melted white chocolate and coconut topping a chocolate covered Oreo. The beak is a cashew. Cute!

The recipes for these, plus many more desserts, can be found HERE. Check it out. Hmm, I'm getting hungry!

Sunday, June 27, 2010

Mother's Day Shadowbox

This is a project I made for Mother's Day using a new Accucut "shadowbox" die. My friend, Vicki Chrisman, was the designer of this die, inspired by a vintage cabinet card. The die includes the trifold base piece, a frame and solid piece (shown on the right), the "shadowbox" frame overlay (center) and two decorative pieces (one shown under "mother" and the other above the photo). This is a very versatile piece - made with cardstock it folds into a card and several of the pieces can be used either as decoration as I've done or as a closure for the card.

I cut mine from chipboard to make a sturdy standing frame. It was covered with beautiful papers and I added a poem about mothers, flowers, lace, a doily, stamped vellum butterfly and buttons. The photograph is of my mother when she was about 9 or 10 years old. It fits inside the "shadowbox" and the top frame is done with bronze Ten Seconds Studio art metal.

Check out Vicki's blog, This Art That Makes Me Happy, to see more samples made with this die. If your LSS does not have this die, you can purchase very reasonable kits of three pre-cut patterned paper sets from Crafty Secrets.

Wednesday, June 23, 2010

Paris book

I belong to an online art group that meets annually in Grapevine, TX, for a retreat. This year's retreat will be the end of July. The format includes creating one large project - usually a book - and several smaller ones. This year the coordinator has asked several members, including me, to share in the design of the book. The theme will be Paris in the 1930's. My assignment was the "Haute Couture" spread and I just finished my two pages!

Since several members also read my blog, I am limited right now to just a few sneak peeks. After the retreat, I will share the full spread as well as all the pages of the book.


Sunday, June 20, 2010

Another Scrapbook in a Day

In May we offered a lovely Scrapbook in a Day class in which students created 20 8x8" pages in the 8-hr. class. The three of us instructors collaborated on the design using the same Moda fabrics, cardstock and patterned papers.

These are the seven pages I designed, in no particular order.


This was my favorite page. I love the egg fabric! The bird is chipboard cut with the Tim Holtz Alterations die, painted and Stickled.


Saturday, June 19, 2010

Easel Cards

These are three easel cards I designed and taught for a class last month. You start with the basic folded card base and then fold the top layer in half, back to the fold. Another card layer (the size of the card) is adhered to the folded section, even with the original fold. Then you need something inside the card to keep the card open like an "easel" - this can be a sentiment adhered to dimensional pop dots; or a 3D embellishment like a button or flower or bow; or a strip of paper or ribbon along the inside edge.

These three cards illustrate three different orientations or sizes as well as three different ideas for creating the easel.

The first one is a vertical A2 card with the fold at the top. A layered sentiment on pop dots creates the easel.


This one is a horizontal A2 card with the fold at the top. The clouds were masked with torn scrap paper and the sky stippled with Distress Ink. The easel is formed with a strip of green cardstock - the "grass" is cut with my new fringe scissors (see a previous post about these) and folded up to provide a lip to hold the card when it is displayed.


And the last one (excuse the pink picture - these are white cardstock pieces - have no idea why this photo came out this color!) is a 5" square, top-folded card which has a button for the easel. The tulip was stamped with a watercolor technique - waterbased markers were used to color directly on the stamp and then lightly misted with water prior to stamping. It's an easy way to get a beautiful watercolor look.


Thursday, June 17, 2010

We are finishing up teaching our spring classes so I can finally share some of the projects I designed for that feature.

Here are two cards that were done for Mother's Day. The first one uses the Tim Holtz butterfly Alterations die. It is large, so I only used half for a butterfly in profile. There are several pieces to this die - solid wings as well as cut-out ones. I adhered Tacky Tape sheet to cardstock and die cut the solid wings; the cut-out ones were just cut from plain cardstock. Then I layered the shapes and sprinkled ultra-fine glitter over the sticky tape that was exposed. I added Glossy Accents to the cardstock outline for added glitz. The scalloped strips were also cut with an Alterations die (the plain strip is Sticky Back Canvas, inked to age it). The paper flowers are two torn paper circles with five cuts for the petals. The side of each petal was then rolled around a wooden skewer toward the center of the petal to form the flower. A coiled paper rosette forms the center of the flower.

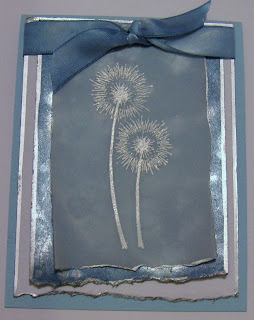
I love the technique on this card. The top layer is vellum, stamped with Versamark and heat embossed with white embossing powder. The blue layer is made with white cardstock. Faded Jeans and Broken China distress inks were blotted on a non-stick craft sheet and then spritzed with water until droplets appeared. The cardstock was then placed in the ink to absorb the colors. It was heated/dryed slightly and then brushed with "Pearl" Perfect Pearls. This makes a beautiful mottled, shimmery paper. The ribbon was "dyed" to match by swiping directly with the two distress ink colors on both sides, then spritzed liberally with water and scrunched into a wadded paper towel to absorb the moisture and crinkle the ribbon. A quick pass with the heat gun finished drying it. And, of course, my favorite pen - Krylon leafing pen - was used to edge the layers.


Wednesday, June 16, 2010

Anthologies Project of the Month

It was my turn to design the June Project of the Month for the Anthologies website and I surprised everyone by doing a layout. I even had wedding photos to use! So I made this using the "I Do" paper collection by American Crafts. I love the colors in this line and they went beautifully with the beach photos.

Complete instructions and a closeup photo of the flowers are on the website here. Click on the Project of the Month and you will get a pdf file which can be printed out. And if you haven't visited recently, check out the gallery for the monthly kit (Anthologies Connection) - there's awesome inspiration there!


Tuesday, June 15, 2010

Almost Father's Day

Have you finished your Father's Day card(s)? I thought I would share a few great masculine images from Digital Tuesday (check out their blog here - every Tuesday they post free vintage images) that would work well for the men in your life.


Sunday, June 13, 2010

And the winner is...

ME! After last week's convention I received an e-mail from Scrapbookpal.com that my name was drawn in their drawing. I was excited to hear that I'd won a Tombox adhesive runner and it arrived today.

My spirits were dampened, however, when my friend, Judy, announced she won not one, but two prizes. Check them out below...


I hate to complain, but geez...it doesn't seem fair!! Anyway, I'm happy for Judy. Then I found out that I had won a blog hop giveaway on my friend's blog - http://scrappingskylar.blogspot.com. Thank you, April, for this generous treasure trove of goodies! She even crocheted the yarn flower - awesome! Makes me feel way better.

Saturday, June 5, 2010

Convention Part 2

First I want to share a photo of us "four Musketeers" - we all work/teach at Anthologies and I don't think we've ever had a photo taken of all four of us! Though we all went separately to the convention, we met up and someone took this (thanks for sharing Tracy) - can you see that Tim joined us? He was actually just in the background demoing, but he did take time out to autograph his picture for Elaine. From left to right are: Rhonda (whose birthday was that day), Elaine, Tracy and myself. We are wearing the new Anthologies t-shirts. There are two styles - one says "tell your story..." and the other says "...because it's cheaper than therapy."


Here's a photo of some of my $1 deals. Yes, each item shown was only $1! The scissors are pinking shears - they cut so much better than the little plastic Fiskars decorative ones. I should have stocked up on more, but I was trying to be good.

And this was a great find. It's a little case with four clear compartments and it "rolls" up very compactly. This shows it closed.

And here it is open. It was only $5 and I bought it to use for assorted embellishments for my "on the go" case. I'm thinking it would be great for small assortments of buttons, brads, ribbons, bling etc.

It came stuffed with all of this - two acrylic alphabet sets, eight little ink pads and eight tiny square acrylic blocks! I really only wanted the case, but I will at least try these items and see if they are worth anything. At least the blocks will be useful; not sure what the quality of the other items will be. But I'm happy with an empty case!

Thursday, June 3, 2010

Great American Scrapbook Convention

The annual Great American Scrapbook Convention is in town and these past two days have been a whirlwind of excitement. Yesterday I attended the 12-hour crop (actually was only there ten hours as the friend I went with had to get home early) - one of my first crops and what an experience! The creative energy in the room was fantastic and everyone was having a great time. I didn't get as much finished as I'd have liked, but learned alot - especially about how to prepare and pack for that period of time away from my personal craft space!

Today was shopping day and I arrived just after the doors opened and left just before closing. Tim Holtz was the main attraction and he was swamped with admirers all day. I went there as soon as I entered and his demo table was already several rows deep in women. Every time I went back (yes, I did serious damage in the Stampers Anonymous booth and was there three times!) it was the same. I did, however, manage to get this photo of "the man" doing his thing and got my copy of his new book autographed.


And here's poor Mario - I don't think he ever emerged from behind the cash register!
I was so busy looking at everything and shopping that I forgot to take many photos. Here's one of a little chandelier in the Crafty Secrets booth that I'm totally smitten with. Look at those cute paper cupcake holders on the lights - isn't that just adorable?! (Oops, looks like one fell off.) In fact, their entire booth was adorable and filled with awesome samples and products. Love that place!


And here's a super cute idea using scalloped circles to make a 3D pumpkin.


Tomorrow is R&R (rest and relaxation) for me before I return to teaching classes this weekend and next week. My mind is spinning with all the creative stimulation - so many ideas and so little time...

Wednesday, June 2, 2010

Anthologies Connection

It's June 1st and you know what that means...reveal day for the current month's kit at Anthologies! This kit is called "Take Flight" and includes papers from the Queen Bee collection of Pink Paislee, along with lots more fabulous goodies. Did I spy some screening, a wine cork and some funky yarn in those boxes? Fun, fun stuff. Check it all out on the Anthologies website here, order your kit before they are gone and spend some time perusing the fantastic gallery of projects created by the Connections Design Team this month!

I'll be MIA for the next few days. The Great American Scrapbook Convention is in town and I'm off to a 12-hour crop tomorrow and shopping on Thursday. Can't wait to see what's new - hope my pocketbook can stand it!