"Art is my vehicle through life; may we share the ride together." Ron Wickersham

Monday, June 29, 2015

Documented Life Planner - Week 25

June Theme - Travel Journaling

June 20 - Week 25

Art Challenge: Hometown Inspiration
Journal Prompt: There is no Place Like Home


The inspiration for this week was "hometown." I couldn't decide what to choose, so I used houses to represent the five major places I've lived.  I had just been creating with products from the Authentique paper collection "Playful" for my LBH Media Team assignment this month, so I used the leftovers to create the page.

The background was painted with a mixture of Dina Wakley heavy-bodied acrylic paints and Dyan Reaveley's new acrylic paints for journals. I first gessoed the pages and then blended the paints with a baby wipe. This creates a nice soft look. I also stamped some texture with paint and Archival inks. The words were computer-generated and I did some doodling with a permanent black pen.

While browsing through Hobby Lobby last week, I came across a framed quote which was perfect for my page title: "Wherever we are together, that is home."

Saturday, June 27, 2015

"Today Happens Only Once" Minibook Tutorial


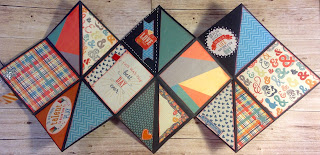
"Today Happens Only Once" Minibook
designed by Susan Tidwell


This is one of the projects I created for my LBH Media Team assignment this month and is being featured over on the LBH blog today.  It's a minibook  using the fabulous "Playful" paper line from Authentique. The fun color palette of orange, turquoise, navy and gray make these papers perfect for summer projects!


This mini "squash" book (4" x 4") is also called a "dragon" book because of it's meandering folds. It can be made larger as well - you just need to start with three square base pages whatever size you desire.

So here's the tutorial!

Supply List

(2) 4"x4" pieces of corrugated cardboard
(3) 8"x8" cardstock (I used navy)
(1) pkg. Queen & Co. "Checkers" (orange gingham "button" stickers)
1/2 yard blue and white baker's twine
2" red satin ribbon
5" thin orange twine
blue ink - Quick Quotes Chalk Ink "Blue Moon"
coral ink - Distress Ink "Abandoned Coral"
2 small pieces velcro
liquid adhesive or tape runner or Scor tape
white Uniball Signo gel pen
1/8 or 1/16" hole punch
Scoring tool and bone folder
scrap of washi tape
optional: star and heart punches, stapler


Instructions

1. Score and fold each square piece of yardstick in half. Open up and score and fold in half in the other direction. This will make a cross ( + ) on each sheet.  Score and fold each sheet once again but diagonally from one corner to the opposite corner.


2.  Grasp the corners with the diagonal folds and push the diagonals in to collapse the sheet into a square. Press all folds well. Repeat for all three.


3. Unfold the squares and adhere together overlapping the lower right quadrant of the first piece with the upper left quadrant of the second piece. Repeat with the third piece, gluing the upper left quadrant to the lower right quadrant of the second piece. When all three pieces have been attached, collapse/"squash" into a square book.


4. Tear paper off one side of each of the corrugated cardboard pieces exposing the ridges. Ink edges and ridges with blue ink. Glue one piece to the front cover and one to the back cover.

5. Cut 3 3/4" x 3 3/4" square pieces from the assorted pattern pieces. Some of these pieces will then be cut in half diagonally to form triangles for some of the pages in the book. Ink all edges with coral ink.

6. Open book and lay flat. Start adhering papers to cardstock pages. Mix up the patterns and colors for interest. I left some pages blank and later decorated with scraps, the cardstock diecuts and journal cards. Below you can see one "side" of the opened book decorated.


7. Turn over and repeat for second side.


8.  Decorate pages as desired. I added some punched hearts and stars and some of the yardstick diets here and there. Add Glossy Accents over these. I also doodled with a white pen.


9. To decorate the cover, I used one of the journal cards, cut it down slightly and inked the edges. I added for checkered "buttons" in the corners and looped and glued baker's twine around to form a frame, knotting it in the upper right corner. The tiny tag is cut from one of the journal cards. I cut it into a tag shape, punched a hole in the top and threaded orange twine through the hole. It is attached around the upper right button as well.


10.  Since the book is fat and didn't want to stay closed very well, I made a closure out of one of the cardstock embellishments. I cut the strip in half and glued one end of each piece under the right and left edges of the cover panel. I added tiny pieces of velcro to the ends and then wrapped them to the back, glueing the other side of the velcro pieces to the back. (See below.)


 11. Add some fun photos and you are finished! Here is another photo showing how the little book "meanders."


I hope you enjoyed my little minibook project! All supplies can be found either in-house at The Little Blue House or on our website: www.thelittlebluehouseonline.com  The book is also on display at the store if you would like to see it "up close and personal."

HAPPY CREATING THIS SUMMER!


-----------------------------------------------------------------------------------------

I  also wanted to share with you a workshop I will be repeating soon at The Little Blue House!
If you love the color theme of the Authentique- Playful Collection you will love these
"Happy Houses" designed me!


This fun mixed media workshop will be offered on July 7th  (Tuesday) and you can choose either the morning or evening session.  Visit the Workshops Page on the LBH Website for all the details on this upcoming class! www.thelittlebluehouseonline.com


Friday, June 19, 2015

Documented Life Project - Week 24

June Theme: Travel Journaling
Week 24
Art Challenge: Recording Memories
Journal Prompt: Take the Road Less Traveled


For this week, I chose to document our trip to Colorado with our grandson, Drew, a few weeks ago as it's the most recent one we've taken. 

We had flown into Albuquerque to babysit the boys but had to go a few days early because of flight availability. So we took that opportunity to drive up to Buena Vista, CO, where my husband's almost-ninety-year-old aunt lives. I hadn't seen her in four years and she'd never met Drew.

For this spread I covered the background with torn maps, adding one of Colorado on the top. Then I added some paints and stamping in the background. I also used photos of the Collegiate mountain range and of Drew at the river near her house. 

Memories of the trip were journaled on the back of a vintage postcard. The "road less traveled" journal prompt was perfect, as we took a wrong turn at one point and ended up taking the scenic, but longer, route there!

I'm looking forward to next week's prompts to be posted tomorrow. I can't believe that it's almost halfway through the year already!

Tuesday, June 16, 2015

The Patriotic House Canvas Class is back!


Due to popular demand, I will be teaching the popular Patriotic House Canvas class at The Little Blue House again this summer. If you have created some of the other season's houses and need this to compete your set, be sure to check this out!

It will be offered during select Buffet class times. Check out the complete details on the LBH website online here.  You can also call the LBH at 817-431-7930 to sign up.

I hope you will join me in class!

Monday, June 15, 2015

Documented Life Planner - Week 23

June Theme - Travel Journaling
June 6
Art Challenge - Illustrative Journaling
Journal Prompt - Take Me Away


The challenge for week 23 was Illustrative Journaling. Yikes, I can't draw! 

The first traveling that came to mind was our trips to Mexico the past few years for my dental work. Despite having to go to the dentist during these stays, it is actually quite relaxing and enjoyable
 to go to Los Algodones. 

It's a border town near Yuma, AZ, and exists primarily to serve the dental needs of Americans and Canadians. It is very safe and there is only one "hotel," a quaint little 40-room hotel that is reminiscent of the 50's!  There are several little food establishments in town but the primary one for the "tourists" is the Paraiso, an open-air courtyard which features live music every day and is a favorite for everyone. It's quite a crowd-watching place!

I decided to try to sketch and watercolor a few of these spots and add journaling to remember our times there. I don't love this spread but it does capture the feel of the place and I've managed to complete the challenge. I need lots more practice in sketching, drawing, watercolor and perspective!

Because the Dylusions journal pages aren't great for watercolors, I first covered both pages with clear gesso and then sanded them smooth. It worked reasonably well with the watercolor. I know better than to use many of my pens over gesso, but I had forgotten about the gesso and was just thinking of writing and sketching over watercolor. Oops! Ruined a few practically-new pens. Lesson learned!

Friday, June 12, 2015

New Prima Mixed Media Workshops

Announcing two new Prima Mixed Media workshops I will be teaching at The Little Blue House later this month!


Prima Technique Tags Workshop

Create 6 artsy tags while learning lots of techniques using new Prima texture pastes, 
crackle, beads, mica and more!

Tuesday, June 23
10:00 am - 1:30 pm
or
6:00 - 9:30 pm
$35.00


Prima Mixed Media Canvas Workshop

Create beautiful dimension, texture and color with Prima Art Basics and Art Ingredient
 products in this fun mixed media workshop. Surface is a 12" x 12" canvas.

Friday, June 26
10:00 am - 2:00 pm
$50.00 

detail

More photos of both projects and complete details can be found on the LBH website or call 817-431-7930 to reserve your seat.

I hope you will join me for some fun, messy, artsy play!


Thursday, June 4, 2015

Documented Life Planner - Week 22

May Theme - Touchy Feely (Texture)
Week 22
Art Challenge: Textured Paper
Journal Prompt: I'm So Not Feeling It


This week's journal prompt was exactly how I was feeling while working on this page - "just not feeling it!" My muse just couldn't decide on how to proceed with all the old textured papers I found in my stash. I finally discovered a page on the FB group on which the artist split a heart and used the "holey" packing material (right side). Since I also had that same paper, I went from there.

She had layered different papers behind the heart but I couldn't get that to look right with the papers I had. I found the square doily and the white doily-type wings which I'd been saving for years so thought I should just start using some of my treasures instead of squirreling them away forever!

The textured papers here are the doily, the handmade paper (left side of heart, which I painted), the packing material which I painted white, the small white heart--shaped doily, the red heart which is textured wallpaper cut into a heart shape, and the wings. In the lower right corner of the spread, there are also two strips of embossed paper (which I inked with pink) and a lacy tissue-type paper.

I used black-and-white-patterned washi tapes for under the die cut days of the week. For the background I first stenciled gel medium which resisted the pink paint when I painted over it. I then stenciled some numbers with red paint and small white dots. I also randomly smudged orange gelato.

Once again, I finished before the end of the week! I'm relieved this page is done!

Tomorrow we leave on a 6:30 am flight for Albuquerque. We'll be babysitting Drew and 4-month old Grant (or rather helping their Dad while Mom is out of town on a business trip). Looking forward to seeing my little guys again!