|
Monday, November 26, 2012
Third Annual Little Somethings Workshop


Sunday, November 25, 2012
12 Days of Ornaments - Days 11 and 12
I was out of town for Thanksgiving, so hope you were following The Little Blue House blog and saw the last two ornaments for this year's 12 Days of Ornaments feature.
If not, here is Day 11, created by Tracy Pounds. It's a "remodeled" blue house from last year, updated with washi sheets, glitter and paints. Isn't it adorable?

And, last but not least, Lynette's Letter from Santa ornament created from a paper tube, metal, cardstock and ribbons. What a fun way to display and collect all the letters to Santa through the years!

Be sure to check out the LBH blog for the complete instructions for all 12 ornaments!
Tuesday, November 20, 2012
12 Days of Ornaments - Day 10 - My Vintage Shadowbox Ornaments
Today is my day to share my vintage-style ornaments on the LBH blog. I used mini hinged aluminum tins to create tiny shadowboxes for trimming the tree.

Here are the supplies you will need to recreate these little scenes, all of which are available at the LBH.
 |
Supplies
|
Christmas paper with small images (Kaisercraft Turtle Doves "Lords")
Coordinating patterned paper (Simple Stories Handmade Holiday)
Old music paper
Lightweight scrap paper (copy paper)
Scissors
Medium Snowflake Rosette Die (Tim Holtz/Sizzix)
Decorative punch
Small embellishments (Studio Calico wooden snowflakes/bits of artificial greenery)
Small metal hinged tin
Glossy Accents
Stickles (Diamond and Xmas Red)
Red and green Distress Markers
Silver glass glitter
Shaved Ice
Sugar Dust
White paint dabber
Red metallic ribbon
Red and green twisted cording
Pencil
Water brush or small paintbrush and water
Let's begin!
(**Note that the lid of the small tin will be the left side of the shadowbox and the bottom of will be the right side. The lid is slightly larger than the bottom.) The instructions below are for the right ornament above. See the variation at the end of this post for instructions for the ornament on the left.
First you will need to make a pattern for the paper pieces which will be glued inside the tin. Lay the tin on a piece of scrap paper and trace around it. Cut this out, place in tin and adjust until it fits well. Then cut the final pattern out of the center of a scrap paper, leaving a margin around.
 |
Trace around tin.
|
 |
Test pattern inside tin
|
Place this scrap paper over the paper with the images and use as a viewfinder to "audition" which image or portion of an image you wish to use. Then trace inside the window, cut the image out and glue into the tin with Glossy Accents. Repeat this step for the lid using music paper - since the lid is bigger, you will have to make another pattern.
 |
Using pattern cutout as viewfinder
|
Use Glossy Accents and Stickles on the image wherever desired and let dry.
Smudge Glossy Accents around the inside perimeter of both sections and immediately sprinkle with Shaved Ice. Turn over and tap gently to remove excess.
 |
Glossy Accents and Shaved Ice along inside edges
|
Paint tiny snowflake with white paint and sprinkle with Sugar Dust while wet. Let dry and then glue in place inside tin. Glue tiny bits of greenery at the bottom of the image, apply a light coat of Glossy Accents and sprinkle with Shaved Ice. Tap off excess.
 |
Painted snowflake
|
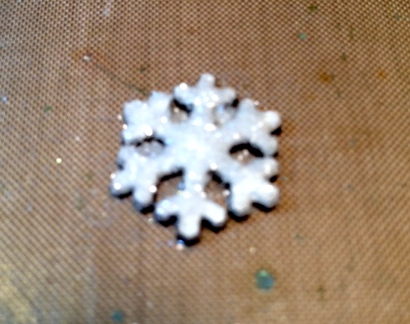 |
Snowflake with Sugar Dust
|
The image I used for the left side of the ornament was a brown and white line image from the Christmas paper. I colored the wreath with a green Distress Marker and a waterbrush and the ribbon with red marker. I added Glossy Accents over the red ribbon and tiny dots of red Stickles for the berries. This was then glued in place on the lid.
 |
Finished wreath inside lid
|
Glue on red metallic ribbon around the outside of the tin. This was a bit wide for the lid, so I cut approximately 1/16" off the edge for the lid. (Note - this ribbon did not fray because of the metallic content.)
 |
Glueing ribbon on outside
|
Apply a thin line of Glossy Accents around edge of both parts of the tin and sprinkle with silver glass glitter. Let dry.
 |
Apply Glossy Accents around outside edges (this photo shows the second ornament)
|
Fold cording in half and tie a knot about 2" down from fold. Lay knot at top of tin on hinged side and wrap around tin, glueing in place.
 |
Folded cord with knot to form hanger
|
For a finishing touch, I punched two shapes from the coordinating paper to glue on the back of the tin for dating and signing the ornament.

VARIATION
The second ornament was made in the same manner, except for the image in the lid. I used the medium snowflake rosette die to form a 3D snowflake from music paper.
To create the snowflake rosette, use the die to cut your paper of choice. (**Note: this die is wonderful because it not only die cuts the rosette but also perforates it so you don't have to manually score it. However, when the die is new and very sharp, it often cuts right through the perforations. To compensate for this, try adding a strip of copy paper or even cardstock along with the paper you want die cut to reduce some of the pressure of the die. You might have to adjust this several times.)
Punch out any loose bits and accordion-fold the entire strip, creasing gently. Glue ends together, forming a circle. Be sure to keep the "mountains" and "valleys" of the folds in a zigzag pattern. You shouldn't have 2 mountains or 2 valleys side by side.
 |
Die cut rosette
|
Place wrong-side-out on a slick surface and gently press down in the center, also keeping the folds intact. (**This is much easier to do with a partner/4 hands!) Glue a small circle (or the decorative piece from the die) to the center as a base to hold the snowflake. (**Hot glue is best for this step.) When the glue is set, turn over and glue a decorative element (I used a wooden snowflake which I previously painted and dusted with Sugar Dust) to the center which will help to reinforce the rosette.
 |
Rosette wrong side out, ready to be pushed down
|
 |
Glue on base
|
Apply a thin line of Glossy Accents along the outside edge of the snowflake rosette and sprinkle with silver glass glitter. Shake off excess and, when dry, glue to lid of tin.
 |
Apply Glossy Accents to edges
|
 |
Sprinkle glass glitter on edges
|
 |
Finished stacked snowflake
|
To finish, continue steps of first ornament above.
I hope you have enjoyed seeing my ornaments. Please leave a comment on today's post on the LBH blog for a chance to win one of these little vintage shadowboxes. Let us know your favorite Christmas dessert and why - is it a traditional family recipe or just something you like?
Don't forget to visit tomorrow and Thanksgiving Day - only TWO more ornaments!
Happy Creating,
Susan
Monday, November 19, 2012
12 Days of Ornaments - Day 9
Kristen is sharing her gingerbread couple "cookie" ornaments on the LBH blog today.

Aren't they cute? They're made with paper mache ornaments, covered with self-adhesive cork and decorated with Stickles and "Goosebumps" bling for buttons.
Visit the blog to see the complete tutorial and leave a comment for a chance to win one of these cuties.
Sunday, November 18, 2012
12 Days of Ornaments - Days 5-8
I've been out of town all weekend and have much to catch up on. Here are the four ornaments posted these past few days on The Little Blue House blog.
Day 5 Rhonda created a darling Iris-folding inspired paper mache circle ornament. The detailed instructions are on the blog.

Elaine created this pretty acrylic tag ornament for Day 6 which could also be used on a pretty package. she used lots of "lotions and potions" including the new Metallic Distress Stains and the Mini8 Punch from WRMemoryKeepers.

Rhonda shared another ornament on Day 7 which she created out of corrugated cardboard which comes in a roll and is available at the LBH. She also used Snow Tex and Shaved Ice for the snowy bodies of these cute snowmen.

Today (Day 8) Miss Tracy created two versions of her "petals" ornament: one is a poinsettia and one is a snowflake. These, too, are created from the rolled corrugate and Snow Tex. Aren't they pretty?

Remember to continue following this blog and the LBH blog for the remaining four ornaments. The last one will post on Thanksgiving Day, just in time for those who start decorating as soon as the turkey is put away!
Be sure to comment on each day's post for a chance to win that ornament. (Congrats to everyone who has already won an ornament!) And if you are local, stop by the LBH to see all these pretties on our tree - photos just don't do them justice.
Wednesday, November 14, 2012
12 Days of Ornaments - Days 3 and 4

I hope you are following the"12 Days of Ornaments" on the Little Blue House blog. We are posting some fantastic ornaments, complete with tutorials, each day. You even have the chance to win one if you post a comment each day.
Yesterday's ornaments were these two beautiful stars created by Elaine Howell. She used the new Washi Paper which has the same properties as Washi Tape but comes in 12"x12" sheets! This can be die cut or cut on electronic cutting machines - love it. She also used new Halo Glitter which is a mix of several colors giving a tremendous shine and wow factor.

Today Lynette Chiles is sharing this gorgeous pinecone ornament made from plastic spoons, a styrofoam egg and the new VerDay Paints. If you haven't seen these, you must check them out at the LBH - they create amazing effects on just about any surface!

So visit these gals' blogs (click on their names above) and hop on over to the LBH blog to see more and be sure to leave a comment.
Monday, November 12, 2012
Little Blue House 12 Days of Ornaments - Day 2
I hope you are joining us for the "12 Days of Ornaments" on the Little Blue House blog. Yesterday featured Miss Tracy's darling cork tree. Check it out here.

Today my ornaments are featured (we each create two similar ornaments - one for the LBH tree and one to give away to a lucky commenter on that day's blog post.) For my ornaments, I created tiny mixed media canvases that can be hung on your tree or added to the wrapping of a gift for a special someone. I hope you will create some of these ornaments along with us!
MIXED MEDIA CANVAS ORNAMENTS

Designed by: Susan Tidwell
Here are the supplies you will need for the canvas ornament (all of which are available at the LBH).
3"x3" canvas
Mod Podge (or decoupage medium of choice)
Acrylic paints - white, ivory and background color
Clear Rock Candy Distress Stickles
Diamond Stickles
Quick dry tacky glue (Helmar's 450)
Black Archival ink
Black journaling pen (must be permanent)
Tiny wooden snowflake (Studio Calico) or jingle bell with Baker's twine (depending on which canvas you are making)
Scrap of burlap or burlap ribbon
Old sheet music to cover canvas
6 - 1/4" wide strips of coordinating Christmas papers
3" square of coordinating paper for back of ornament (optional)
1 or 2 background stamps (script or overall print)
"Tools" for mark-making (see instruction #3 below)
4-5" ribbon for hanger
1. Cover canvas with Mod Podge and decoupage music paper on top and edges. You can tear pieces or just use one piece for the entire canvas.

2. Lightly paint over the canvas with white paint, leaving some of the paper showing through. Be sure to paint portions of the edges of the canvas as well.

3. In the next steps of creating the layered background you will use various mark-making tools - bubble wrap, sole of a flip flop, punchinella. See photo below.

First lightly wipe ivory paint over the bubble wrap and "print" onto the canvas in random places. Don't forget to stamp some on the edges.

Mix some of your colored paint (I used green) with ivory or white to get a lighter color. Lightly dab this color through the holes of the punchinella, much like using a stencil. I also swiped the paint in places with my finger. Again, don't forget the edges!

Next wipe the darker paint color on the bottom of the flip flop and print that design. Mine had a crosshatch design but flip flops come in lots of different patterns! (I promise, you will never look at flip flops again in the same way!) Again, swipe some of the darker paint on the canvas, especially on outer edges.

4. Now you will create even more depth by stamping with black permanent ink with several background stamps. I used a script stamp and a honeycomb-pattern stamp. If your ink is too dark, stamp off on scrap paper first so the stamping is lighter. You are creating a subtle background, not the focal image.

5. If the background becomes too dark, whitewash with a light coat of either white or ivory paint to subdue the color. Here I used some white to mute the bright green.
6. Coat with Rock Candy Distress Stickles and dry. (Note: Distress Stickles can be heated to dry, unlike regular Stickles.)

7. Cut six 1/4" strips of coordinating printed papers. These will all be shorter than 3." (Note: this is a perfect way to use the patterned barcode strips on many brands of papers!) Glue these on the canvas starting with the longest and working up to the top of the tree, cutting each strip approximately 1/4" shorter than previous strip.
8. Cut tiny piece of burlap for tree trunk and glue below tree.
9. Paint a tiny wooden snowflake with white paint and dab on Diamond Stickles. Glue to top of tree for star.
10. Use fine permanent journaling pen to outline and doodle as shown, if desired.
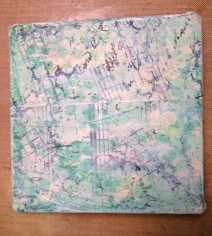
11. Form loop with ribbon and glue to center top back of canvas for hanger. Glue 3" square of paper to back to finish canvas and hang proudly on your tree!
 |
| Finished tree canvas ornament |
VARIATION
To create the bell canvas (or any other shape), follow directions as shown above, substituting the instructions below for steps 7 through 9.
Draw or trace the desired shape on lightweight copy paper. (I traced a cookie cutter I had that was the perfect size.) Cut out.

Arrange and glue strips of papers over the paper pattern.

Turn over and cut excess strips off around shape. Then glue entire piece to canvas.

Repeat as for tree canvas but eliminate the snowflake tree topper. Tie a length of Baker's twine through a tiny jingle bell and glue to bottom of bell.
 |
| Finished bell canvas orament |
I hope you have enjoyed these mixed media pieces. Would you like to win one of these? Just hop on over to the LBH blog and comment on the post letting us know the craziest item you've ever crafted with. Have you ever used flip flops as a stamp? One lucky commenter will receive their choice of these ornaments - winner will be posted tomorrow so be sure to visit again!
Happy Creating!
Saturday, November 10, 2012
Coming soon - 12 Days of Ornaments

Are you ready for our third annual "12 Days of Ornaments"? Starting tomorrow, the Little Blue House gals will be posting a different Christmas ornament, complete with instructions, on our Little Blue House blog. This will continue for 12 days, ending on Thanksgiving Day. This is our annual pre-Christmas gift to you. Be sure to check out the blog each day and leave a comment. One lucky commenter (each day) will win the ornament of the day. If you are local, stop by the store to see the ornaments "in real life" on our little tree.
Subscribe to:
Posts (Atom)