I hope you are joining us for the "12 Days of Ornaments" on the Little Blue House blog. Yesterday featured Miss Tracy's darling cork tree. Check it out here.

Today my ornaments are featured (we each create two similar ornaments - one for the LBH tree and one to give away to a lucky commenter on that day's blog post.) For my ornaments, I created tiny mixed media canvases that can be hung on your tree or added to the wrapping of a gift for a special someone. I hope you will create some of these ornaments along with us!
MIXED MEDIA CANVAS ORNAMENTS

Designed by: Susan Tidwell
Here are the supplies you will need for the canvas ornament (all of which are available at the LBH).
3"x3" canvas
Mod Podge (or decoupage medium of choice)
Acrylic paints - white, ivory and background color
Clear Rock Candy Distress Stickles
Diamond Stickles
Quick dry tacky glue (Helmar's 450)
Black Archival ink
Black journaling pen (must be permanent)
Tiny wooden snowflake (Studio Calico) or jingle bell with Baker's twine (depending on which canvas you are making)
Scrap of burlap or burlap ribbon
Old sheet music to cover canvas
6 - 1/4" wide strips of coordinating Christmas papers
3" square of coordinating paper for back of ornament (optional)
1 or 2 background stamps (script or overall print)
"Tools" for mark-making (see instruction #3 below)
4-5" ribbon for hanger
1. Cover canvas with Mod Podge and decoupage music paper on top and edges. You can tear pieces or just use one piece for the entire canvas.

2. Lightly paint over the canvas with white paint, leaving some of the paper showing through. Be sure to paint portions of the edges of the canvas as well.

3. In the next steps of creating the layered background you will use various mark-making tools - bubble wrap, sole of a flip flop, punchinella. See photo below.

First lightly wipe ivory paint over the bubble wrap and "print" onto the canvas in random places. Don't forget to stamp some on the edges.

Mix some of your colored paint (I used green) with ivory or white to get a lighter color. Lightly dab this color through the holes of the punchinella, much like using a stencil. I also swiped the paint in places with my finger. Again, don't forget the edges!

Next wipe the darker paint color on the bottom of the flip flop and print that design. Mine had a crosshatch design but flip flops come in lots of different patterns! (I promise, you will never look at flip flops again in the same way!) Again, swipe some of the darker paint on the canvas, especially on outer edges.

4. Now you will create even more depth by stamping with black permanent ink with several background stamps. I used a script stamp and a honeycomb-pattern stamp. If your ink is too dark, stamp off on scrap paper first so the stamping is lighter. You are creating a subtle background, not the focal image.

5. If the background becomes too dark, whitewash with a light coat of either white or ivory paint to subdue the color. Here I used some white to mute the bright green.
6. Coat with Rock Candy Distress Stickles and dry. (Note: Distress Stickles can be heated to dry, unlike regular Stickles.)

7. Cut six 1/4" strips of coordinating printed papers. These will all be shorter than 3." (Note: this is a perfect way to use the patterned barcode strips on many brands of papers!) Glue these on the canvas starting with the longest and working up to the top of the tree, cutting each strip approximately 1/4" shorter than previous strip.
8. Cut tiny piece of burlap for tree trunk and glue below tree.
9. Paint a tiny wooden snowflake with white paint and dab on Diamond Stickles. Glue to top of tree for star.
10. Use fine permanent journaling pen to outline and doodle as shown, if desired.
11. Form loop with ribbon and glue to center top back of canvas for hanger. Glue 3" square of paper to back to finish canvas and hang proudly on your tree!
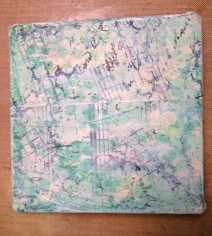
 |
| Finished tree canvas ornament |
VARIATION
To create the bell canvas (or any other shape), follow directions as shown above, substituting the instructions below for steps 7 through 9.
Draw or trace the desired shape on lightweight copy paper. (I traced a cookie cutter I had that was the perfect size.) Cut out.

Arrange and glue strips of papers over the paper pattern.

Turn over and cut excess strips off around shape. Then glue entire piece to canvas.

Repeat as for tree canvas but eliminate the snowflake tree topper. Tie a length of Baker's twine through a tiny jingle bell and glue to bottom of bell.
 |
| Finished bell canvas orament |
I hope you have enjoyed these mixed media pieces. Would you like to win one of these? Just hop on over to the LBH blog and comment on the post letting us know the craziest item you've ever crafted with. Have you ever used flip flops as a stamp? One lucky commenter will receive their choice of these ornaments - winner will be posted tomorrow so be sure to visit again!
Happy Creating!
No comments:
Post a Comment