"Art is my vehicle through life; may we share the ride together." Ron Wickersham

Saturday, June 27, 2020

Last Collage Challenge #25

I've come to the last page in my stamp-catalogue-recycled-into-collage-book. Even though these challenges continue weekly for the rest of the year, I will be taking a hiatus, at least for now, and this will be the last collage I will do with the prompts. It's been fun and certainly a challenge but it's also time to move on.

Collage #25


Prompts:

1) magic - whatever that means to you (I used an image of magic mushrooms)
2) floral (image of a bird's nest orchid)
3) dashed lines (on paper at top of page)
4) a form or portion, filled or blank (the blank time card on left of page 
and consignment note lower center)
5) text not in your natural language (Russian page, lower right; 
French script in center)
Bonus: washi tape (floral tape in several places on page)

And here's the cover finished:


Thursday, June 18, 2020

Coiled Fabric Bowl

What to do with scrap fabric strips? Make a bowl/basket of course!


I found instructions online and decided to try to make one. The directions called for 5mm cotton rope and, luckily, I found some in our garage. I'm not sure if it was 5mm but it was about 1/4" and worked fine.  The main thing is it needs to be soft enough to stitch through a sewing machine. Then I tore scrap fabrics into strips, approximately 3/4" to 1" wide but I didn't measure anything and they were all random widths.

You need a sewing machine for this - I used a regular needle, regular thread and a medium size zigzag stitch.  Basically you wrap the fabric strips around the rope to cover it and form into a small coil to start. Zigzag stitch over where the coils meet, continuing in a circle until the "base" is the size you desire. Then you start lifting the "bowl" as you stitch to form the sides.

This is an easy project. I was happy to have all the supplies I needed without having to shop! If you miss stitching any areas you can just go back in and stitch them. I didn't even backstitch until the very end!  

My bowl ended up being about 7" diameter and 3" high. But it could be any size depending on the length of the rope and how much fabric you have. This can even be adapted to make round coasters. I will probably use this for paper scraps on my art table when I'm fussy-cutting.


Monday, June 15, 2020

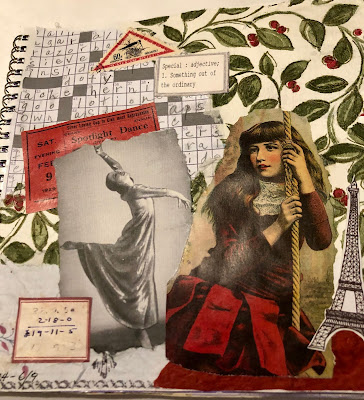
Collage Challenge #24

Collage #24


Prompts:

1) dance (image of dancer and dance ticket)
2) something in shape of triangle (Eiffel Tower and stamp)
3) crossword or newspaper puzzle (crossword)
4) something you wear (girl's red dress)
5) crinkled paper (red handmade crinkly paper in lower right corner)
Bonus: piece of napkin or tissue paper ( green vine napkin)

I also added a few labels and a patterned paper in lower left.

Saturday, June 13, 2020

Junk Journal Page Swap

I am participating in a junk journal page swap in June. The theme is "women" in vintage style. The page is 5' wide by 7" high.


Front


I collaged various bits of papers and text to the background base (file folder) before collaging a portion of a doily, some lace and image of flowers with the focal point of Edwardian ladies, an image from the internet. I added the little blue ticket to balance the blue of the paper at the top and the flowers and then added a large paper flower with a vintage button.  The cluster at the top right is made by clipping strip of lace, a piece of ribbon, a ticket with a postage stamp and a tiny button onto a bulb pin.


Back


The back is supposed to be very lightly decorated so I stenciled with Distress ink and then added two paper bits at the bottom. The recipient can still use this side for journaling if they so desire.

Wednesday, June 10, 2020

Using 6" x 6" Paper Pads

I'm slowly trying to work through my stash, especially that now is not the time to be out shopping! I have many 6x6 paper pads and rarely use them. I think I bought them because I liked the paper collection and didn't want to spend so much money on the 12x12 pads! Anyway, I just seem to hoard them so decided to actually start using them.

I am participating in a card swap this month where we are to use either scraps or our stash. I decided to use these papers. I found an old card technique which I think was called "herringbone." I cut four 3/4" strips of six coordinating patterns and was able to make three cards with a few strips left over.


This was so easy but barely made a dent in even one paper pad! Guess I'll have to mass produce more cards!

Another way I've been using them is on 12" x 12" scrapbook layouts. Four 6x6's equal one 12x12 if you want to cover the entire page; two 6x6's across the center of a page make a nice base for other papers and photos. I've just begun to try all the ways to work with them.

Thursday, June 4, 2020

Collage Challenges #22 and 23

I'm not quite sure how I did, but I got a week behind on these challenges. So I did two this week.

Collage #22


Prompts:

1) a string of numbers (the ledger entry in upper left corner, the numbers along bottom, and the numbers in the label in lower right corner)
2) something with teeth (the camel - isn't he ugly?)
3) an office supply (I used stapes in several places as well as lots of torn masking tape)
4) text or image in reverse (stamped text at middle top from a Tim Holtz "reflections" 
stamp set and script on right edge from same stamp set)
5) something shiny (bits of red foil candy wrapper, the mirror in the ad, and the 
shiny little purse by the #6)
Bonus: connecting links (image of heavy chain links)


Collage #23


Prompts:

1) an instrument that measures something (tape measures and 
the Trader Joe's sticker of a scale)
2) something red (ticket, red paper scrap, red teddy bear, circle punched from 
magazine)
3) an emblem (the emblem on the antique label)
4) a piece of magazine or newspaper text (magazine text in upper left corner 
and small piece to right of teddy bear)
5) repeating pattern (polka dot paper in background; also textured pattern on white paper)
Bonus: paper with a bumpy surface (the handmade white paper that I embedded with
some rug hooking canvas while making it)


Monday, June 1, 2020

"Waterfall" pockets using envelopes

This waterfall pocket is made with two business envelopes (#10). I cannot find the You Tube channel I originally found the tutorial on, but here is one if you want to see the actual construction. (https://www.youtube.com/watch?v=w663mrPlgZ8)  The top edge is cut off slightly to make pockets. One envelope is folded so there is one end longer than the other (this forms the top pocket and the back). The second envelope is also folded to form two more pockets. This is tucked into the fold of the first to form the waterfall.

I sewed the two envelopes together at the top fold and covered the fronts of the pockets with vintage wallpapers, vintage images and lace. The undersides are covered with tea-dyed paper for space for journaling.


The tags/journaling cards inside each pocket are book pages folded over and glued together to form a sturdy base then collaged with various papers and images. The backs are plain paper for journaling.


This can be slipped behind a belly band or tucked into a journal with a paper clip or even glued to a page. I love that it's interactive and not hard to create.