"Art is my vehicle through life; may we share the ride together." Ron Wickersham

Thursday, March 7, 2013

One of my Front Porch Kit Layouts and a Tutorial

I think this was my favorite project to create with the "Say Cheese" kit - probably because I used some "lotions and potions" which I love to do. It's a layout with three photos of my youngest grandson, Drew, a few weeks ago when he cut his first two teeth. My daughter sent me these photos to document the occasion, but we couldn't even see his teeth!


the full one-page layout

and some closeups


I wanted to share how I made the background for this layout. I love the texture, soft color that coordinates nicely with the photos and the papers, and the amount of white space which places the focus on the photos.

I started with a piece of plain white cardstock and used a small chevron stencil (from Studio Calico) over which I spread white gesso with a palette knife. I immediately removed the stencil and then let it dry completely. (You can see that the stencil did not cover the width of the page so I had to do it twice and it doesn't exactly line up. No problem, because the photos will cover that space!) Look at that fantastic texture!


Once that was dry, I tinted more white gesso with a bit of Dylusions Turquoise Spray Ink to make a soft aqua color. I used a brayer to roll this over the stenciled pattern, covering about 2/3rds of the page. It doesn't completely cover, especially over the stenciled area, but I like the randomness of this.


This created a softly colored background and even more texture as you can see in this closeup.


When this was dry I started laying strips of patterned papers and the black and white dotted fabric in place on the layout. The edges of the papers were distressed and the fabric strips were torn. None were inked as I liked the clean contrast of the white core.  The strips were machine-stitched to the cardstock page. The title strip and "snap on" word strip were sewn just down the center so they would have some dimension.


Another fun element on the page is the addition of the white plastic rings that were in the kit. I painted some of them with acrylic paint and then added Glossy Accents to make them glossy again. I heated these with my heat gun to dry them and a serendipitous thing happened - they bubbled! I quite liked this additional texture so I didn't try to "fix" the problem.


I left the little wooden camera embellishments natural as I liked the contrast with the soft colors. I also added pieces of the tiny white acetate filmstrip under one photo and as photo corners on the other two photos.


The green-blue color of the edges of the authentic filmstrip coordinated nicely and the black contrasted well and made the photos pop. I wanted to add some dimension with this so I ruffled and stapled the filmstrip before glueing down under the largest photo.


So there you have my layout with my precious little Drew. Maybe at some point we will see his teeth and I can add a tiny photo!

I still have a few more projects to share so stop by again tomorrow!

Wednesday, March 6, 2013

My Front Porch Kit Projects - Part 1

Did you enjoy seeing the  "filmtastic" kit reveal yesterday?  This kit will appeal to so many people - who doesn't take photos? It's bright and cheerful too - a winning combo!

Today I'm sharing two projects I created from the kit using the file folders. Remember these (under the cute photo booth accessories)?


For my first project, I created a camera box to accomodate loose photos. I made a pattern for a simple, small box (about 4"x6"x2") and cut it out of one file folder, then covered the inside with turquoise cardstock and the outside with two coordinating patterned papers from the kit.  I used pieces of the filmstrip to create a little window on the front as well as covering the bottle cap for the camera lens. The three "buttons" on the front were from the alphabet sticker sheet; the "knob" on  top was one of the wooden pieces and I added a small black domino as well. The black cording strap is threaded through a hole in the top of the box.


This view shows the top better.


And here you can see how many photos will fit inside.


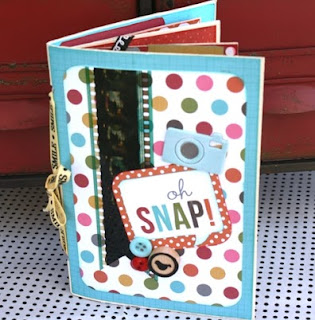
The next project was also created from the file folders. It took the full two remaining folders. I had very little left over!  I cut both folders in half and cut away the gussets. Then I cut them down a bit and folded the bottom edges up to create pockets and folded them in half. This yielded four folded pages which were stacked inside each other and held together with the ribbon.

Here's the cover. This was the last project I created from the kit so I used the "leftovers" - bits and pieces of the cardstock and patterned papers and lots of the remaining buttons and other embellishments.


More inside pages. For the pages with the pockets, I created tags from the remaining file folders and punched tabs for the tops from scraps of assorted papers.


 This project was lots of fun to create. Though small (approximately 5" x 7"),  it will hold lots of photos
 and was a great way to use up lots of the extras in the kit!

Kits are still available for purchase online: www.thelittlebluehouseonline.com or locally at The Little Blue House (817-431-7930 or 118 W.Olive St., Keller, TX)  

Be sure to visit the online gallery (see previous link) which is chock full of beautiful eye candy - projects made by the fabulous FPK Design Team all from this kit! You will certainly be inspired!!

Tuesday, March 5, 2013

"Say Cheese" Front Porch Kit Reveal


 Have you had enough sneak peeks and are you ready for the full reveal? Today is the day!

This is the full design board showing all the fabulousness packed into this one kit - cardstock; patterned papers, many from Simple Stories; a full set of Thickers alphas; ribbons; buttons; chipboard banners and cameras; six coordinating fabrics including burlap; filmstrip (the real stuff!); diecut grungeboard camera; plastic rings; three gusseted file folders; a glittelry word paperclip; kraft labels; a large Maya Road bottlecap and a layered diecut title. Whew, lots of goodies - hope I didn't forget something.


And a few closeups


Also included in the kit are "Blueprints" (ie. full tutorials with photos) of five projects designed by Tracy, all of which can be created with ONE KIT!

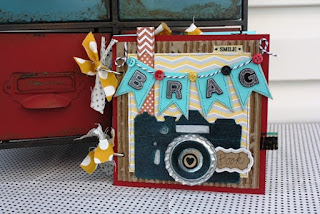
A darling 6"x6" "brag" book with lots of room for photos


Two double-page layouts


"Photo booth" props (three signs, lips, mustache and funny glasses)


And a hanging organizer made from the three pocket folders


The kit is available for pickup starting today at The Little Blue House.  And most of the Design Team projects are on display so come see these fabulous creations up-close-and-personal! Photos just don't do them justice.  The online gallery should be available either today or Wednesday so be sure to check that out to see ALL the projects - www.thelittlebluehouseonline.com.

Still haven't ordered yours? There's still time, but they're going fast and we only have a limited supply.

Starting tomorrow I will share the five projects I created for this kit.

Monday, March 4, 2013

Last day for Sneak Peeks!


Today is the last day before the full reveal of the Front Porch Kit tomorrow!
 Here's another peek at some of the many wonderful products packaged in this kit.
There's something for everyone to make layouts, home decor, cards, books and so much more.


Here's a peek at another one of my projects. I can't wait to show you the complete projects starting tomorrow!


Have you visited the other designers' blogs to see their creations? (See the list at the right.) Be sure to check out the Little Blue House blog daily and comment to have a chance to win a free kit.

Pre-orders are now being taken online at www.thelittlebluehouseonline.com or in person (or by phone) at The Little Blue House. Kits can be picked up as early as tomorrow and come by to see the display of designers' projects in the House.

Sunday, March 3, 2013

Peek #3

Time for some more teasers for the "Say Cheese" Front Porch Kit. Here's a portion of the design board showing some of the products that are packed into this kit@


And here's a peek at another of my projects. (That little cutie is my youngest grandson, Drew, whose first two teeth just came in!)


Here's an easy list for you to check out all the other designers' blogs to see their peeks.

and our guest designer

The kits are available for pre-order NOW at
The Little Blue House - 817-431-7930 or

Be sure to check out the LBH blog here and comment each day for a chance to win a free kit!

Saturday, March 2, 2013

Ready for another Sneak Peek?


Only 3 more days til the full reveal of this Front Porch Kit - "Say Cheese!" It's a super cute kit with lots of bright colors and fun embellishments. It's sure to put a SMILE on your face!

Here's another peek at one of my projects.


Be sure to check out the other designers' blogs. Leslie Ashe, a talented and much published local designer, is our guest designer for this kit so visit her blog at www.leslieashe.blogspot.com to see what she's created!

Remember, you can pre-order your kit now at www.thelittlebluehouseonline.com or call or stop by the store. Kits will be available to pick up on March 5th.

Friday, March 1, 2013

Today's the Day!


The new Front Porch Kit from The Little Blue House will be released on Tuesday, March 5, but sneak peeks and orders start today!

Here's a peek at part of the awesome design board showcasing this fun and colorful kit. Can you guess what the focus of this kit is?


I created 5 cute projects with this kit and here's a small portion of one. Can't wait to share them all after the 5th!


We are happy to welcome a guest designer for this kit, Leslie Ashe.  Check out her blog here and see what she is creating with the kit!

You can order your own kit online at www.thelittlebluehouseonline.com starting today or by calling The Little Blue House at 817-431-7930.  You can also stop by the store - starting the 5th the projects will be on display!

Be sure to visit all the other Design Team members (see their blog list on the right of my blog) to see their sneaks too.