Here is the final project I created from the "Game On" Front Porch Kit. It's a minibook, the base of which is made from just one piece of pattern paper. A few folds and two small cuts and you have a darling little book that can hold a surprising amount of photos. Of course, I added lots of scraps and snippets of other papers, buttons, and ribbons to embellish.
 |
| Front cover using alpha stickers and metal foil tape (see instructions later in post) |
 |
| First and second pages - page on right lifts up to reveal two photo mats as seen below |
 |
| Using a decorative photo corner punch adds so much to the design |
 |
| Page three which is actually a pocket revealing a tabbed double-sided photo mat inside - love those polaroid frames which were on a paper included in the kit |
 |
| Back page is a tiny pocket holding another polaroid frame and a card |
 |
| Overall view |
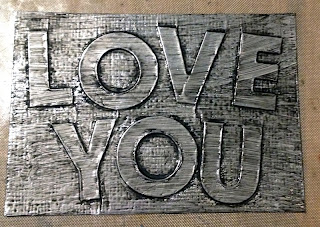
I thought I would share step-by-step photos of how I made the title block for the front cover. I first cut a scrap of the cardstock the desired size (any color would do as it will be totally covered, but I happened to have red on my workspace so that's what got used!). Then I added the alpha stickers that were included in the kit - you can see that the "v" tore as I took it off the sheet but it won't show when we're done.
Next I covered the entire piece with the foil tape with extra to fold over the edges.
This is already sticky on the back which makes it super easy to use. I rubbed over the entire piece with my fingers to reveal the letters.
Then I burnished well with a paper stump, defining the letters even more and smoothing the background.
In this closeup you can see the pattern of the cardstock in the background.
After folding over the edges, I swiped the piece with black Distress Paint (this acrylic paint works well on non-porous surfaces). It collects in the crevices around the letters and makes them pop.
The final step was to wipe off the excess paint, especially on the tops of the letters.
And voila, the title is ready to be mounted on the front of the minibook. (Excuse the red "E" - must be a reflection of something as it really isn't red!)
Hope you enjoyed this brief tutorial on how to get extra mileage from ordinary sticker letters. This would be a great way to use up those colors you don't like or use!
If you haven't ordered a "Game On" kit, there are just a few left!
To get yours, call or stop by the LBH:
118 W. Olive St.
Keller, TX 76248
817-431-7930
or order online: www.thelittlebluehouseonline.com


1 comment:
You are a genius, Susan. Great work! Thanks for sharing.
Post a Comment