"Art is my vehicle through life; may we share the ride together." Ron Wickersham
Showing posts with label techniques. Show all posts

Monday, April 20, 2020

Finishing the 14-Day Art Journal

Here are the last four days of Julie Fei-Fan Balzer's 14-day mini art journal series.


Day 11 - Abstract (left page)

The technique for this day was to stamp with acrylic paint multiple times on the page and then color in the negative space with watercolor to form an overall abstract design. My stamp did not give me as abstract a result as Julie's but the technique was interesting.

Day 12 - Black and White Doodles (right page)

This technique was simply drawing lines with black marker to form shapes and then to doodle on the lines and within the shapes with both black and white pens of different widths to form patterns. My white pens didn't show up well on the black - it seems they soaked into the pigment so the result is far more subtle than desired. I discovered several dried up pens, so I was also able to declutter!


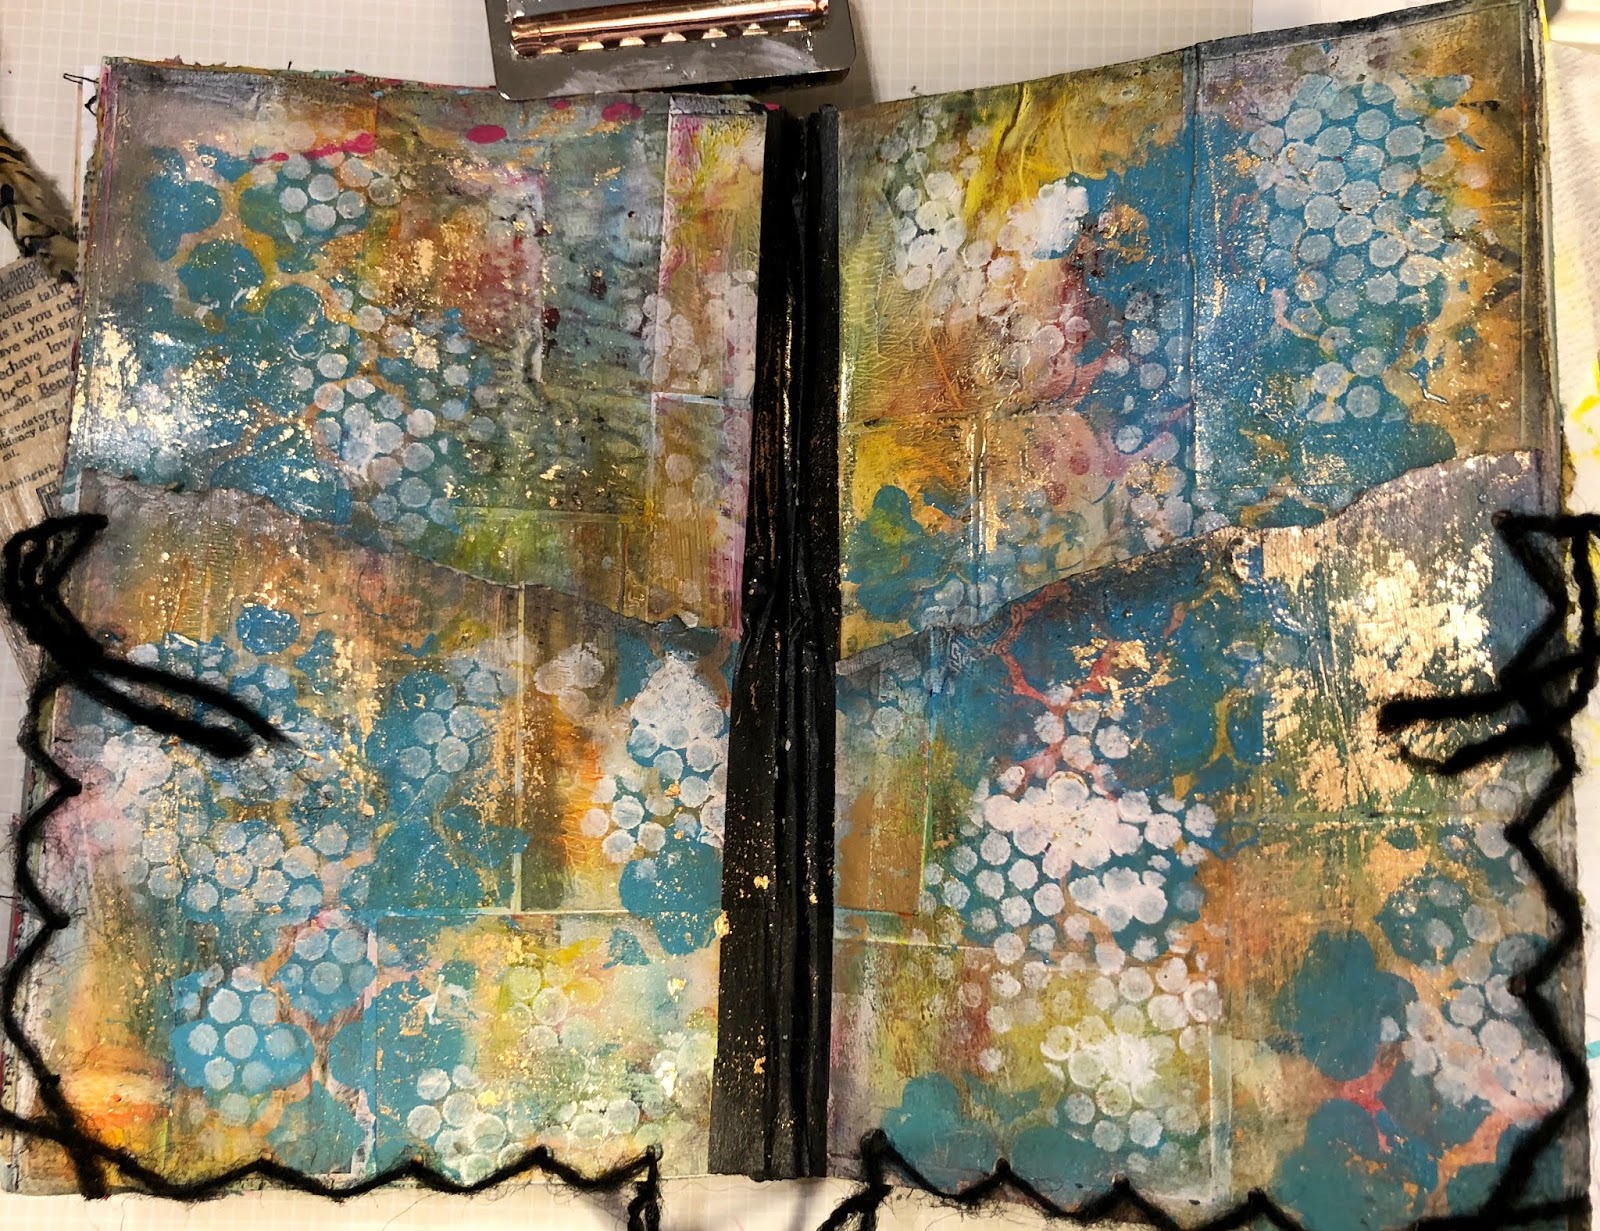
Day 13 - Mixing Media (left page)

This technique used water-soluble crayons (I used Tim Holtz Distress Crayons) and acrylic paint. Three colors of the crayons were scribbled on the page and then spread with a paintbrush and water.  The yellow circles and dark blue marks were also added with the crayons. In order to make this layer permanent, I used matte medium on the gel plate and printed over the entire page. . This is a great tip to fix any water-soluble medium instead of brushing over.  Once this dried, the light blue acrylic paint was added for extra interest.

Day 14 - Monoprint and Sketch (right page)

This page was already painted from the extra acrylic paint (blue) that I used up from the previous page. Then I used the gel plate to print a second layer with orange paint. When dry I sketched the flower with permanent pen and then used fluid acrylic paints to color the flower. Since these are transparent, you can see the sketch marks and previous layers underneath. I also doodled with white pen since the page was quite dark.


I thoroughly enjoyed experimenting with these techniques - some old and some new. It was a great distraction from what's presently going on in the world. Art is therapeutic!


Sunday, April 5, 2020

More Art Journal pages

Having fun playing in my tiny little art journal following Julie Fei-Fan Balzer's techniques.

Day 6 (on left)


This day was repeat stamping to make a pattern.  Julie used a nice tiling stamp that she had hand-carved. I didn't have any stamps like that so I used a zigzag I had hand-carved awhile ago.  It's not as graphic a result as hers but it worked ok.

Day 7 (above right)

This technique was "rainbow roll stamping" using a brayer with multiple colors and a large foam stamp. I had forgotten how much fun this technique is.


Day 8 (double spread below)


For this page we did layered stenciling. First a thin layer of three colors of acrylic paint was applied over the entire page and dried. Then a contrasting color was stenciled over the page. Lastly, a thick coat of acrylic paint was placed all over and then quickly wiped away through a stencil with a baby wipe.  The possibilities for this are endless, depending on the colors and stencils used.

Tuesday, March 31, 2020

Art Journal pages 4 and 5

Here are two more days of Julie Fei-Fan Balzer's art journal technique series.

Day 4 (on left) was using watercolors. Concentrated colors were used to make marks on the page (she used arches; I used rectangles). Then a wash of color was added to the background and, when everything was dry, the rectangles were outlined with white pen. It worked well, considering this was not watercolor paper.


Day 5 (on the right) looks scary! The theme was doodled collage. A magazine image of a woman was glued to the page and then doodled with gel pens. I only have a few of these, so had to make do with what I had. This is a fun technique and could be used in so many ways to enhance a magazine image.

Thursday, March 26, 2020

14-Day Art Journal Freebie

Julie Fei-Fan Balzer is hosting a free 14-day art journal series on her website. You have to join, but it's free. You can check it out here: balzerdesigns.com

First she makes a tiny journal - about 3" wide by 5" high. You take four pieces of paper 6"w  x 5"l and fold each in half lengthwise. (I used mixed media paper but it's not very thick and, if I did this another time, I would use watercolor paper to stand up to all the wet media she is using.) Whatever you want for a cover is also cut 6" x 5" (or even slightly larger) and folded. The pages are nested into the cover and then stapled along the spine. To reinforce the covers, the first page is glued to the inside of the front cover and the last page is glued to the inside of the back cover. This will give you 14 pages for the series.

I had a piece of fabric cloth leftover from a book cover I made a few years ago and it was almost the exact size! So that is what I used.


Every day Julie is posting another mini-tutorial (5-10 minutes) for a technique. I think today is the third day, but I've done two so far.

The first (on the left) was using oil pastel as a resist with acrylic paint. I had recently decluttered my oil pastels, so I used a white crayon. I don't think it resulted in as nice a resist as hers did, but it was a lesson learned!


The second (on the right) used two layers of acrylic paint. The first layer was dried thoroughly before painting on a thick layer of the second paint. Then before this dried it was scribbled into using a skewer. This technique is called "sgraffito."

This is an interesting and fun exercise, especially now when we are home-bound and looking for projects to fill the time. Hope you will join us and spend some time arting!

Sunday, July 29, 2018

Altered Book - Final Pages

And here are the last of the pages in this altered book.

This spread has a sewn vellum pocket tip-in. The background for both pages plastic wrap/watercolor technique. Paint with juicy watercolors and then lay a crumpled piece of plastic wrap over the wet paint. Remove plastic wrap to reveal a fun texture. If you let the paint dry before removing the wrap, the texture will be more defined. I also added gold foil.


The crown on this page is made with a flattened aluminum Coke can which I embossed with the Cuttlebug and an embossing folder. Then I added alcohol inks and some black paint to color it.

Metal embossed crown with magazine image

I may have shown this spread before. It's a "neighborhood" created out of various scrapbook papers with little windows and doors that open to reveal more vintage faces. The background is watery watercolors sprinkled with alcohol while wet. The water repels the alcohol making puddles that reveal the layer below.


One more three-page spread with a window in the center page with a suspended corrugated heart. The vintage sepia images are on a background of acrylic paints and gesso through a stencil.


Left page


Right page 


Center window page

This is the last spread in the book. I glued many pages together in the back to be able to cut a niche with a door (left page). The background is a napkin decoupaged over random ephemera and then a wash of walnut ink to age it.  The Bingo card is a collage I made years ago and decided to give it a home here.


Cut out niche with door revealing key and keyhole


I hope you enjoyed peeking inside my altered book. I am so addicted! I have already started prepping yet another book!

This post was scheduled to go live while I am in Chicago. We left yesterday to visit our youngest daughter there for a few days. I'm hoping for some relief from the brutal Texas heat.  I'll be back next week!

Friday, July 27, 2018

Altered Book - Part 2

Continuing on with more book spreads...

For the next page I followed along with LorriMarie Jenkins in this video using cutouts and a Tim Holtz "paper doll."


Cutouts/paper dolls

This page incorporates a zipper to make a pocket for a tag. The old cabinet card image of the man was printed on another image creating a layered look.


Zipper pocket

The background of this spread was done quite awhile ago. I layered two vintage black and white photos over pink tissue paper for the focal points. Then I found an old ratty pink flower which I cut in half and added to the page for texture.


This spread consists of three pages. The first and third pages are decoupaged with a napkin over a painty background. The middle page is actually a pocket for tags. Many scraps, a tag, postage stamps and even fabric bits were sewn to the pages before they were taped together. I found two very old tiny framed photos to add to each side.


Left page and one side of pocket


Other side of pocket and right page


This spread has an acetate window tip-in on the left page. The acetate was already printed with the text and flower. It covers a large image of a family and their house. The background has texture paste through a stencil and watercolors. 


Left page with acetate window tip-in


This spread has two torn pockets, hand-stitched together with black yarn. I added some tags I received in a swap. The microscope slide on the left page is one I received years ago in a swap and the heart on the right page is a sample I made while playing around with black UTEE (Ultra Thick Embossing Enamel), a stamp and gold ink.


Torn pockets 

Still more to come...

Thursday, July 26, 2018

Another Altered Book - Finished!

I've been working on this altered book for a few months, with lots of interruptions! Many of the backgrounds were done and I had to add focal points. And then the book was starting to fall apart so I dared not add any more spreads!

For the covers, I glued on wrinkled wrapping paper for texture, painted brown and then added the three Prima Rust Effect Pastes (Red Rust, Brown Rust and Brass) with a natural sponge. I sprayed with a clear coat to protect the texture and avoid it brushing off. The bookplate is very old - it may have been Basic Grey. I added the words cut from book text. I added a piece of patterned paper to dress up the spine and covered everything with a coat of Mod Podge to further seal it.


The first spread consists of three pages. The middle page has six small windows cut out and is covered with a large piece of mica which I attached with eyelets. The first and last page have six images each, cut from old Stampington magazines.

Left page, spread one

Middle page of first spread

Right page, spread one

Middle page with mica attached


The next spread is two distinct pages.  The images on the left page are placed under old slide mounts altered with alcohol inks. There is gold foiling on the page but it's hard to see.


Left page with foiling

The right page is a packing tape image transfer laid over a spray mist scrap (thank you Gloria!). The butterflies are old puffy stickers someone gave me that had warped - they look like they're flying off the page!


Right page image transfer

This third spread was done with aluminum duct tape over textures, burnished to bring out the patterns and then painted with a black paint wash.  The image on the right page was cut into thirds and I added glass microscope slides and copper tape to each section. I love this technique!


Left page with lots of textures


Right page with three microscope slides

I will be back tomorrow to share more spreads with you.


Monday, May 28, 2018

Starting another altered book


Happy Memorial Day!  I hope everyone is enjoying parades and barbecues but also remembering the brave soldiers who fought and died for our freedom.

After returning home last week, my back went out and I was immobile for three days. I couldn't even make it to my art room which was the hardest part of the whole ordeal! 

Thankfully it's feeling much better now and I have managed to get back into a routine of working on an altered book I recently started. I am again following along with LorriMarie on YouTube as she posts each background technique.

So far, I have completed five spreads (I'm including the link to each specific video). These, of course, are just the backgrounds. I will go back later to add focal points and finishing touches.


Technique #1: Torn pockets, gelato, gold foil


Technique #2: fabric, texture paste and stencil; envelope pockets


envelope flap open


Technique #3: acetate window tip-in


acetate window


Technique #4: watercolor/plastic wrap, copper foil, vellum pocket tip-in


Technique 5: napkin collage, pocket page - left spread


Right spread


Center pocket page with tag

Have a great week!


Thursday, March 23, 2017

Recent Swaps

I recently hosted an "Old Techniques are New Again" swap. We revisited a marbling technique using shaving cream which has been around for years.  Basically the technique uses shaving cream sprayed into a pan and leveled out like frosting. Then drops of a few colors of acrylic ink, paint, alcohol ink, or even food coloring are dropped onto the shaving cream and "combed" through with various tools. A sheet of paper is placed on top and rubbed gently. After removing the paper and scraping off excess shaving cream, it is left to dry and you end up with some amazing background papers!

For this swap we had to make a card using one of our marbled backgrounds.

This was the one I sent off. I used a second marbled piece to die cut the bird.


And I received this one.  I think we were all thinking "spring" as the cards were all bright and colorful.


If you haven't tried this technique before, give it a whirl. It's expensive and fun and the papers smell amazing. I've even seen this on Pinterest used for coloring Easter eggs, which would be fun to do with kiddos!

I am also participating in a "Divided Postcard" swap where we each divide a postcard into thirds and decorated one section. We then send it to two more people and, when completed, gets sent on to a fourth person. This is truly cooperative art!

Here is the postcard I started with. I decorated the address side with stamps and watercolors.


For my section on the reverse side, I used modeling paste through a floral stencil and then added Color Burst powder watercolors. I finished with a stamp and some spritzes of gold paint.


This is the first postcard I've received. The left section was already completed. I used Distress Ink on my background and stamped a Ken Oliver daisy stamp in Archival ink.  I colored with regular colored pencils, white paint for the flower and used gold Stickles for the flower center.


It will be fun to see how these postcards progress and what they look like finished!


Friday, June 12, 2015

New Prima Mixed Media Workshops

Announcing two new Prima Mixed Media workshops I will be teaching at The Little Blue House later this month!


Prima Technique Tags Workshop

Create 6 artsy tags while learning lots of techniques using new Prima texture pastes, 
crackle, beads, mica and more!

Tuesday, June 23
10:00 am - 1:30 pm
or
6:00 - 9:30 pm
$35.00


Prima Mixed Media Canvas Workshop

Create beautiful dimension, texture and color with Prima Art Basics and Art Ingredient
 products in this fun mixed media workshop. Surface is a 12" x 12" canvas.

Friday, June 26
10:00 am - 2:00 pm
$50.00 

detail

More photos of both projects and complete details can be found on the LBH website or call 817-431-7930 to reserve your seat.

I hope you will join me for some fun, messy, artsy play!