Welcome to Front Porch Kit Friday! The Design Team for the "Say Cheese" Front Porch Kit will be sharing on their blogs today either a project or fun tutorial and some of our favorite items found in this kit.
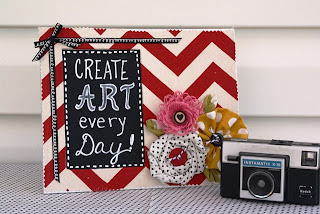
This project I created is a covered chipboard frame which I found in my stash from years (yes, years!) ago. When I spied it I thought it would be a good surface to showcase some of the lovely fabrics in the kit.
I covered the frame with the red and cream chevron fabric, pinking the edges to add a cute little edge element. Inspired by all the "chalk art" that is currently popular, I cut a piece of the chalkboard paper to fit inside the frame opening and wrote on it with a chalk marker (not included in kit). The ribbon is just glued in the corner to balance the flowers on the opposite corner.
The flowers were all created from the fabrics. For the yellow polkadot flower I cut a long strip, folded it over lining up the cut edges, and hand-stitched along the cut edges. This was then pulled tight to ruffle until it formed a rosette.
The black and white polkadot fabric was also cut into a strip and tied in a knot at one end. This knot was glued to a scrap paper and then coiled and glued together in places to form the round coiled flower. The leaves are squares of the green and cream chevron print fabric folded several times to form a leaf shape and hot glued in place.
I have a short tutorial for you on how to make the pink flower as seen above. It was made from the square of pink burlap that was included in the kit.
First cut a rectangle approximately 2" wide by 6" long. (The wider the piece, the deeper the flower; the longer the piece, the bigger around the flower will be.)
Fold the rectangle lengthwise and hot glue together along the cut edges. Trim glued edge smaller if necessary.
Remove all lengthwise woven threads of the burlap between the edge of the hot glue and the fold.
 |
| threads beginning to be pulled out |
 |
| all threads between glued edge and folded edge pulled out |
Begin to roll strip up tightly against itself, glueing as needed to keep together. Continue until strip is totally rolled up.
 |
| beginning to roll - glue at intervals along cut edge |
 |
| fully rolled up |
Glue bottom of rolled strip to a piece of scrap paper.
 |
| base glued to scrap paper |
Push down in the center of the roll into a circular flower shape. Arrange loops as needed. Embellish center with a jewel or button.
 |
| finished flower without embellishment |
This flower could also be made with any loosely-woven fabric. It's super easy but looks complicated!
I loved working with this kit. It was packed with fun embellishments and surprise products (like the authentic filmstrip and the gusseted file folders). The patterns and colors are bright and cheerful and very versatile (have you checked out the
gallery online to see all the unique projects created from this kit?)! If I had to pick a favorite part of the kit, I would have to say the fabrics - there are chevron pieces in red, green and gold; a gold and white polka-dot; and black and white polka-dot; and pink burlap. Fun, fun, fun!
Now you must go check out all the designers' blogs (on the right column of my blog) to see their tutorials and find out their favorites!
There are still a few remaining kits, so be sure to get yours before it's too late! You may order
online here, call
The Little Blue House at 817-431-7930, or stop by in person at The LBH at 118 West Olive St., Keller, Tx. And, if you're local, stop by the House anytime to see in person the fantastic projects created with this fabulous kit!


.JPG)


