"Art is my vehicle through life; may we share the ride together." Ron Wickersham
Showing posts with label FPK DT projects. Show all posts

Friday, March 9, 2012

LBH Spring Open House and "Nature's Charm" Cards

Come join us at The Little Blue House for our Spring Open House today and tomorrow from 10:00 AM - 4:00 PM and see all our new spring class projects.  We have a super cute free make-and-take for you and some yummy refreshments.  Hope to see you there!

Here are more fun projects I created from the Nature's Charm FPK (which is still available by ordering online or directly from the LBH).  One of the best parts of our kits is the inclusion of BluePrints which are complete instructions with full-color photos of SIX projects made with the kit.  Both of these cards are included in the BluePrints with this release.

This card was inspired by the current chevron trend.  We saw many renditions of the chevron pattern at CHA.  
Chevron Card

This card is a double-slider card. When you pull the top "tag" out the bottom one emerges at the same time. 

Friendship Double Slider Card

Closeup showing the extended card

Hope to see you this weekend!

Wednesday, March 7, 2012

More FPK Projects

I'm in LOVE with this Nature's Charm kit. The colors are springy and beautiful without being the expected pastel palette.  I made lots of projects for the online inspiration gallery on the NEW website


Here's a layout featuring a favorite photo of my four daughters, taken in East Texas at Thanksgiving this year. I used the looped wire piece as a mask for the background, misting with several colors of ink sprays.  A piece of the wire is also layered behind the pocket in the lower right corner. The dovetailed paper strips are all from the kit.


Here's a closeup of the background where you can see a hint of the mask.


Here's a closeup of the cute kraft pocket embossed and inked. I used one of the journaling cards inside the pocket instead of the library card that originally came in it.


 I also did a two-page spread in my art journal.  With all the many layers, it's hard to see the papers I started with, but they were from the kit as well. I used lots of inks, paints, charcoal pencil and India inks on these pages.


Can you see the smoke coming from the chimneys in these photos?  They are pieces cut from that same bright green looped wire piece, but painted white.


This Front Porch Kit is still available for purchase either at the LBH or online. Get yours now!

Sunday, September 4, 2011

Last but not Least

I'm finally getting around to posting my last projects from the "Time To..." Front Porch Kit. 

For this mini cupcake stand, I used one of Wendy Vecchi's Art Parts which is a thick, durable paperboard surface for altering. It's much sturdier than chipboard and can be painted, decoupaged, inked, misted and stamped.  I first painted it with white paint and then decoupaged the gorgeous floral paper from the kit on the top and base.  The scalloped edges were covered with tiny circles punched from the book pages in the kit.  They were already this marvelous antique shade. I glued buttons to the four corners.


The "stem" was painted a bright yellow-green and then I wrapped the sheer ribbon around and tied a bow.


I also created a tiny cupcake for display.  The cupcake paper liner is a large circle cut from aqua paper and then folded multiple times.  I formed a "cake" from a strip of chipboard stapled into a circle and then glued on one half of a small plastic Easter egg for the cupcake top.  

The first layer of frosting is a strip of white rick rack glued to the top of the paper liner.  Then I spritzed cheesecloth (also in the kit) with a pink glimmer mist and, when dry, glued it randomly to the plastic egg, covering completely and retaining the folds.  The whipped cream/frosting topping is a strip of white cardstock misted lightly with water and then scrunched and pleated.  This was all topped off with a tiny candle I had in my stash and a generous touch of Stickles.


Here are the two displayed together.


If you haven't ordered your Front Porch Kit yet, we still have a few available.  Check out the website or order directly from The Little Blue House.  And be sure to visit the gallery to see all the fantastic projects made by the Design Team!

Sunday, August 28, 2011

Two Cards from the Front Porch Kit

Two more of my projects created from the "Time to..." Front Porch Kit. 

The first card is a horizontal bi-fold card using several of the patterned papers, ribbon and embroidery floss.  The yellow flower is a handmade crocheted piece included in the kit. I topped it with a mini accordion rosette made from book pages in the kit.  I also did some machine stitching on this card. 


The second card is more masculine.  For the background I inked a Tim Holtz grungy embossing folder before placing the white cardstock inside and embossing.  This transfers the ink to the design and embosses all in one step!  The J is from the mistable chipboard alpha sticker set misted with glimmer mist.  The corner flourish and cogs are cardstock diecuts from the kit.  I used Glossy Accents on the flourish to make it look like a wrought iron sign post and the cog wheels were painted, inked and heat-embossed with various embossing powders to look like rusty metal and grungy steel.


It's "time to" order your kit - you can do so on the website here or call The Little Blue House while there are still available.  There's a limited supply, so when they are gone, they are gone!  

We are expecting the online gallery of all the fabulous Design Team projects to be up and running tomorrow (Monday, Aug. 29), so be sure to visit the site to view all the awesome and inspiring creations.

Thursday, August 25, 2011

Another Front Porch Kit Project

Remember this sneak from last week?  Did anyone guess what it might be?


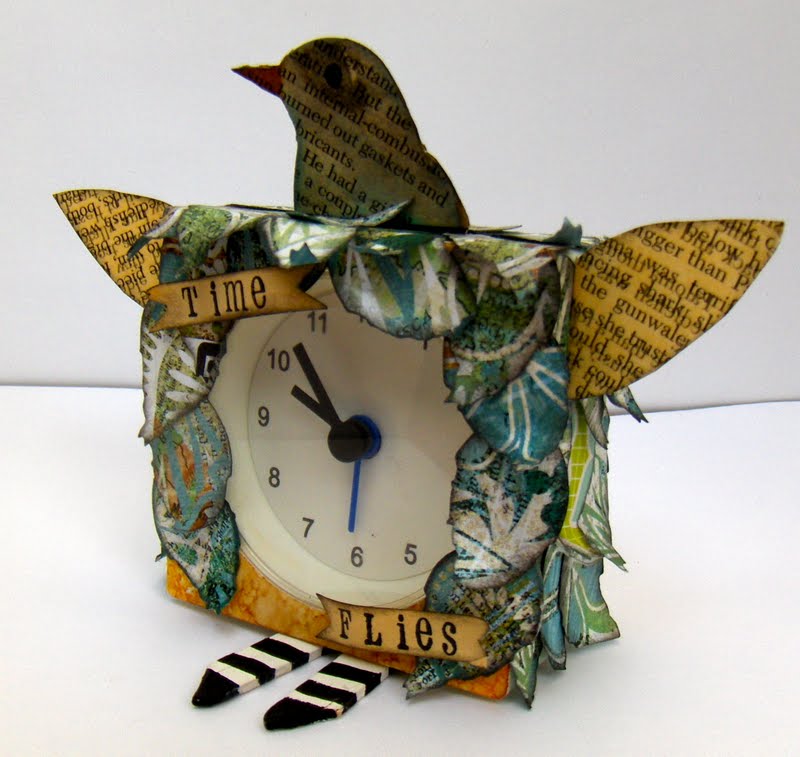
This "Time to..." kit comes with a little white clock.  The Design Team was challenged to alter or decorate it in some way.  This is what I created - a little birdie for "Time Flies"!


I alcohol-inked the front of the clock and then used the new small leaf "movers and shapers" die to cut a bunch of "feathers" for the bird's body.  I overlapped and glued them to the sides and around the front of the clock.  

The wings are book pages handcut into wing shapes and covered with beeswax, then glued to the sides.  The head was also cut from the book text and inked.  The eye is hard to see but is a drop of black Enamel Accents from Ranger.  "Time Flies" was stamped on a strip from the border of the same page.  

And the little feet? Craft sticks are included in the kit so I cut one in half, shaped the ends and painted them with black and white stripes.  All supplies are from the kit, with the exception of the alpha stamps, inks and paints.

Monday, August 22, 2011

Today's the Day!

Ta da - today is the full reveal of the newest Front Porch Kit - "Time to..."  Just look at this beautiful kit! It includes 10 printed papers; 6 coordinating pieces of Bazzill cardstock; a full package of Pink Paislee Mistables Alphas; Maya Road chipboard number set; cardstock clock hands; journal, frame and word diecuts; Basic Grey stitched brads; embroidery floss and thread cards; crocheted embellishment; paper roses and leaves; felt flowers; lunch sack; flourishes; assorted ribbons, ric rac and buttons;  yes, a mini clock...and more!  There is also a CD included with 5 projects and full tutorials complete with photos!


There's more information and photos on the website: www.frontporchkits.com  where you can order this beautiful kit. (You may also call the LBH directly at 817-431-7930 to order.)   They will be available for pickup or shipping on August 26.  Don't wait to get yours, as the supply is limited and when they are gone, they are gone!

Here is the project I created for the instructional CD.  It's a small folded notebook that is handy for your purse and once the pages are filled, you can refill with more!  I am in love with this paper and the crepe ribbon.


I can't wait to show you what the Design Team did with the clocks - each is truly unique and so creative!

Sunday, June 12, 2011

"Happy Family" Star Book

I wanted to share yet another project I made with the recent Front Porch Kit.   Because my children are all grown and none live locally, I don't have many family photos except from Christmas and weddings and I wasn't sure if they would coordinate with the bright colors and patterns in this kit. But I think it worked out well.

I created this star book which (closed) measures 4" tall and 6" wide.  This photo shows the book closed.


This is a closeup of the flowers.  The yellow polka dot flower was made with the "Build-a-Flower" template that is included on the CD in the kit.  Three paper flowers of different sizes are stacked together,   molded with a "rock and roll" technique and finished with a button in the center.  The dark blue coiled flower is made with a strip of denim fabric.


This is a view from the top showing the seven different "signatures" that make up the book.  You can see the star shape, hence the name of this kind of book!


On the pop-out headers at the top of each page, I alternated embellishing them with the orange rick rack and the yellow ball fringe.


On the right page below you can see the torn sandpaper strip (yes, that was in the kit!) that I added to some beach photos along with a few tiny shells.


 I color-misted all the mini scalloped chipboard pieces and used them for journaling.  A torn strip of denim was used for the closure ties.  Everything used in the book (except the shells) was in the kit and I still have lots of products left over!

Saturday, June 11, 2011

Floral Canvas Pocket Tutorial


I made this canvas pocket using two of the canvas pennants from the Front Porch Kit.  Here is the tutorial to make your own.
Floral Canvas Pocket

Supplies from the kit:
2 Maya Road canvas banners
Stella Rose “Happy  Bouquet” paper - strip approx. 1 1/2” x 5”
denim fabric - 1/2” x 10”
turquoise print fabric - 1” x 8”; 1/4” x 6”
yellow and orange print fabrics - 1/4” x 6” each
rust rick rack - 14”
teal sheer ribbon (full piece) 
1 daisy cut from daisy trim
2 large dark blue buttons
1 small yellow button
yellow balls - 4 large; 1 small
small yellow flower
glassine bag
Additional supplies used:
Liquid glue (Helmar 450 Quick Dry)
Glimmer Mist - Gold (Tattered Angels)
Tattered Florals die (Sizzix) or flower die or punch of choice
large hole scallop border punch (EK Success)
paper piercer
large-eye tapestry needle
sewing needle and thread
pinking scissors
1” circle scrap cardstock any color
Directions:

1.  Protect your work surface and spray two canvas banners with a generous layer of gold glimmer mist.  Let dry.

Tip:  Using a brayer over the surface while still wet will result in more even coverage.  Be sure to clean brayer well.
2. Turn over one canvas piece to work on the back.  Place the middle point of the length of rick rack on the center bottom point of the canvas piece and start glueing the trim along the edge. Position it so about half the width will show from the front.  


Continue glueing along one side.  Turn over to check that rick rack is peeking out from the edge.


3.  With plain canvas sides facing each other (colored sides facing out), line up both pieces (rick rack will be sandwiched between) and glue together along outer edges.  Do not glue the top edge together as this is a pocket!


4.  Border punch the strip of paper and glue along top edge of front banner piece.
Tip:  I punched twice to get scallops along both edges.  First punch the strip normally.  


Then turn the punch upside down so you can see the cutting edges.  Turn the strip around so the first punched edge is facing away from the scalloped cutting edge and align the design with the already-punched section.  The unpunched edge should be facing the back of the punch and the scallop cutting edge. 


Punch and you will have a double-edge scalloped strip.


5.   Glue four large yellow balls in 4 center holes of the paper border.


6.   Thread each end of the turquoise ribbon through the holes of the two dark blue buttons. Glue one button to each end of the paper strip.
Tip:  Cut ribbon end on a sharp angle and use a large-eye needle or tweezers to pull/poke ribbon through.
7.   Glassine Flower: Cut six pieces of glassine bag approximately 3" square (or larger than your specific flower die or punch) and die cut 6 flower shapes. Stack all six together and pierce through the center (protect your work surface with a foam piece or old mouse pad). Insert the wired yellow flower and bend the wire to hold all together. Cut off the excess wire and add glue if necessary to hold. Scrunch the flower to add dimension.


8.  Denim Flower: Add a drop of glue to the center of a scrap piece of cardstock (1" circle or  square - color doesn't matter as it won't show). Pinch one end of the denim strip and place in glue.

Hold the scrap piece in one hand and, using your dominant hand, start twisting the fabric strip. As you twist, coil around the center.

At about every quarter turn, add a drop of glue on the cardstock close to the fabric coils.


Continue until the strip is completed or you have reached the size desired.  To finish, glue the end of the strip under the cardstock scrap.  

Cut off any excess paper that shows.  Glue a small yellow ball to the center of the flower.
9.  Gathered Flower:  Use pinking scissors to pink the long edge of the larger turquoise fabric strip.  Thread a needle with sewing thread and knot the end.  Sew a small running stitch along the straight edge the entire length.  When completed, gently pull the thread to gather the strip into a tight circle.  Take a few final stitches to secure the circle and tie off with a knot.  Cut one daisy from the daisy trim and glue to the center of the flower.

10.  Glue all three flowers on canvas banner as shown.


11.  Thread one narrow strip of fabric through a small yellow button. Glue the remaining two strips to center bottom point of the pocket. (The button holes are too small to get all strips through.) Glue the threaded button over the other strips.

ENJOY!

Friday, June 10, 2011

More cards using the FPK

I created two additional cards with the kit supplies - these were for the Inspiration Gallery online and the instructions were not included on the CD in the kit.

I used several of the coordinating patterned papers from the kit for this card, stamping one of my favorite friendship sentiments on the yellow paper.  I used the wired, navy blue burlapy (is that a word?) trim across the middle.  I attached it with a strong double-sided narrow tape and then sprinkled super fine iridescent glitter in the holes.  It adds alot of sparkle!  The flower was made with one of the white glassine bags in the kit. I die-cut several layers using the Tim Holtz Tattered Florals die (the daisy-type flower), stacked and glued them together in the center and then added one of the wooden buttons with some of the yellow "stamens" around it.  I also lightly inked the petals - I was surprised that the glassine didn't resist the ink!  The bottom edge is scalloped with decorative scissors and inked with navy ink.


The card below also uses the glassine bag - this time it was embossed and die cut with a butterfly die.  I also die cut the same shape out of the orange patterned paper.  The edges of all the layers of papers are distressed and I machine stitched around the base layer to add some definition.  The white shape and coordinating stamps are from Papertrey Ink.

Thursday, June 9, 2011

Front Porch Kit Projects

I created these two cards as feature samples for this month's "One Sunny Day" kit.  The step-by-step tutorial for each of these is included on the CD enclosed with each kit.  (If you haven't ordered yours yet, go to www.frontporchkits.com to see the kit contents and the fabulous gallery of projects and order before they are gone!)  Both projects were created solely with items in the kit.

The first card is a birthday card using one of the canvas banner pennants included in the kit.  This is a Maya Road banner/album but you should see all the creative ways the design team used it - not one banner or album in all the projects!  

I cut off the top of the banner piece with the grommets (and used a strip of the canvas for tying on the little tag) and turned the pennant over to use as a party hat.  The plaid pattern was "stamped"  with a piece of the corrugated cardboard cut from the kit box.  I used orange paint in one direction, let it dry and then restamped with teal paint in the opposite direction to form the plaid.  The "pouf" on top of the hat is flower stamens included in the kit.


The second card is a pool party invitation.  A package of Thickers alpha stickers was in the kit.  I misted "pool" with Maya Road mist and added Glossy Accents when dry.  I left the remaining letters white but inked the edges lightly.  The water is two layers of the wide, lacy trim that's in the kit. The top layer is left loose and ruffly.  I created the wavy background on the white card base by glueing yarn from the kit to a strip of cardstock and then inking it and stamping on the background.  The flip-flops were hand-drawn and cut from one of the patterned papers.