"Art is my vehicle through life; may we share the ride together." Ron Wickersham

Sunday, December 24, 2017

"12 Days of Christmas" Swap

I always participate in my online group's annual "12 Days of Christmas" swap. We are split into groups of 12 and we each make eleven handmade gifts, one for each member in the group. We each are assigned a number and that is the day that our gift is opened.

The gifts are always as unique and special as each member and this year was no exception.  Here's this year's booty.

Day 1 - lavender oil (for de-stressing during the holidays)


Day 2 - wooden glue holder


Day 3 - card holder (made from mousetrap)


Day 4 - Christmas "bag" recipe book


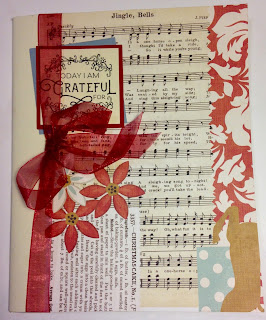
Day 5 - gratitude notebook


Day 6 - felt ornament in shape of Iowa


Day 7 - beaded angel ornament


Day 8 - star ornament


Day 9 - butterfly pendant


Day 10 - monogramed key necklace


Day 11 - mine (see below)


Day 12 - hot cocoa, candy cane and fuzzy socks


For Day 11, I made shabby chic mini composition books. I covered them with old upholstery fabric remnants and lace. I wrapped more fabric around a vintage Santa image (one of my favorites) and added a bell and charm to a tiny knotted strip of fabric.

They looked so cool all laid out together. 


Here are a few close up -  they were all slightly different due to the charms and vintage laces.


With that, I wish you a very happy Christmas Eve and Merry Christmas tomorrow. We are on our way to San Diego to celebrate with the entire family. We will probably fly on Christmas Day since the flights are less full then.  I'll catch up when I get back!


Saturday, December 23, 2017

Shrink Plastic Ornament

My five-year old grandson, Carl, loves to draw. He has a little tablet he carries everywhere. When they were here last weekend, he drew several snowmen for me. As I was adding it to the gallery on our fridge, I had a wonderful idea. I would make it into a keepsake ornament so he could remember his early drawings.

I took some shrink plastic (remember that?) and traced his drawing with a few Sharpie permanent pens. I even traced his "signature" and added the year. I die cut it into a large scalloped oval and punched a hole at the top. I used my heat gun to shrink it and added a piece of baker's twine for hanging.

I think it came out darling and I sent it to him to put it on his tree. Can't wait to find out his reaction!


I need to do this for all the boys and every year!

Friday, December 22, 2017

December Daily - Days 19 - 22

Days 19-20


For the 19th I made a pocket and added a digital image (the pickup with tree) from The Planner Society at the top. Inside I placed a tag made with coordinating patterned paper on which I wrote a story of our family's last real tree (1988). I also added a photo of said tree on the back of a journaling card.

Here's a close-up of the tags out of the pocket.


On the 20th I added a plaid paper for the background and a digital journal card from Heidi Swapp. The Merry is an old Maya Road chipboard I painted and Stickled red. The ribbon at the top is from a recent "12 Days of Christmas" gift swap. I love the chalkboard feel. I fastened it at the left side with two brads and when it lifts up I journaled about how this December Daily was falling apart and how I took it apart and added a new spine to hold all the lovely chunkiness! Next year I will have to plan better for the expansion!  I made a shaker pocket with Christmas sequins that lays over the journaling card at the bottom.


Shaker pocket tip-in


 Days 21-22


There wasn't anything memorable going on these days so for the 21st I used tissue paper for the background with two photos of a Christmas project I finally finished up that day. I had bought it at the Great American Scrapbook Convention in June, promptly covered it in papers and then just let it sit forever without finishing! The Christmas bulbs at the top of the page is an image transfer from a magazine ad.

Today (the 22nd) I used a beautiful handmade Christmas card I received last year reminding me of the reason for the season!

Monday, December 18, 2017

December Daily - Days 13 - 18

Days 13 - 14


The backgrounds for these pages are patterned paper. On the left, I added a photo and journaled a bit about my online group's annual tradition of a "12 Days of Christmas" Swap. We are split into groups of twelve and each of us makes a small handmade gift for the eleven others. We are each assigned one of the days and on the 13th of December we start unwrapping one per day. This is so much fun and one of the highlights of my Christmas so I had to devote the 13th to it. The photo shows all the gifts before I started opening.

For the right page, I had this awesome tissue border of toy soldier nutcrackers in my stash so I used it and journaled about how every year when my girls were younger we would attend The Nutcracker Ballet. I miss that - next year I need to go again!


Days 15-16


There wasn't much happening on these days so I added a beautiful Christmas postcard on the left which I've saved for years. It feels good to have a home for it where I can enjoy it.

On the right page I made a tree out of fringed and stacked scrap strips of paper. I love how it turned out but it made the page very thick!


Days 17-18


Again, not much going on on the 17th so I used an old Jenni Bowlin Christmas bingo card, tiny scrabble tile alphas and a photo of my four oldest kids visiting Santa in 1982. I did a Christmas Past page in my Dec. Daily last year (using an old photo of my siblings and I) and really love adding it.

Today (the 18th) I have an old Christmas card as a tip-in, under which I journaled that my husband went in to the VA Hospital today for a three-day observation for new heart medication. Below you can see the tip-in opened. I cut the "making spirits bright" from a magazine ad. You can see that there's no limit to things you can find to add to the album!


Wednesday, December 13, 2017

December Daily - Days 1-12

I've been keeping up with my December Daily but had to wait for a few photos for one of the pages before I could post. I just love working in this traveler's notebook size and will enjoy looking back on this for years to come. You can see my cover in this post.

Days 1 and 2


Tissue paper background on left and patterned papers on right. Gingerbread house cut on Silhouette. Photos printed on my Polaroid Zip Instant Printer. Numbers for days are from a pack from Fun Stampers Journey (a new stamp company much like Stamping Up). Washi tape and old stickers!


Days 3 and 4


Left page has painted background and a flip page with more photos on back. Right page journal card is a pocket with a tag with four tiny photos (not shown).


Flip card open revealing photos with Santa.


Days 5 and 6


Not much going on these days, so I printed the story of the candy cane for the left page. The right page is dedicated to shopping for little gifts for the boys' stockings and ordering their regular gifts online. Washi tape and, again, some old stickers! The owl clothespins were bought last year at the Target $1 Spot.


Days 7 and 8


Day 7 was spent doing lots of errands. I also had to make a return at Michael's and purchased myself a little gift of Jane Davenport Aquapastels. I added swatches inside the glassine envelope/pocket.

Day 8 I baked cookies for the boys who arrived that night. They were an epic fail! The banner is from an old sticker set from Jennie Bowman, the images and phrases from a Crafty Secrets collage sheet and the little spatula from my stash from who-knows-where.


Days 9 and 10


Kelly, Josh and the boys came this weekend and on Saturday, I took Carl to Michael's for their free Kid's Club craft session. He made a darling elf t-shirt with felt and pompoms and had a blast! I couldn't resist adding that stamped elf banner.

On Sunday we all went to the Gaylord Texan ICE event and met Josh's sister and niece there. The photos from in the venue are all very blue. My phone even froze up after a few minutes because it was so cold (9 degrees)! I watercolored a journal card from Adorn It for the flip in order to add another photo and more journaling. I had to stack the photos in a waterfall in order to get more on the page. Below shows the opened flip section.


Days 11 and 12


There wasn't much going on these days - I was recuperating from the weekend! On the 11th I received a text message and photo of Drew's (5-yr-old in Albuquerque) letter to Santa. It was so hilarious that he wrote such a brief, to-the-point wish list that I had to add it to my page.

The right page has a copy of our 2017 Christmas card that I had just picked up that day. I attached it with washi tape at the top so it flips up for journaling.  The background of this page is foiled tissue paper.


I hope you enjoy peeking into my December Daily. It's such a fun thing to do every year.

Monday, December 4, 2017

Life Documented 2017 - last week of November

We returned from Austin last night from a fun weekend. On Saturday I helped the boys make gingerbread houses (I had forgotten how frustrating those can be!) and then yesterday we rode the North Pole Flyer from Cedar Park to Bertram and back to Cedar Park. This is a 2-hr. steam engine special event excursion similar to the Polar Express and features a visit with Santa, hot cocoa, cookies with Mrs. Claus, a coloring page activity, elves reading the exclusive North Pole Flyer book, a Christmas carol sing-along and an elf making custom balloon creations. The kids had a blast!

Today I finished the last week of November in my Life Documented 2017 planner.
This will be my last entry as I will move into my December Daily for the month of December. 


The background was done with a watercolor "smooshing" technique where you add any water-soluble medium on a piece of acetate, spritz with water and smoosh onto your substrate. It's an easy way to get a unique background. 

The right page is another quirky collage using some digital collage sheets I mentioned in previous posts. I am having lots of fun with these!

Friday, December 1, 2017

More Collage

At the moment I'm enjoying making quirky collages (ala "craftyhodges" on You Tube).  I took her recent free mini-online class and am hooked!  I've been cutting tons of stuff out of magazines and have purchased a few of the digital collage sheets from Mischief Circus online which she recommends.

This is a recent collage I made to add to my collage journal made from an old magazine. It's a traveler's notebook size - about 8.5" x 4.25." The face and eyes are from two different magazine images, the hair is part of a plant and the remaining pieces and background are from the collage sheets.


Joanne (crafty hodges) recently posted a video with instructions for this adorable banner (here's the link - the banner starts about halfway through) . When I saw it, I just had to recreate it! It's pretty much the same as hers and was so much fun to make. This will hang somewhere in my art room.


Entire banner - quite long - spans width of two closet doors


Here's a closeup of the left portion.


And a closeup of the right portion.


When you read this, we will be on our way to Austin to celebrate our son-in-law's birthday, to babysit while they go out on a date night and then on Sunday we will be going on the Polar Express with the grand boys! Looking forward to this fun experience. I'm sure it will be very scrap-worthy!

Wednesday, November 29, 2017

Scrapbooking

Scrapping is what I've been up to this week. Trying to keep up with four albums for the grand boys!

Here are a few layouts I've done. I'm also trying to use up stash and not buy more paper!


Two similar camping layouts for Drew and Grant
Two first day of kindergarten layouts for Carl and Drew


Two layouts of the Albuquerque Balloon Fiesta for Drew and Grant


Single page layout for Halloween costumes and trick-or-treating (also did three others for the other boys)


Single page layout for Carl loosing his first tooth Thanksgiving week

This brings me pretty much up-to-date but there will be many holiday layouts soon to come! For someone who never scrapped for my own children, I'm making up for it now!


Saturday, November 25, 2017

Happy Thanksgiving - and I'm back!

We're back from our Mexico Thanksgiving trip for dental work and I hope everyone has had a wonderful Thanksgiving weekend with loved ones.  We spent Thanksgiving Day finishing up at the dentist and had tacos for dinner! Actually it was quite relaxing and a nice change from the usual hectic turkey meal!

I'm caught up on the past two weeks of my planner.

November Week 3


I used acrylic paint for the background both pages, numbers and days of the week cut from a calendar, washi tape for dividers and some very old flourish and word stickers.  On Wednesday my two besties and I had our annual baking day for Thanksgiving and Christmas cookies. I used a little image from Crafty Secrets as a flip with a photo of some of our cookies on the back (see below).

The collage on the right page is from an old magazine and I added some legs from a clothing catalog. The hat is actually an upside-down martini glass from an ad!


November Week 4


For this week's background on the left page I used Distress Ink and more very old stickers. The right page is decoupaged with a napkin - isn't it a pretty one? I added some glitter tape at the top and bottom and a few word stickers.

The "flips" are portions of my boarding passes. The photo on the right is of my husband and I eating a very untraditional Thanksgiving Day dinner in a little local open-air taco shop in Mexico.

Only five more days of November and one spread until I move into my December Daily for the month of December. How is it possible that this year is almost over???

Saturday, November 18, 2017

Life Documented 2017 - November Week 2


One more week in my planner. It was a fairly uneventful week for a change! The background of both pages is watercolor. On the right page I smooshed a few more colors with the yellow, added a doodled border and a tag that I received in a swap years ago! The quote is a stamp.

We are getting ready to leave for Mexico today. We were supposed to go tomorrow, but the flights are all filling so we are going to go to Albuquerque tonight through Houston, and then on to Phoenix, Yuma and Mexico tomorrow. And, no, I won't be lounging on a beautiful beach for Thanksgiving - I will be completing my dental implants! Hopefully this will be the last dental work for awhile.

Happy Thanksgiving!

Tuesday, November 14, 2017

It's Beginning to Look A Lot Like Christmas!

Can you believe that all the stores are already in full-Christmas mode? In fact, there were sales of Christmas trees the week of Halloween! Whatever happened to waiting until after Thanksgiving?

Well, I'm caught up in the fever too. Since we will be gone for the week of Thanksgiving, I decided to start preparing my December Daily book so it will be ready for Dec. 1. Last year was the first year I've done this and I have really enjoyed looking back on that traveler's notebook. At the time, you don't think you are doing much, but in retrospect there were lots of events and special moments. (It doesn't hurt that I have four little grand boys to document as well!)

This year I am going to continue in the traveler's notebook standard size ( 8.25" h x 4.25" w).  I will do one day per page.  This size is perfect for me - not too big to intimidate or be able to complete, but  big enough to document and decorate. And, if not, I can always add a tip-in.

Here is my cover:


Everything I used on the cover was from my stash except the acrylic title which I just bought at Tuesday Morning. When I saw it, I thought it would be perfect for this.  The charm dangle was given to me in a Christmas swap a few years ago and I was waiting for the perfect place to use it.


And inside front cover:


I added a pocket on the left for bits and pieces I find to add to the book. The right page is entirely made from a Michael's ad, even the borders!


December Monthly Calendar:


This calendar has mainly washi tapes and a stamped label for Christmas Day.


Back inside cover:


The main image again is cut from the Michael's ad and layered with printed paper and card stock.


My December Daily is now ready for December 1. I can't wait to start filling it with December memories!